
Welcome to the eleventh post in my series focused on providing a set of revision notes for the PL-400: Microsoft Power Platform Developer exam. Last week, we took a look at the capabilities on offer as part of Power Automate flows. We now look to finish up our discussion of the exam area Configure business process automation by evaluating the following topics:
Implement processes
- create and configure business process flows
- create and configure business rules
- create, manage, and interact with business process flows by using server-side and client-side code
- troubleshoot processes
The tools referenced above - Business Process Flows and Business Rules - are perhaps most advantageous from a client-side perspective. They also have powerful features that can address common automation scenarios for actions performed at the server level. Let’s dive in and see what they are all about!
As with all posts in this series, the aim is to provide a broad outline of the core areas to keep in mind when tackling the exam, linked to appropriate resources for more focused study. Ideally, your revision should involve a high degree of hands-on testing and familiarity working with the platform if you want to do well in this exam.
Business Process Flows
Overview
In our discussion around model-driven Power Apps, we highlighted that these are, in effect, data-driven applications. As such, following an approved business process within them becomes necessary. Achieving this objective ensures you can guide end-users towards the correct outcome for, let’s say, a sales process and guarantee the population of accurate data to progress to the next stage. Consider another scenario involving a case management process; a service desk manager needs to ensure that a case proceeds according to any agreed SLA’s with an end customer and, where appropriate, they must monitor how long a Case has resided within a specific stage. Without the ability to comfortably accommodate these scenarios, it becomes incredibly challenging to meet the business and end customers’ expectations.
Business Process Flow’s (or BPF’s) aim to address these concerns by allowing developers to model out and enforce a business process effectively. You can then apply this at the table level within a model-driven Power App. As part of this, we can tailor many aspects of either an existing or new BPF and integrate the tool alongside other features within the Power Platform. The screenshot below illustrates a BPF called the Lead to Opportunity Sales Process, which is associated with the Lead table:
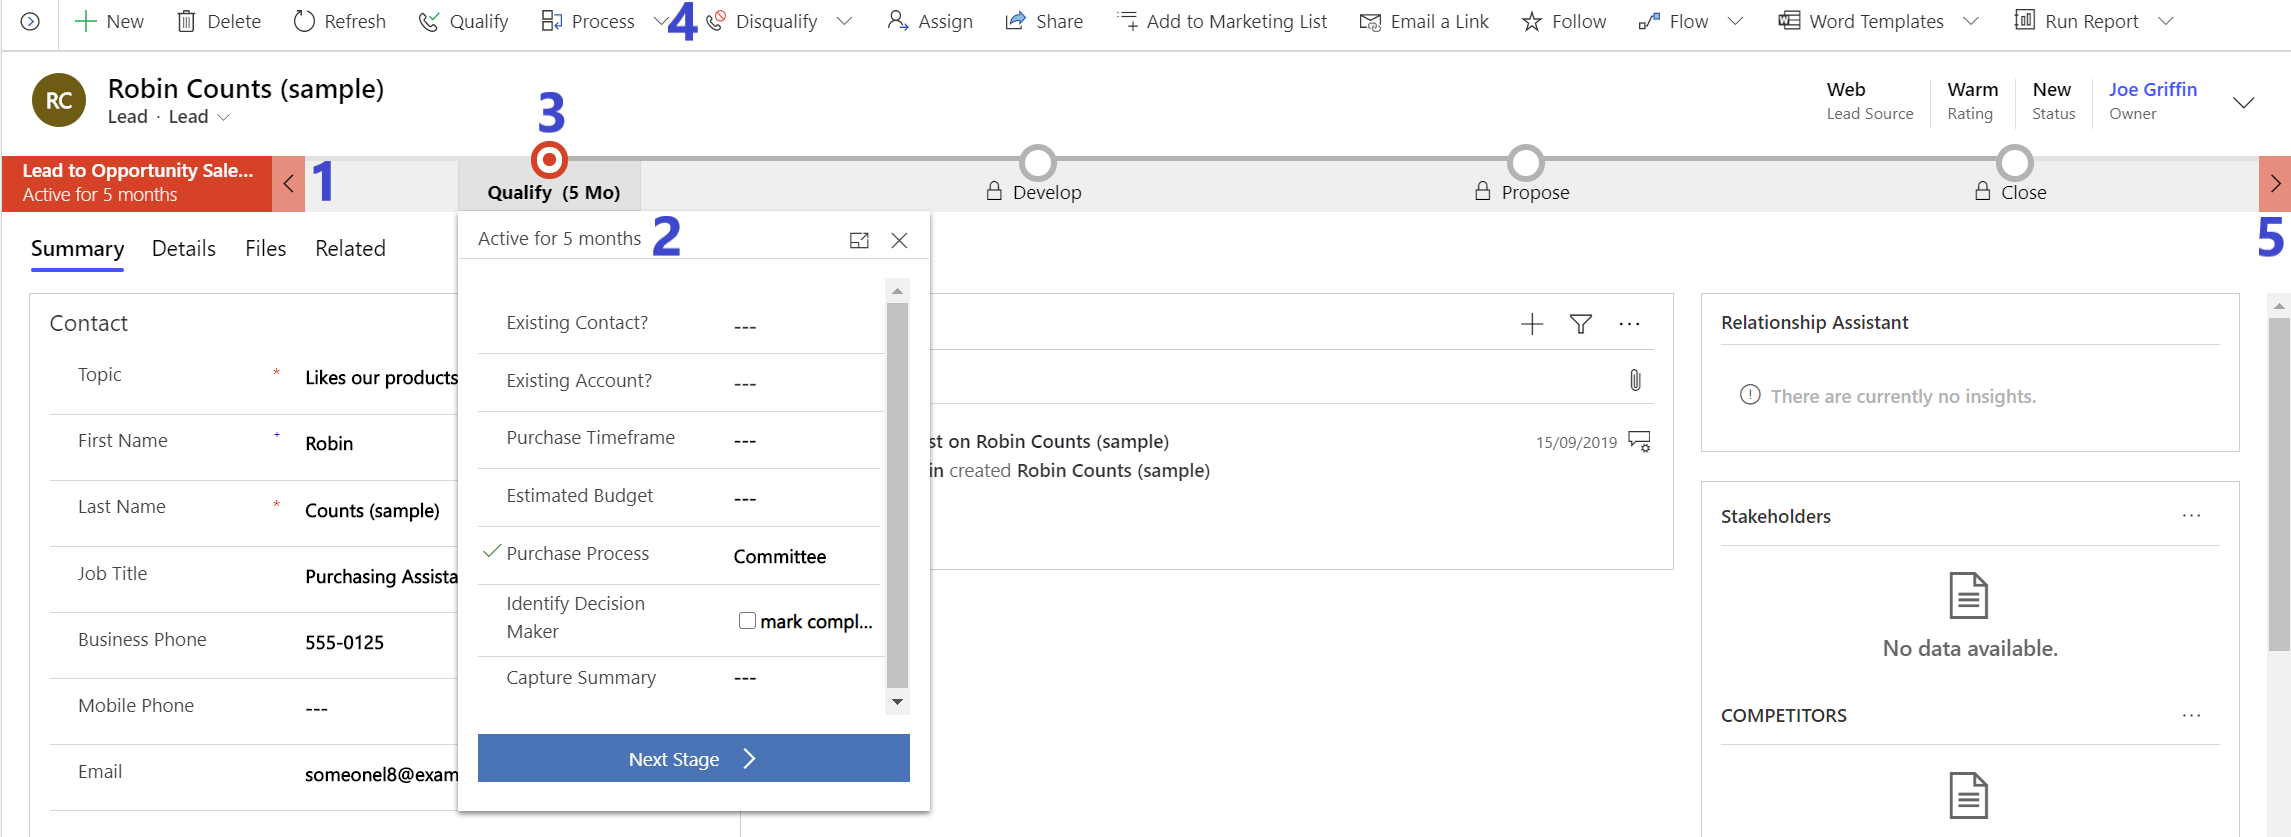
Users have access to the following features when using a BPF, indicated by the numbers above:
- Here, the user can view details about the name of the BPF and also how long the current process has been active; in this case, for around five months.
- A BPF is structured by stages, which the user can click on to view the further details required to proceed to the next step. In this case, having expanded the Qualify stage, the user is prompted to provide additional information, such as Estimated Budget and details of any existing Contact or Account row. Users can expand any active/inactive stage to review the details required.
- The stage which is coloured is the current, active stage in the process, which, in this case, would be the Qualify stage. We can also see the amount of time the BPF has resided in this particular stage.
- Users have several options underneath the Process dropdown field on the ribbon. You can choose to switch to another available process or even abandon the current BPF entirely. Abandoned BPF’s will be marked clearly within the application, as indicated in the screenshot below:
- The arrows at either end of the BPF allow you to toggle the current, focused stage. Note that they do not move the process to the next step but will enable you to preview the details needed as part of the next/previous stage.

Some other valuable features regarding BPF’s are worth highlighting at this stage:
- BPF’s can span multiple tables if required. In the example shown earlier, the BPF is designed to “crossover” from the Lead to the Opportunity table as you progress through each stage.
- Because BPF’s integrate alongside security roles, it is possible to dictate which process applies for a subset of users within the application.
- Most system tables are enabled for use alongside BPF’s, with some exceptions. Consult the documentation for further details. There are no restrictions on their usage for custom tables.
- BPF’s have some specific limitations, namely:
- A table can only have ten active BPF’s at any one time. Consider deactivating any BPF’s that are no longer in use should you hit this limit.
- A BPF is limited to a maximum of 30 stages.
- Although BPF’s have full multi-table support, you are limited to using a maximum of 5.
All in all, BPF’s are incredibly easy to use and, as we will see next, we can also create them with startling ease.
Business Process Flow Designer
Similar to the model-driven app designer, we have an interactive editor available to create or modify a BPF, illustrated below:
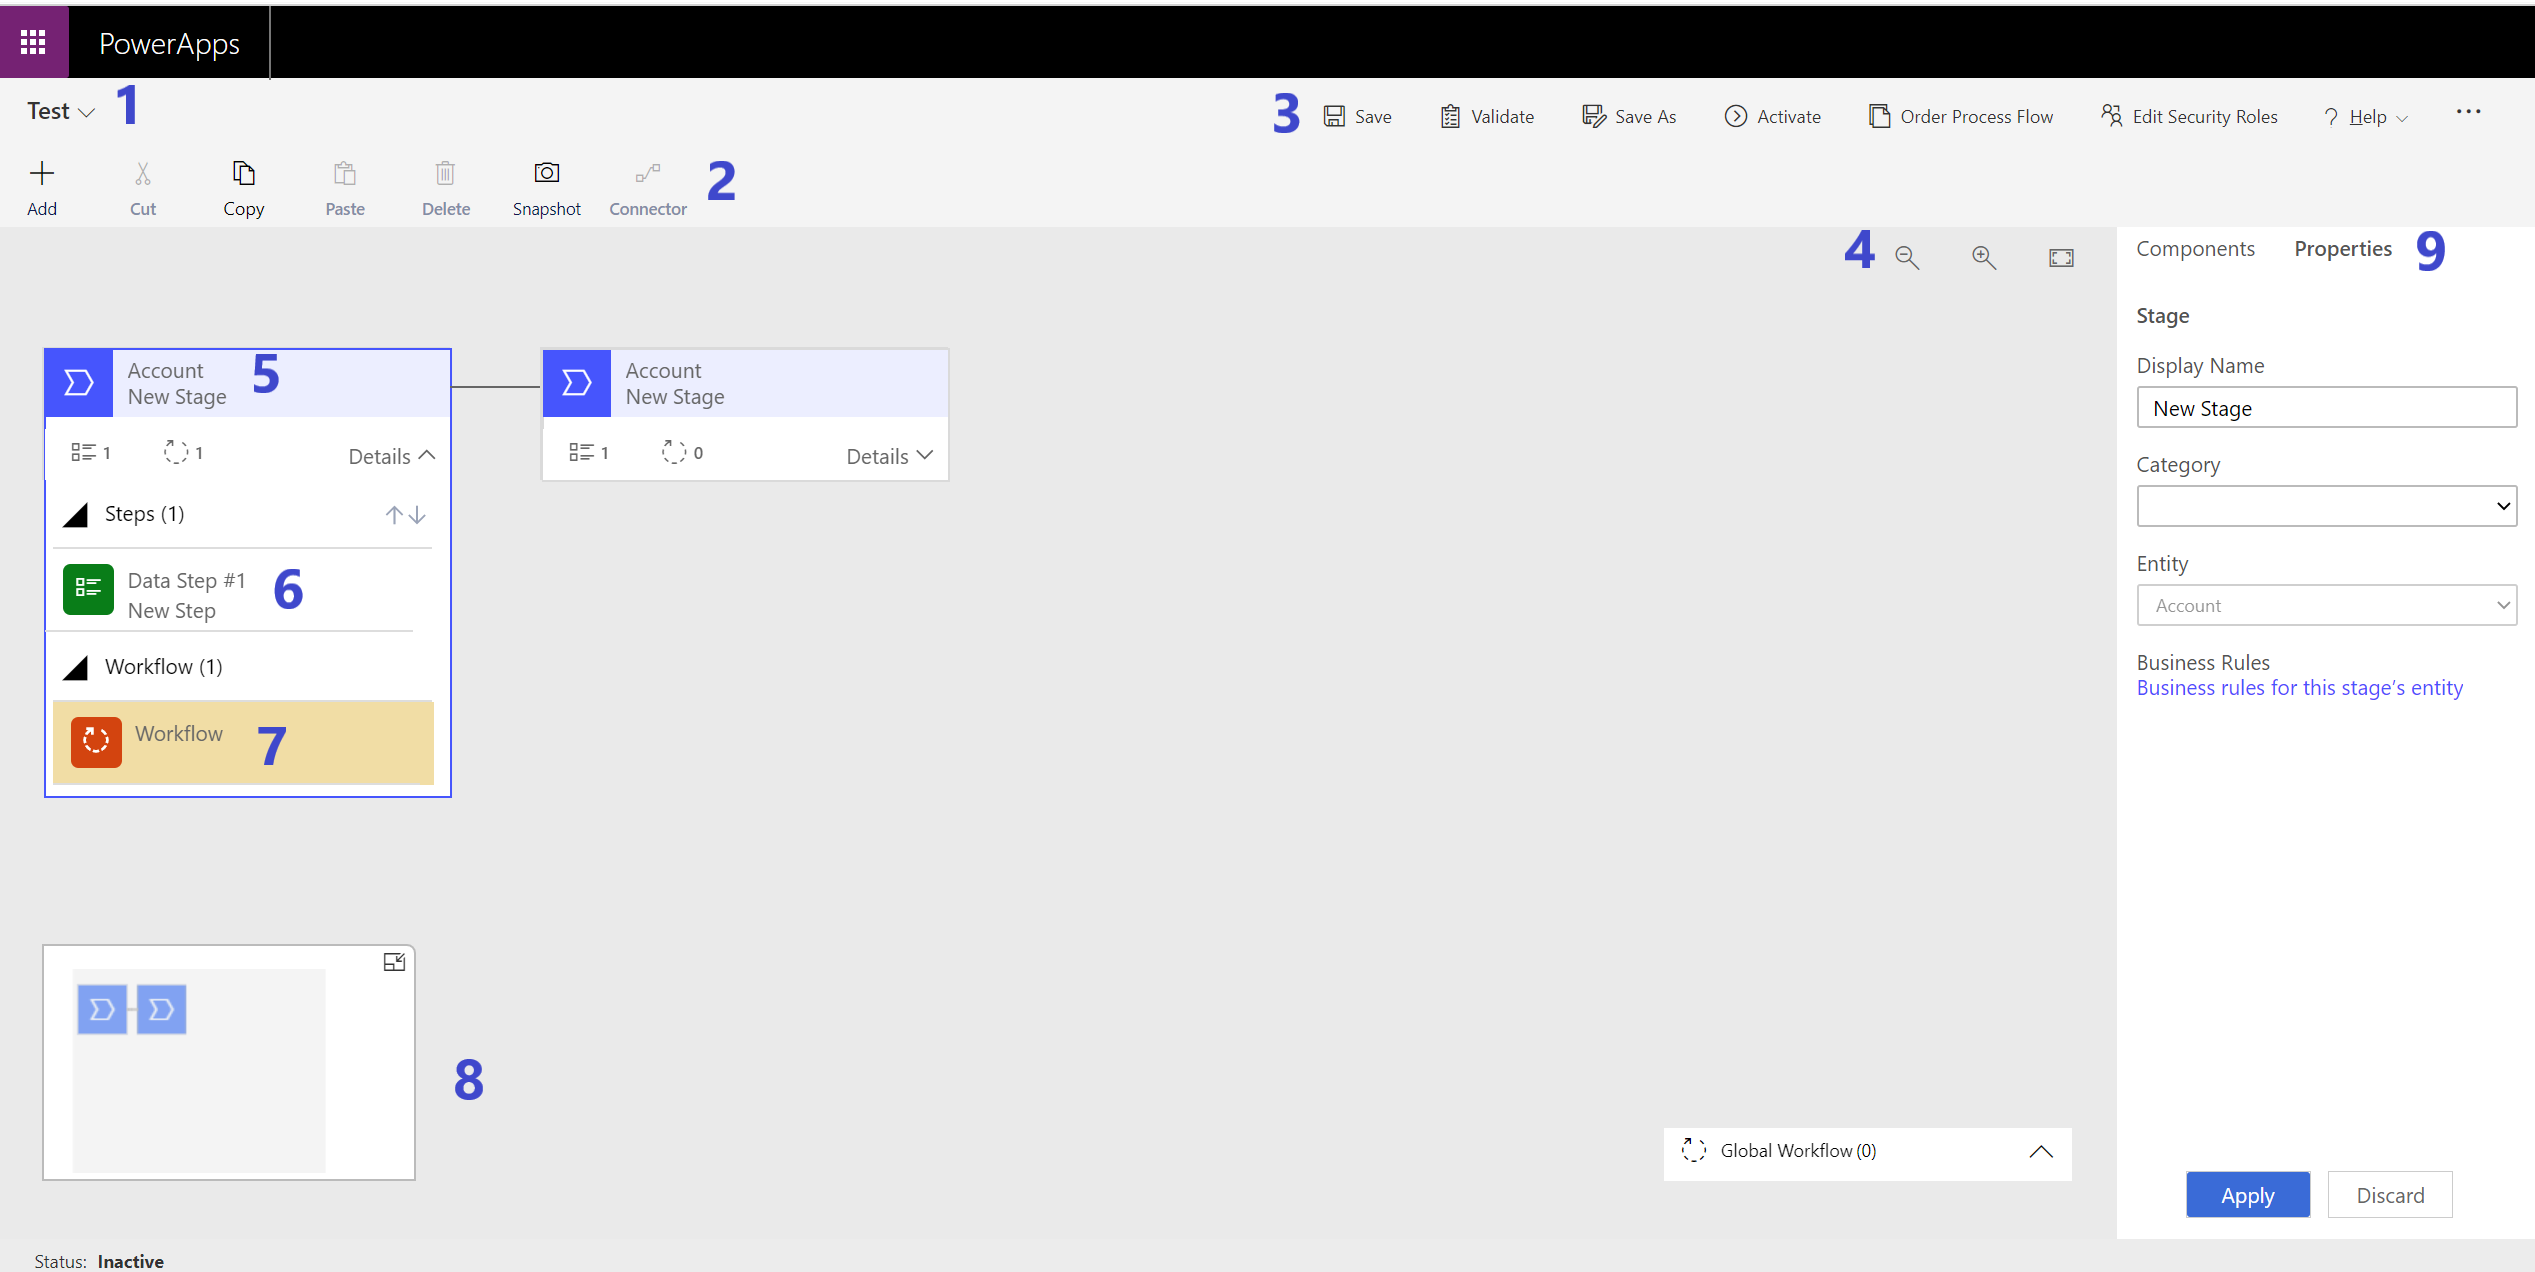
Again, I have numbered each relevant section and provided a description below regarding its purpose:
- Expanding the arrow here will allow you to modify the name and description of the BPF, alongside details regarding some of its fundamental properties (owner, Primary Entity etc.)
- The icons here let you quickly add components to your BPF or perform standard operations, such as cut, copy, paste and delete. On these, it is worth highlighting that the familiar keyboard shortcuts for each action will also let you perform it. Finally, you can use the Snapshot button to download a .png image file of the BPF, which you can then include as part of any documentation or training materials.
- From here (in order left to right), you can save your BPF, validate it, save a new copy, activate or modify its display order for users, grant/deny access to it or access some of the available help articles for the Power Platform. Expanding the ellipses will also allow you to share an email link for the BPF, show any associated dependencies or view specific properties relating to it.
- These options let you zoom in/out and adjust the view to fit the visual editor’s canvas.
- As discussed earlier, a BPF can contain several stages, represented like this on the canvas view. By default, a new BPF will always include a single stage. Clicking on it will allow you to modify its name, category and, for the second stage onwards, its associated table. A stage can contain two subcategories of additional components, the first of which is…
- …the data steps or fields to be populated. You can add multiple of these to each stage, and you can define their order. The columns available for selection must exist on the table associated with the current stage (i.e. it is impossible to reference related table columns). Finally, you can also define a name for the step, which can differ from the field’s display name. The next type of component that you can add to a stage is…
- …a workflow step. We’ll discuss this component type in further detail shortly.
- Here, you can see a visual representation of your current BPF. You can hide this window by using the button on the top right.
- Finally, the right-hand pane allows you to access the Components toolbox or the currently selected component’s Properties. In this example, because we have the 1st stage selected, the Properties pane for this surfaces.
Component Overview
We’ve alluded to this topic already, but it is worth discussing in detail the complete list of different component types that can be utilised within a BPF, as outlined below:

Clicking or dragging each component will add it into the appropriate area on the canvas designer. Let’s dive in and discuss each one:
- Flow:
- Stage: Requires no further explanation, I think. 🙂
- Condition: With this, you can specify branching rules that will modify how the Process proceeds for the user based on conditions that you specify. Evaluation of conditions is performed on a similar basis to Business Rules, in that you can select one or multiple fields on the current table to evaluate, as well as implementing some basic AND/OR evaluation logic. Once a condition is defined, you must then populate details for each subsequent stage, for when the condition evaluates to both true and false. Through the correct use of conditions, you can potentially consolidate several BPF’s into one and, ultimately, achieve the same outcome.
- Composition:
- Data Step: A concept mentioned earlier, data steps are the fields that the user must populate for a given stage.
- Workflow: Via this feature, it is possible to automatically trigger a workflow to execute, either when the stage commences or finishes. This feature could be helpful if, for example, you would like to send an email out to a sales manager after a user successfully qualifies a Lead. We can only use workflows with a BPF if activated and configured as on-demand for the same table that the current stage targets.
- Action Step: Operating on a similar basis to the Workflow component, this allows you to trigger an Action instead.
- Flow Step (Preview): Finally, similar to the previous two-component types, it’s also possible to trigger a Power Automate flow within a BPF stage. As a feature that is (at the time of writing) still in preview, it is generally not recommended for use within a production environment.
As such, BPF’s can be incredibly powerful when integrated alongside tools such as Power Automate flows, allowing you to automate substantial aspects of a business process as a user is working through each appropriate stage. From a developers standpoint, the emphasis is to utilise these tools wherever possible and only resort to custom code if you cannot achieve the business requirement natively within the platform.
The Hidden Table
The final thing to note with all BPF’s is that, upon creation, the system will automatically create a new table in your Dataverse environment. This table will have the same name as the BPF in question and, for each active process that users create in the system, the system will create a corresponding row within this table. The table has several custom columns that capture a range of valuable properties, several of which we can access easily within the application. For example:
- Active Stage (activestageid): The name/details of the current, active stage on the BPF instance.
- Active Stage Started On (activestagestartedon): The date on which a user selected the current, active stage for the BPF instance.
- Completed On (completedon): The date on which a user completed the BPF instance.
- Duration (duration): This field indicates the time between the start and completion date of the BPF instance.
Also, the system will create lookup fields for each appropriate table row associated with the BPF.
Developers can freely utilise this table as part of any bespoke solution they develop and also, if required, create additional columns, views etc., with no restrictions. I recommended that you always package up any BPF table with the same solution where your BPF exists so that you can ensure the successful deployment of all applicable customisations.
Extensibility Options
As developers, we have a few options for working with Business Process Flows within code - either from the client-side perspective (i.e. a model-driven app form) or from the server-side (i.e. via a plug-in or the Web API). We will be diving into these specific topics in later posts, but it’s worth briefly touching upon how we can work with Business Process Flows in this context:
- Via the various formContext.ui.process methods exposed to us, we can modify multiple details relating to the currently assigned process to change its display state on the form or hide it completely.
- As mentioned already, the hidden table stores details about each instance of a Business Process Flow. We must work with this programmatically if we wish to do things such as automatically moving a process to the next stage. This entity will record an activestageid field that we can update to meet this specific scenario.
Microsoft has provided a whole article devoted to this subject, which is well worth a read.
Demo: Designing and Interacting with a Business Process Flow
To help familiarise yourself with some of the concepts discussed in this post, take a look at the below video, where I will show you how to create a BPF and interact with it as part of a model-driven app:
Business Rules
Overview
In days gone past, when there was a need to carry out more complex, logic-based actions directly on a model-driven Power App form, client-side scripting via JScript form functions would have been the only mechanism to satisfy this requirement. Examples of the types of things I mean by this include setting the value of a form’s field based on when another field changes, showing/hiding fields or even displaying error messages when a user violates a business condition. Given the specialist knowledge area involved, having to bring in someone with the required technical knowledge to achieve what I certainly see as basic requirements can introduce a degree of complexity and technical/monetary cost into a project or the solutions ongoing maintenance.
For this reason, Microsoft provides a route to satisfy some of the common scenarios highlighted above via Business Rules. These offer a built-in and supported mechanism to implement client-level or even platform-level operations when certain conditions are satisfied. They are technically classed as a Process by the application and, like classic Workflows, must always be bound to a single table on creation. From an execution standpoint, they almost certainly interact and work with the same client-side API’s Microsoft expose to developers writing JScript form functions, but with a reduced risk of causing potential end-user errors when you implement them. They can also negate the need for prolonged testing or factoring in as part of a system upgrade, as they should “just work” in all circumstances. In short, an effective Power Platform developer should use and push Business Rules to their absolute limit before even considering writing a single line of JScript. This is a topic I have banged on about evangelised over previously on the blog, and it is worth repeating more than ever, particularly in the context of the PL-400 exam.
Business Rule Visual Editor
Business Rules are created in the Power Apps maker portal by navigating to your target table and selecting the Business Rules tab. From here, the visual editor will load, represented in the screenshot below:

The editor contains many buttons and areas that it’s worth getting more familiar with, so you can fully appreciate Business Rules’ capabilities. Each one has been numbered and explained in detail in the list that follows:
- Expanding the arrow will allow you to define a name (mandatory) and a description for your Business Rule. I highly recommend always providing a helpful description of any Business Rule, to assist any future developers or to even give your memory a jog down the road. 😀
- From this area, you can save your Business Rule, validate its current structure to highlight any warnings/errors, define the Business Rule’s scope (discussed in more detail shortly) or access some of the available help articles for the Power Platform.
- The icons here let you quickly add on an additional component to your Business Rule or perform standard operations, such as cut, copy, paste and delete. On these, it is worth highlighting that the familiar keyboard shortcuts for each action will also let you perform it as well. Finally, you can use the Snapshot button to download a .png image file of the Business Rule, which you can then include as part of any documentation or training materials.
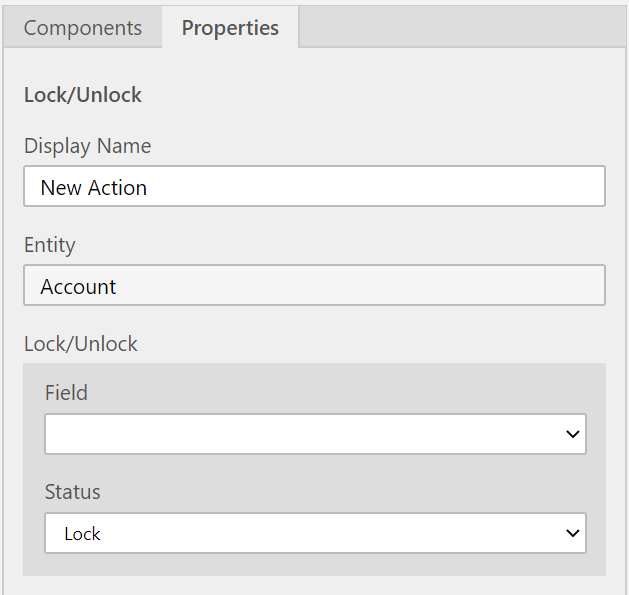
- The visual editor’s central part allows you to select, drag & drop or re-order any added components via your computer’s mouse. Selecting each component will also display its underlying properties within the area highlighted in 6 on the screenshot. For example, the properties tab for the Lock/Unlock action resembles the following:
- Here, you can toggle between the Components and Properties tab.
- The Components tab, when selected, will display a list of all possible components you can add to your Business Rule. The following section will discuss all of these in further detail.
- Traditionally, Business Rules would be specified and built out using a text-based view, defined within IF…THEN…ELSE logic. This experience is persisted as part of the new visual editor experience to provide a precise and straightforward mechanism for you to validate your Business Rule’s logic.
- Finally, the options here let you zoom in/out and adjust the view to fit the visual editor’s canvas.
Available Components
A Business Rule comprises several potential components, depending on the complexity of the business logic that needs to occur. These are defined under the two categories of Flow and Actions. Within the visual editor, you will see a handy “toolbox” on the Components tab that lists everything we can double click/drag and drop onto a Business Rule:
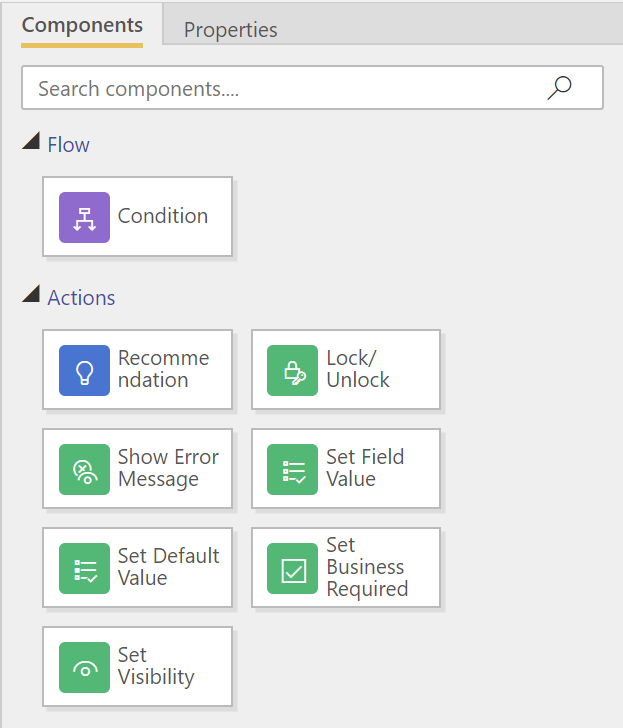
A description of each of these is found below:
- Conditions: As the central component within all Business Rules, at least one of these must exist. From there, you can define multiple rule sets; these represent the specific field on the current table whose value you wish to evaluate. You have a range of operators at your disposal when performing evaluations, primarily dictated by the selected field’s data type. For example, a text field has operators such as Contains, Equals, Begins with etc. When multiple rule sets are defined, you must also indicate the type of grouping to apply to the evaluation - AND or OR. It’s not possible to specify more granular grouping rules underneath this level.
- Recommendations: In certain situations, you may wish to guide users towards populating a form in a specific manner, based on other inputs that have been made to the record so far. This component type meets this requirement by showing recommendation text to the user alongside a button. Once pressed, the Business Rule will then apply any number of updates to other fields on the form. It is then left up to the user to decide whether they accept the recommendation or ignore it entirely.
- Lock/Unlock: With this, you can set or remove a fields read-only property on the form.
- Show Error Message: By selecting a field and specifying a custom message, it’s possible to display any custom error message that will bind itself to the field chosen.
- Set Field Value: Perhaps one of the most potent components at our disposal allows you to auto-populate other fields on the form when our stated conditions are met. You can configure this component in one of three ways, based on the Type value you specify - you can choose to provide a custom value (Value), set the field to match another on the form (Field) or even remove all data from a field (Clear).
- Set Default Value: This works on a similar premise as the Set Field Value component, with the exception that it does not include a Clear option and is instead designed to populate a field automatically when creating a new record.
- Set Visibility: Using this component type, you can toggle whether a field appears or gets hidden from the user.
As highlighted earlier, each component has its own set of distinct properties that you must specify for it to work correctly. It’s worth spending some time familiarising yourself with these properties and how they behave on a table form once published.
Scope
An important concept to grasp relating to Business Rules is the circumstances around their application, dictated by its Scope. Depending on the scope, your Business Rules logic could be executed as expected or not at all. You should, therefore, consider which value to select for this property to ensure your Business Rule always runs as expected. The list of possible values you can choose for this include:
- Specific Form: A list of all available forms for the table will display in the dropdown box, meaning it is possible to scope a Business Rule to a single form only.
- All Forms: Does exactly what it says on the tin 🙂
- Entity: As we’ve seen so far, most available components for a Business Rule relate strictly to a form itself. Having a Business Rule with a scope of Entity will ensure that the appropriate action occurs, regardless of whether the user updates the row via a form, Power Automate flow or SDK call. While potentially a powerful mechanism of enforcing business logic across an entire Dataverse instance, consider carefully the impact this action may have in conjunction with your broader solution.
Demo: Working with Business Rules
In the video below, see how it is possible to create a simple Business Rule and how it then behaves within a model-driven app:
We’ve rounded up our discussion of the functional Power Platform components that you’ll need to have an awareness of for the PL-400 exam. In the next post in the series, we will look at our first code-related topic by evaluating client-side scripting options involving JScript, TypeScript and the Web API.