
Welcome to the fifth post in my series focused on providing a set of revision notes for the PL-400: Microsoft Power Platform Developer exam. We saw how to implement a proper application lifecycle management (ALM) process via Solutions and automation with Azure DevOps in the previous post. Today, we continue with our focus on the Configure Common Data Service area of the exam, by looking at the following topics:
Implement entities and fields
- configure entity and entity options
- configure fields
- configure relationships and types of behaviors
As part of this next area, we can now focus more closely on the features available within Microsoft Dataverse. This powerful tool will enable us to model out the core data within an organisation straightforwardly. Developers can leverage these capabilities without resorting to code, thereby providing us with a secure, highly scalable, Software as a Service (SaaS) database. Let’s dive in and discover how easy it is to get started with the Dataverse!
As with all posts in this series, the aim is to provide a broad outline of the core areas to keep in mind when tackling the exam, linked to appropriate resources for more focused study. Ideally, your revision should involve a high degree of hands-on testing and familiarity working with the platform if you want to do well in this exam.
Note on Terminology
In late 2020, shortly before the PL-400 exam went into general availability, Microsoft made some significant changes to the core terminology in some aspects of the Power Platform, chiefly affecting many of the concepts discussed in today’s post. I discussed these changes as part of a blog post last year, but, in a nutshell:
- Microsoft Dataverse became the new name for what was previously known as the Common Data Service. This change was announced and discussed further by Ryan Cunningham in a blog post last year.
- Within Microsoft Dataverse, many of the core features were subject to terminology changes. For example, entities are now called tables. Microsoft has provided an excellent summary that you can use to refer to the previous and new terms.
At the time of writing this post, Microsoft has yet to update the PL-400 exam to reflect the new terminology. Therefore, you should take steps to familiarise yourself with the previous terms, so you won’t get stuck when sitting the exam. For this blog post, we will be referring to the new terminology throughout.
Tables Overview
Tables are the core objects within Microsoft Dataverse. From a developers perspective, their name best reflects how these objects look in the back-end database platform; namely, as SQL Server database tables, used to store individual row data for each of our different data types within the system. Many tables, covering common business scenarios and adhering to the Common Data Model, are given to us by default. For example, the Account table contains all the essential information we may store regarding companies that an organisation works with each day. As developers of the system, we can create new tables, to cover bespoke requirements. Also, we have the ability to:
- Modify the properties for a table. For example, we can enable a table for SharePoint Online document management functionality.
- Add new custom columns to a table, to include missing information required by our organisation.
- Setup or modify existing relationships between tables to, for example, ensure specific column values are mapped across automatically.
In short, we have a range of features at our disposal to store any potential type of information within Microsoft Dataverse, allowing us to leverage additional built-in features, where required.
Table customisations is a topic area that is impossible to cover as part of a single blog post and is typically the focus of 2-3 day courses to grasp fully. The next few sections’ aim to focus on the core concepts that you will need to have in the back of your mind when tackling the exam.
Working with Tables
When first contemplating whether to create a new table or not, you must make some critical decisions regarding how to configure it, including:
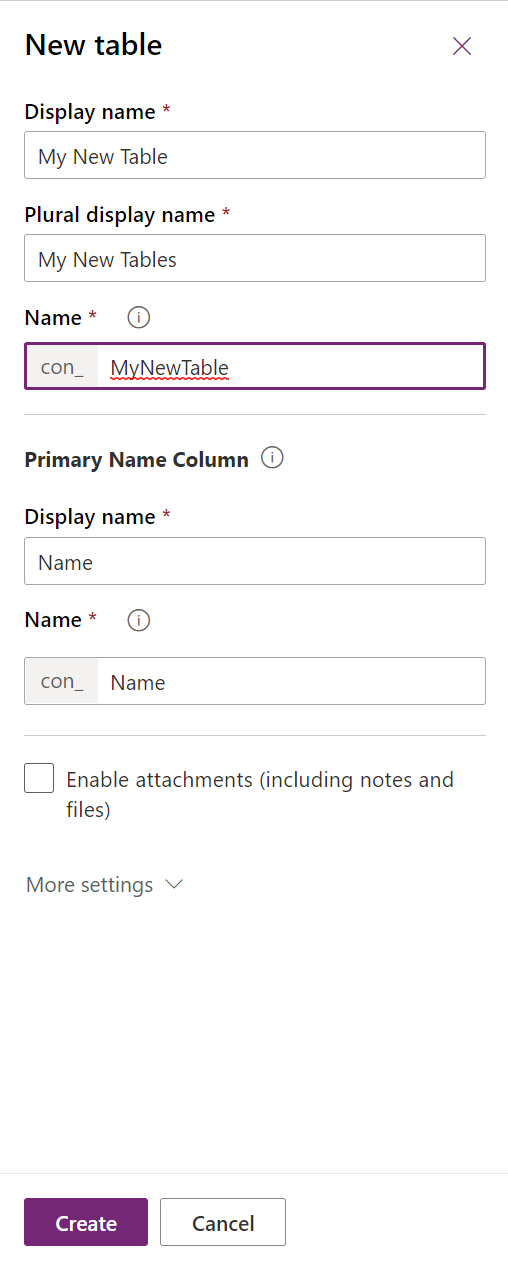
- Name attributes: All tables must have a Display Name, Plural display name and Name (i.e. logical Name) value specified for them.
- Primary Column Details: All new tables must have a text column defined for them, representing the value shown for each created row within the interface. We have full flexibility to specify the display and logical name value for this column, but we cannot change its underlying data type (Single Line of Text). We can also convert this to an autonumber column - the benefit here is that it will always have a populated value, that will be unique across the table.
- Attachments/Notes: We can configure tables to work alongside attachments and notes within the application. Take a look at the following blog post to find out more about this feature.
- Description: You can provide a useful explanation of what the table is here, to better inform others as to its purpose.
- Table Type & Ownership: Here, we can specify two critical options:
- Table Type: Specifies whether it is a Standard or an Activity table. Typically, you should select Standard for your table, unless you wish to use it to record a specific activity type (e.g. Home Visit, WhatsApp message etc.).
- Ownership: As alluded to earlier, this will affect whether the table is subject to more granular access level controls, via the Business Unit hierarchy in the system, or not. In most cases, unless you are sure the table needs to be accessed by everyone within the organisation, you should select the User or team option.
- Create and Update Settings: Within this area, a table can be configured for use alongside Quick Create forms, enabled for duplicate detection or setup for change tracking.
Most of the standard options for tables will be visible within the new Power Apps portal, as indicated below:
Any other setting not visible here will instead be visible in the classic portal.
For existing tables, for the most part, we can carry out the following actions:
- Modify their display and plural display name values.
- Change their descriptions.
- Enable or disable additional features, such as support for Queues or Feedback.
- Delete it (custom tables only)
However, some system tables may behave differently or have certain features permanently disabled/enabled.
Although the application does not enforce this requirement, I would highly recommend to carry out all table customisations within a solution.
For more information regarding tables, you can consult the following Microsoft Docs article.
Columns
Columns represent specific data items to record data. They are also sometimes referred to as attributes and, previously, as fields**.** We can modify or create new columns based on a wide range of different data types available to us. When creating one from scratch, we must specify the following details:
- Display & Logical Name
- Type: e.g. Single Line of Text, DateTime etc.
- Business Requirement: Here, you can specify whether users must always specify a value for this column before saving the record. By default, this option defaults to Not Required.
- Searchable: Enabling this option will allow customisers or Advanced Find users to use this column when creating views or searching for data. My understanding is that the application adds any column marked as Searchable to indexes behind the scenes, thereby speeding up any searches performed; I’d, therefore, recommended enabling this property when you anticipate frequent querying of any data.
- Calculated or Rollup: Specifies whether to use the column as a calculated or rollup column type. These types are typically most useful to generate aggregate information or for use within a reporting solution. You can find out how to work with these column types in more detail, by reading through the calculated columns and rollup columns articles on the Microsoft Docs site.
- Description: Here, you can provide a useful summary of the purpose of the column. Any value saved within this column will then get displayed to users within a model-driven app, whenever they hover their mouse over the column’s name.
For each column and its corresponding type, we can fine-tune additional details relating to it. The following article summarises some of these properties in further detail. It is impossible to cover all potential scenarios within this blog post, so I would encourage you to experiment with creating all possible column types within a test environment.
Comparing 1:N, N:1 and N:N Relationships
When modelling a SQL database, it is desirable to create multiple tables, with any required links implemented via FOREIGN KEY relationships. This type of modelling allows you to create hierarchical relationships if desired and ensure that your solution remains scalable. Microsoft Dataverse leverages the built-in functionalities within SQL Server, by enabling you to define several different types of relationships within the application:
- 1:N & N:1: These relationships are virtually the same, and describe either a one to many (1:N) or many to one (N:1). Regardless of their configured direction, they allow you to have a single parent row, with many related rows. An example of a system 1:N relationship is the one between the Account and Contact tables; a single Account can have many associated Contacts.
- N:N: Many-to-many (N:N) relationships are a bit more unusual, primarily because of the way they can be customised. They describe a situation where you must have many table records related to many other table records. An excellent example of a scenario where this may be useful is if you have Event and Attendee tables set up within the system; many events can have many attendees. Therefore, this would be an appropriate use case for a many-to-many relationship. As mentioned earlier, these types of relationships are an oddity, as you can configure them in one of two different ways:
- Native N:N: This is where you let the system wholly manage the relationship and its setup for you. The Dataverse will create a hidden intersect table behind the scenes to record all N:N relationship instances. This table will remain inaccessible and cannot be customised further. This is the default and recommended option if you do not need to record additional properties relating to your N:N relationship.
- Manual N:N: In this scenario, you create the intersect table yourself. Then, you set up 1:N relationships between your two different table to the intersect table. As you have full control over the intersect table, you can customise it to record additional columns. This type of N:N relationship is most suitable for advanced scenarios only.
Typically, you would navigate to the Relationships tab within the Power Apps portal to create these. However, you can also create a relationship by adding a column of type Lookup to your table. To find out more about the different types of relationships and, specifically, native and manual N:N relationships, consult the following Microsoft Docs article.
Once a relationship has been created, you can also specify additional options concerning column mappings, which allow for data to be quickly copied to new records when created from a primary row. For example, column mappings exist between the Lead and Opportunity tables, meaning that specific columns will automatically copy to the Opportunity table whenever a Lead is qualified. In most cases, you will need to ensure that the source and target column are of the same type and a target column cannot be subject to multiple source mappings. Further details on this feature and how to begin working with it can be found on the following Microsoft Docs article.
Demo: Working with Tables, Columns and Relationships in Microsoft Dataverse
To better understand how to customise Microsoft Dataverse using the concepts highlighted above, check out the below video:
Having a good grasp of these data modelling capabilities within the Power Platform is essential. It allows developers to effectively leverage functional capabilities to complement any bespoke solutions we build. In the next post, we will finish off our discussion of the Configure Common Data Service (AKA Microsoft Dataverse) exam area by looking at security roles, field security profiles, business units and teams.