Welcome to the twelfth and penultimate post in my blog series concerning Microsoft Exam 70-778, where I hope to provide a revision tool for those planning to take the exam or a learning aid for those looking to increase their Power BI knowledge. We’re on the home stretch now and, after reviewing last week the various options available to publish Power BI Reports both online and on-premise, we now take a deep dive into some vital security concepts as part of the Configure security for dashboards, reports and apps theme, which covers the following skill areas:
Create a security group by using the Admin Portal; configure access to dashboards and app workspaces; configure the export and sharing setting of the tenant; configure Row-Level Security
Before exploring these topics further, however, it is essential to outline a concept that this series has continually skated around - Power BI Workspaces.
Workspace Overview
We’ve seen so far in the series how it is possible to deploy Power BI Desktop Reports into Power BI Online. As part of this process, you must define a Workspace where your Reports and Datasets will appear after publishing. There are three types of Workspaces:
- My Workspace - Each user, by default, will have a personal Workspace, which cannot be deleted or changed.
- Office 365 Group Workspace
- App Workspace
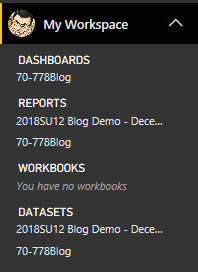
Workspaces are, for the most part, a logical grouping of all the components that you need to start building out a BI solution. They are worked with from within Power BI Online only (meaning that they do not exist as part of Power BI Report Server) and can be interacted with from the left-hand pane within Power BI Online:
As indicated above, each user’s Workspace can contain:
- Dashboards - These are created within the Power BI service, as we saw a fortnight ago.
- Reports - These are built out in Power BI Desktop or uploaded directly into Power BI Online from a .pbix file.
- Workbooks - These will show a list of Excel workbooks that have been uploaded into Power BI, allowing you to leverage an existing solution built out using Excel PivotTables/PivotCharts almost immediately through Power BI. For this exam, it is not something you need to worry about necessarily, but be aware this topic does crop up within Exam 70-779.
- Datasets - Contains a list of all data models uploaded/created for Power BI Reports or Workbooks.
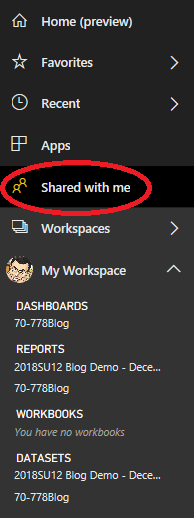
It is possible to share out Dashboards and Reports to other Users/Security Groups, and we will see how this can be done with the example later on in this post. One consideration to bear in mind is that, when sharing Reports, this does not share out any Dashboards that reference it. Content shared to you will become visible within the Shared with me tab on Power BI Online:
Next week’s post will go into further detail on how to create and manage Workspaces, and how to handle access to App Workspaces.
Office 365 Security Groups
Those who have experience administrating on-premise Active Directory (AD) domains will have full familiarity with the concept of Security Groups - logical containers of Users that can then be assigned file/folder privileges, group policy objects and access to other principals on the domain. Given that Power BI uses Azure Active Directory (AAD) as its identity provider, the same kind of concepts come into play when you start to determine how to manage access to Power BI Dashboards, Reports and Datasets to specific groups of Users. Office 365 Security Groups are virtually identical to their on-premise AD equivalent; the primary difference being is that Administrators must create them from within the Office Microsoft 365 Admin Center. It is also possible to add them through Microsoft Azure as well, so your choice here really comes down to preference. In either case, you must ensure that you have the relevant administrator privileges on your AAD tenant to create and manage them. Once created and defined with your required list of Users, they then become available as a shareable object within Power BI Online.
In the example towards the end of this post, we will walk through how to create a Security Group and how this can then be used to share out a Dashboard.
Managing Export and Sharing Settings
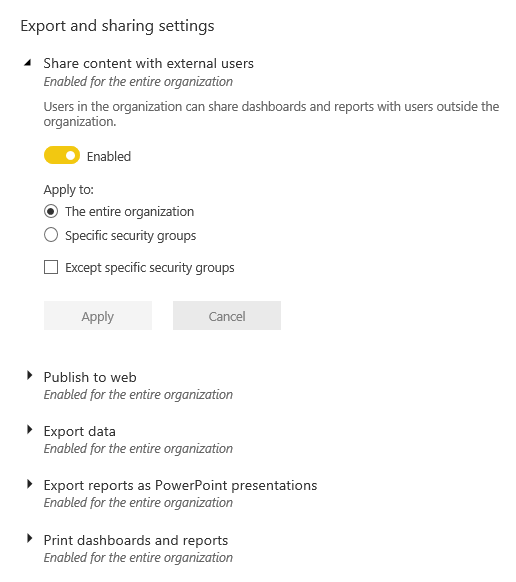
With the introduction of GDPR last year, data privacy concerns remain a paramount concern for organisations. These concerns can often come into conflict with new functionality that technology solutions can offer us such as, for example, the ability to export a Power BI Report as a PowerPoint presentation. To help with these considerations and in line with Microsoft’s overall commitments from a GDPR standpoint, Power BI Online provides several options that allow you to granularly define various actions that Users can and cannot do, such as using custom visuals in reports, accessing audit/usage information and the ability to use preview features, such as dataflows. The list of settings most relevant to data sharing can be found under the Export and sharing settings section on the Admin Portal -> Tenant settings area of Power BI Online:
Each of the listed features can be enabled or disabled globally on the Office 365 tenant. Alternatively, by utilising Security Groups, you can grant or curtail specific functionality to a group/department within an organisation. You have no option to specify individual User access as part of this, so it becomes a requirement to have your required Security Groups defined within Office 365 before you can start working with this feature.
Row-Level Security
Granting global allow/deny privileges at a Report level may not be sufficient for specific business requirements. It could be, for example, that a single Sales report is in place for both junior and senior sales professionals, and there is a need to only present data that is most relevant to their role. Or, for example, there is a need to show data that has the most relevance for an individual’s particular geographic region. In these situations and, to avoid a scenario where you would have to define separate queries to segregate this data appropriately, Row-Level Security (or RLS) becomes a significant asset. It allows you to set Roles linked to DAX expressions, which tell Power BI which data to show to a particular group of Users.
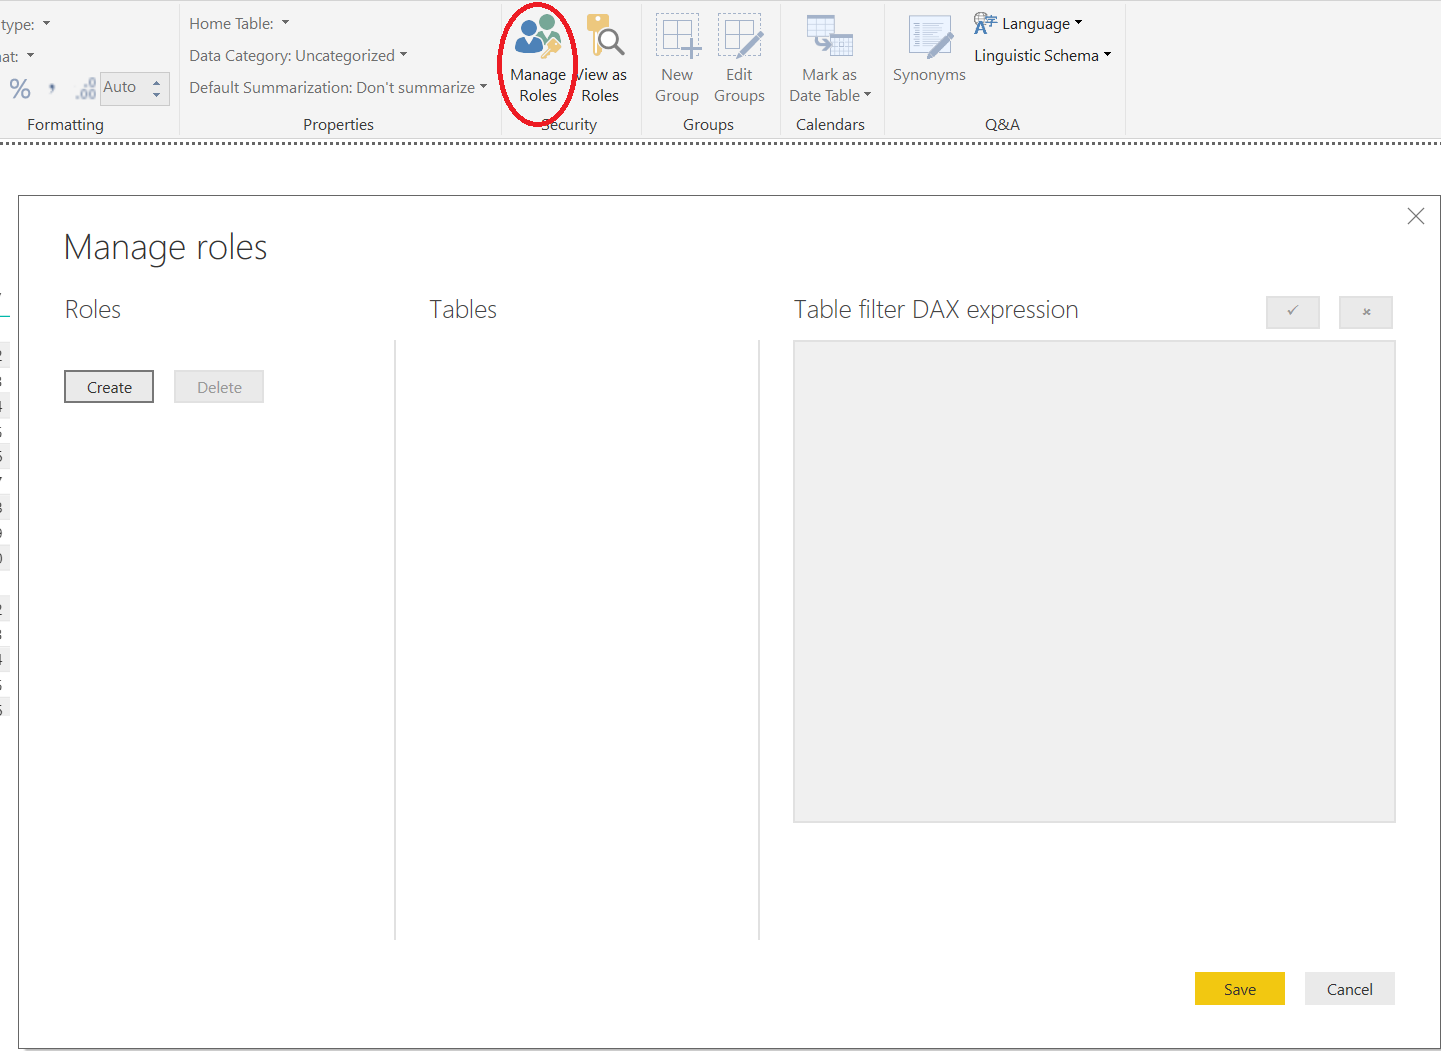
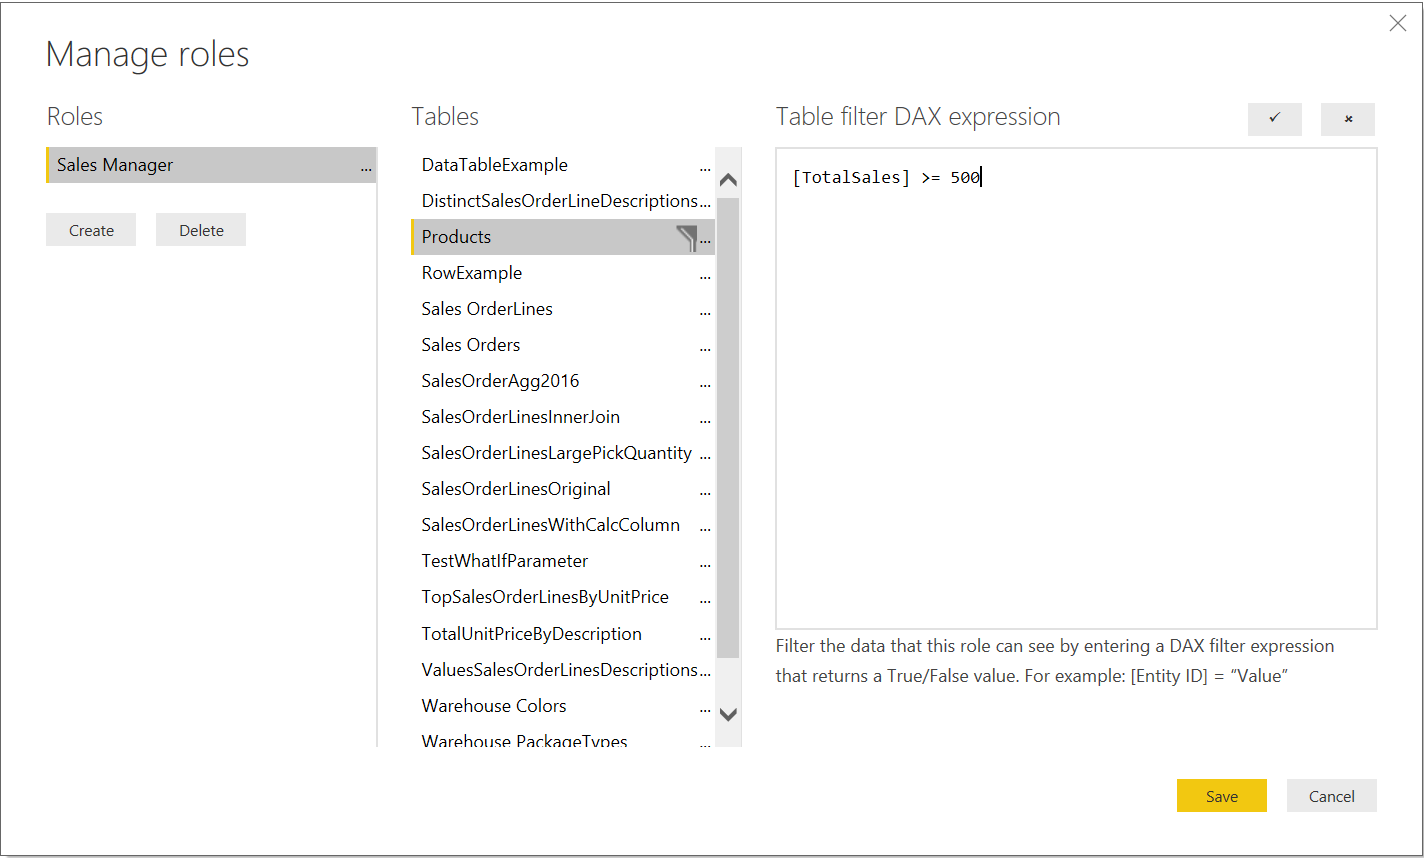
There are two steps involved as part of implementing RLS. First, you must create a Role that defines the list of privileges for one or multiple Users. This step can be achieved by navigating to the Modeling tab within Power BI Desktop and selecting the Manage Roles button, which will open the appropriate dialog window:
Next, you must define a DAX Expression for each table that requires filtering as part of the Role. These can be set up for as many Tables as you like, but the critical thing to remember is that the DAX Expression must conform to a TRUE/FALSE equality check. The example below - whether it will either be TRUE or FALSE that the TotalSales value on a row will be greater than or equal to 500 - meets this requirement:
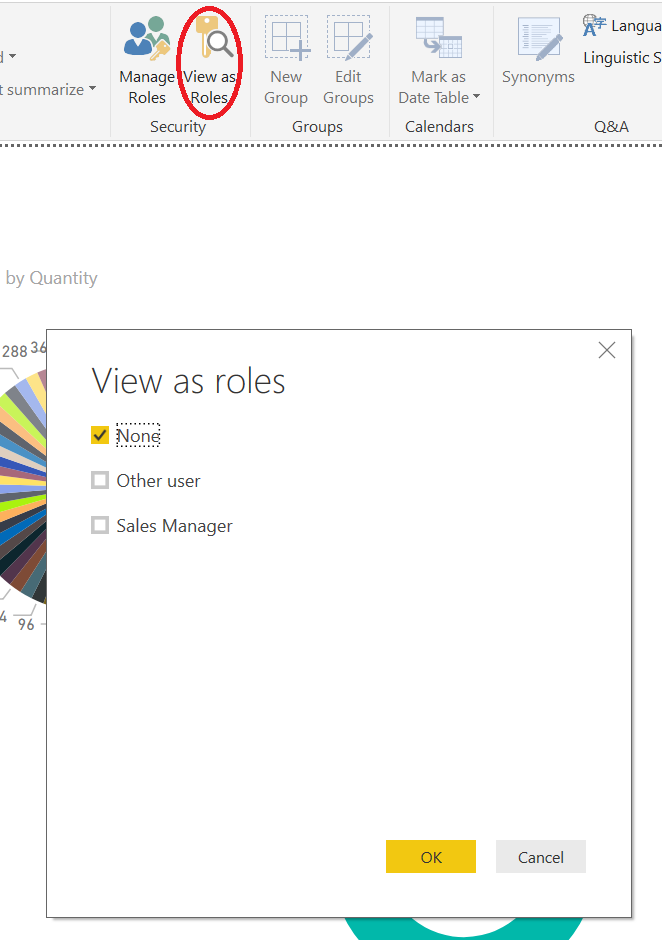
With the Role defined, it is then possible to test it locally from within Power BI Desktop by using the View as Roles button to select your corresponding Role:
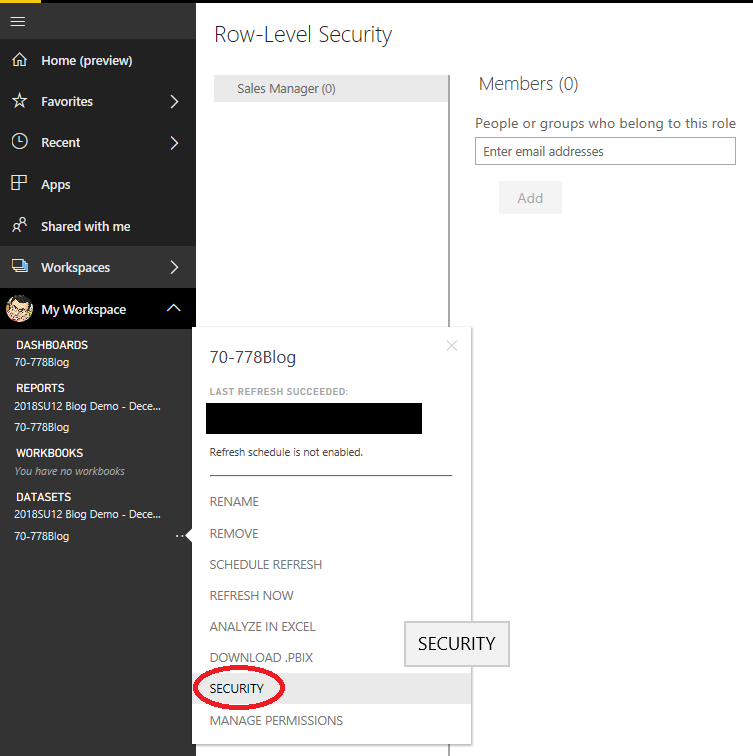
With everything built out and working with Power BI Desktop, the second step is to publish your Report to Power BI Online and then assign the Role to Users or a Security Group by navigating to the Dataset in question:
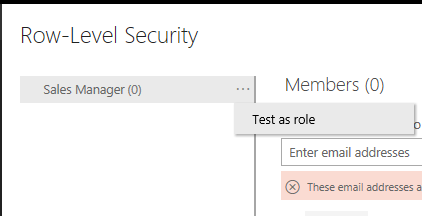
It is also possible to use the Test as role feature within Power BI Online, which behaves identically to its Desktop client equivalent:
To help leverage additional functionality out of RLS, Microsoft provides the following two DAX functions:
- USERNAME() - Returns the domain name of the User accessing the Report. For Desktop Reports, this will typically be in the format \; when viewing the Report online, the value rendered instead will either be the user’s email address or onmicrosoft.com account name.
- USERPRINCIPALNAME() - Returns the User Principal Name (UPN) of the User accessing the Report. The UPN will almost always be the user’s email address or, in some cases for Power BI Online, their onmicrosoft.com user account name.
By using these functions in tandem with IF DAX constructs, you have the additional capability to restrict access to specific data, based on user account names. All in all, RLS is a powerful feature to have at your disposal but, as highlighted in last week’s post, you should be aware of its limitations. RLS is incompatible when there is a need to Publish to web a report and the feature is also not available if you are querying a SQL Server Analysis Services data source via a live connection.
Example: Sharing a Power BI Dashboard with a Security Group
The steps that follow will show how to create an Office 365 Security Group and then share out a Dashboard to it from within Power BI. To complete the steps outlined, you should ensure that you are assigned either the Global administrator or User management administrator role in Office 365 and that your user account has a Power BI Professional license:
- Navigate to the Admin Center within Office 365, expand the Groups tab on the left-hand pane and select Groups:

- The main window should refresh, displaying the list of Groups setup on the AAD tenant. Select the Add a group button:

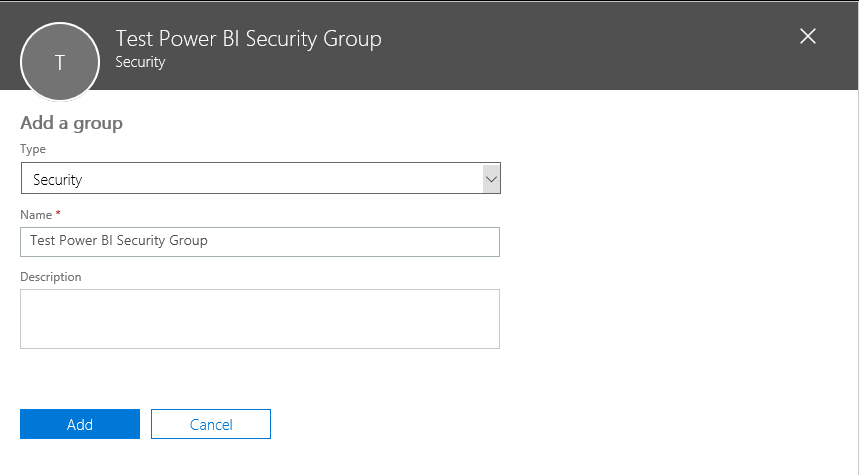
- Define the settings as indicated in the below screenshot, making sure that the Type selected is Security, and press Add:
- You will then receive confirmation that the Security Group was added successfully to your tenant:

- With the main Groups window, select the new Security Group and then click the Edit button on the right-hand details pane:

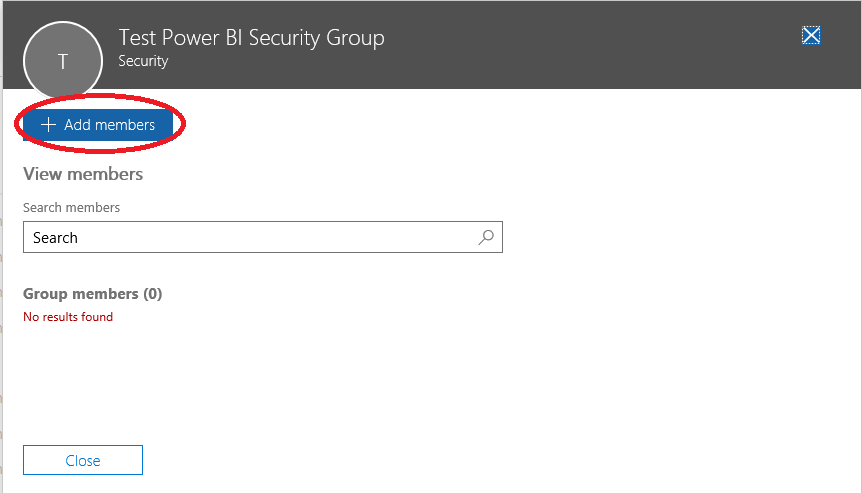
- Then, select the Add members button to add in the required list of Users:
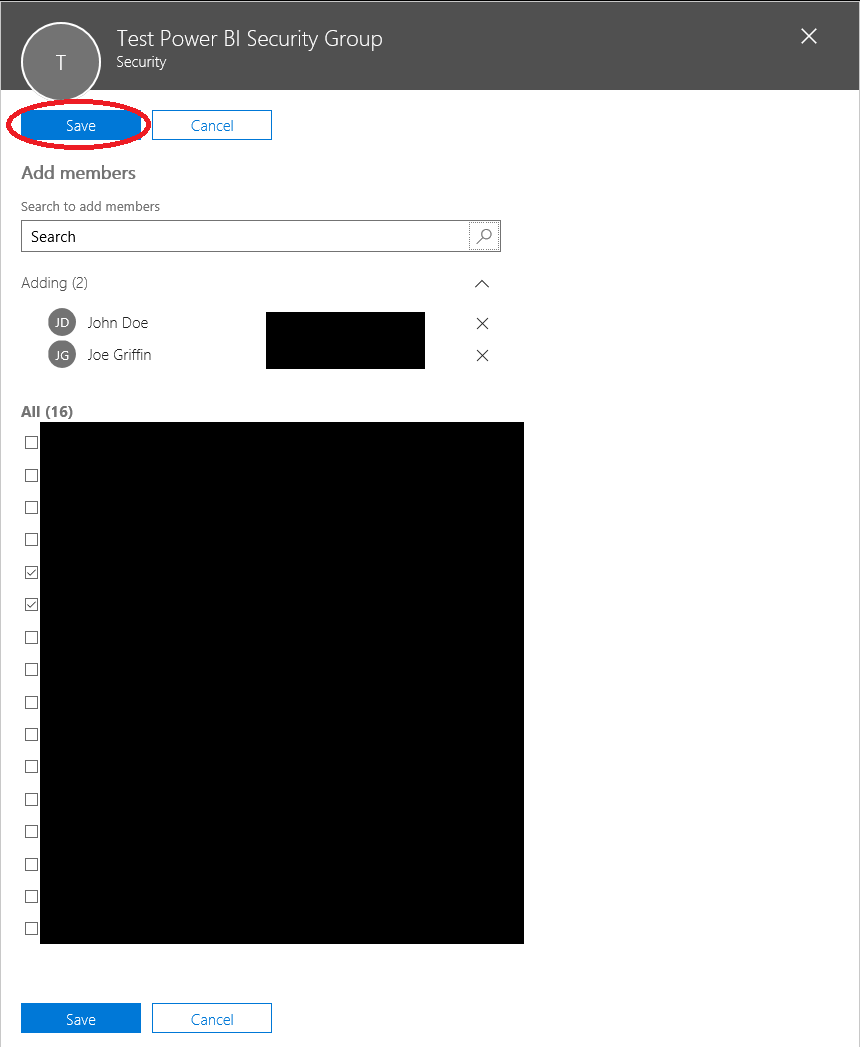
- Press Save to commit any changes:

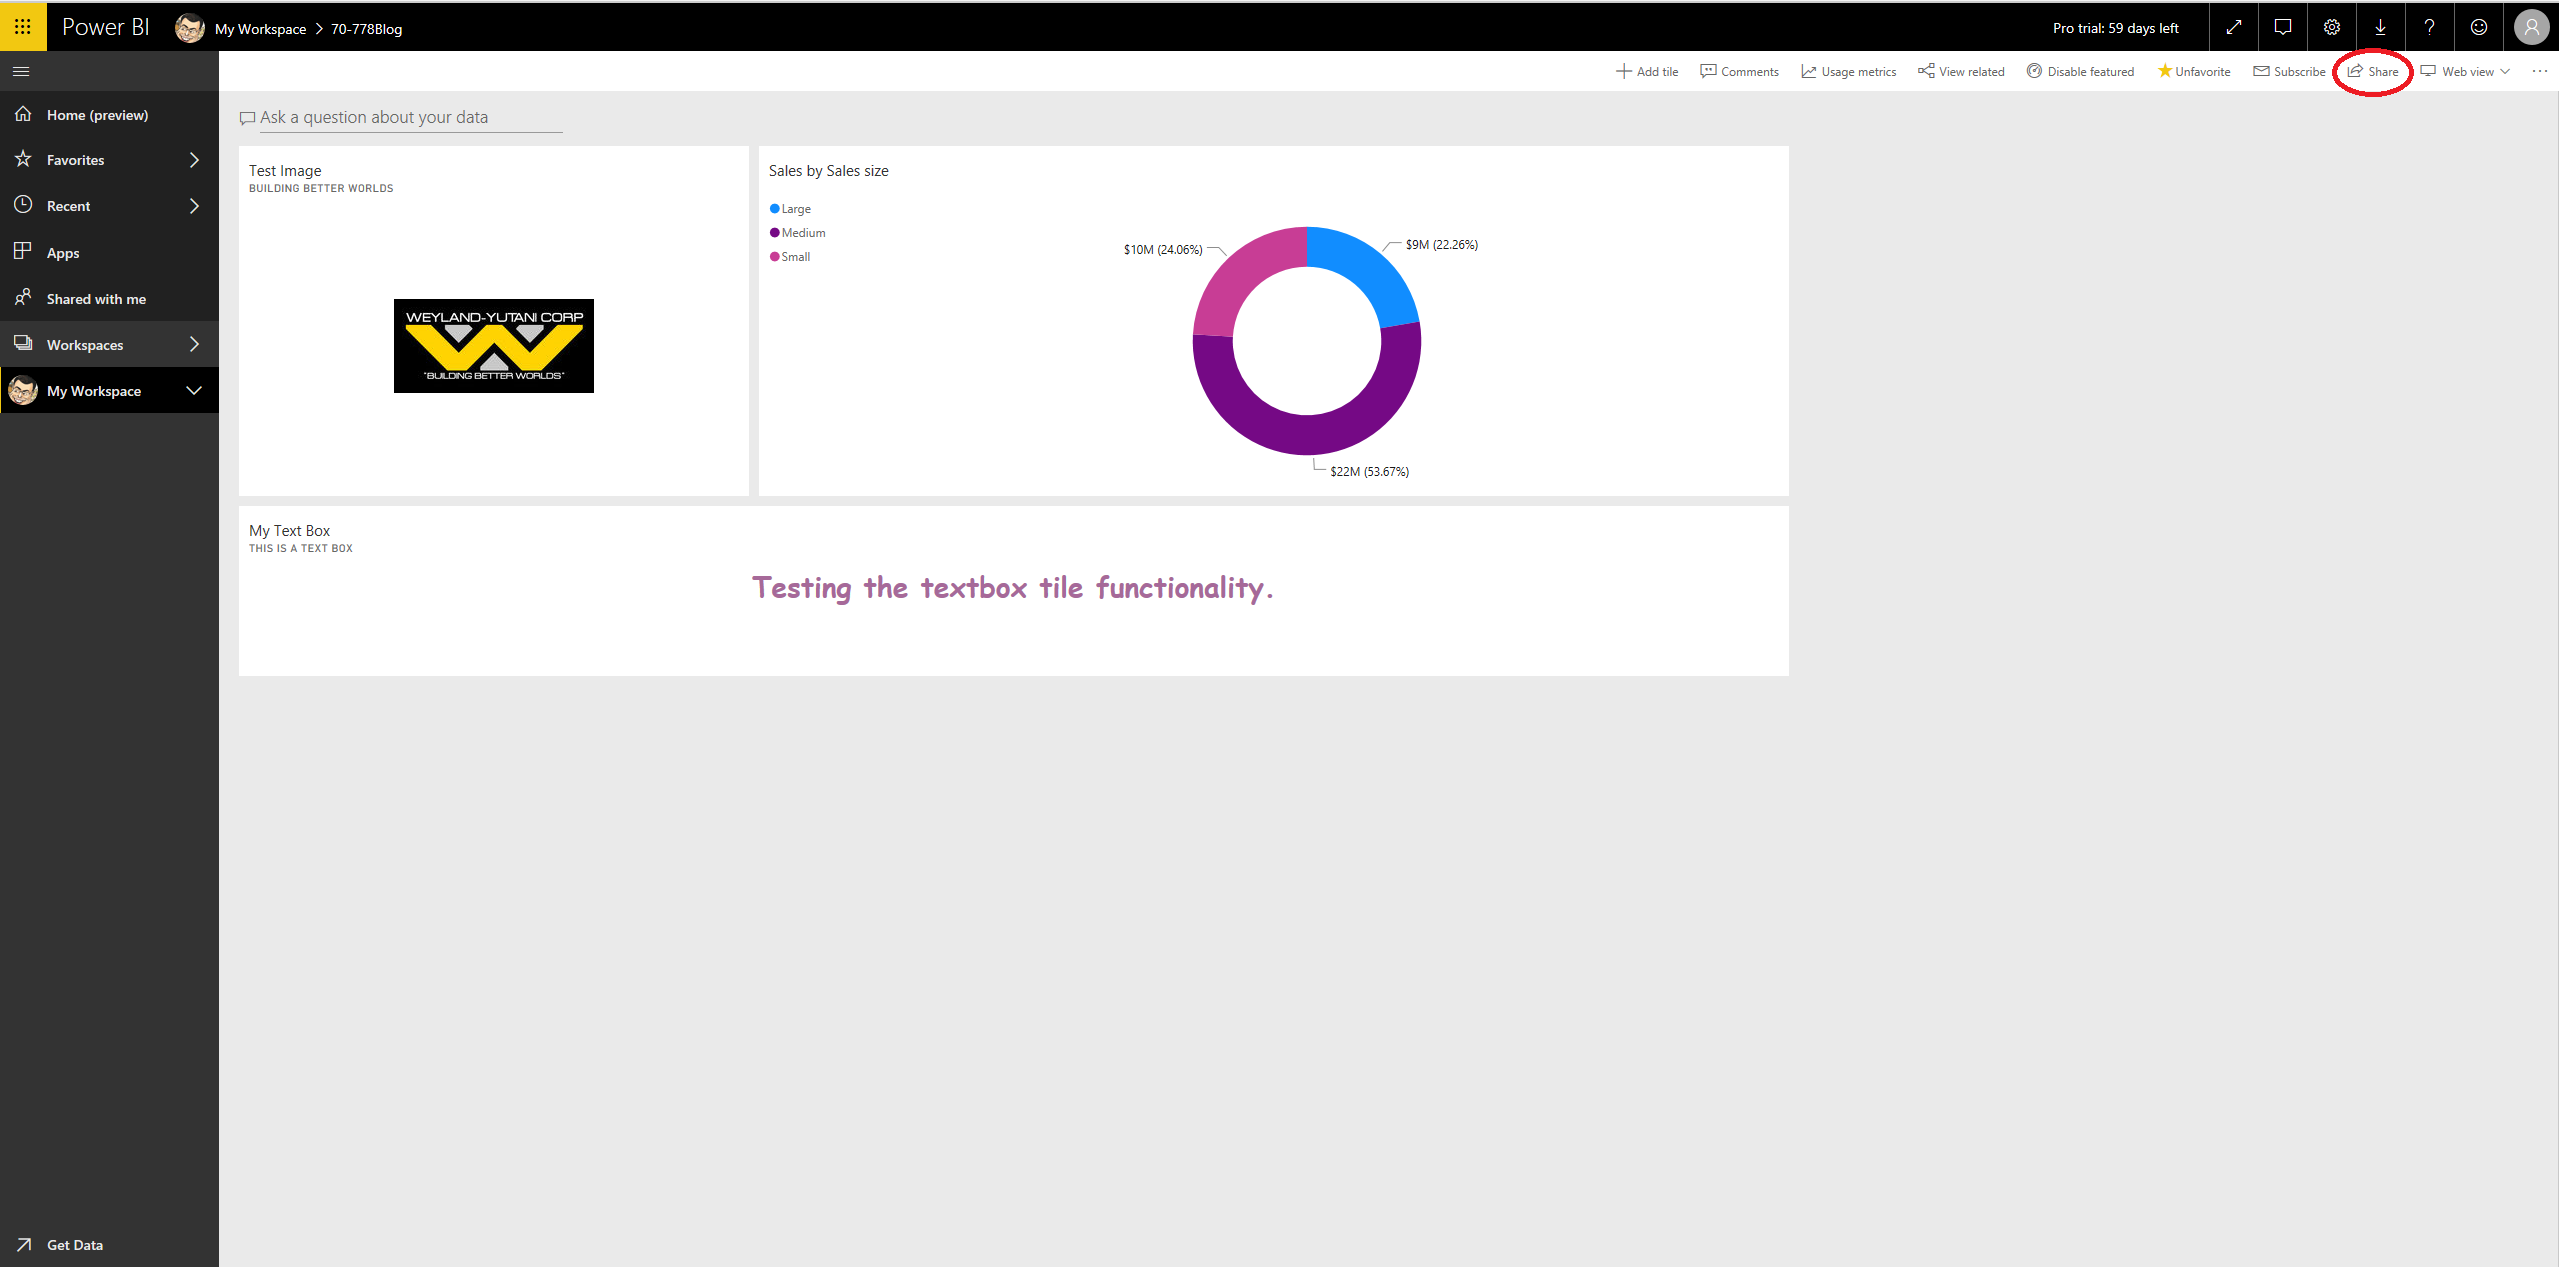
- Navigate back to Power BI Online and to the Dashboard that needs sharing. Select the Share button at the top right of the screen:
- Within the Share dashboard pane, begin typing in the name of the Security Group created in the previous steps. Power BI will automatically detect and auto-complete the name of the group for you. Before pressing the Share button, you can also include a custom message to recipients that will be sent via an email and also toggle whether they will also be able to Share the dashboard themselves. A URL link generates at this point as well, allowing you to copy/paste this into an email, IM message etc.:

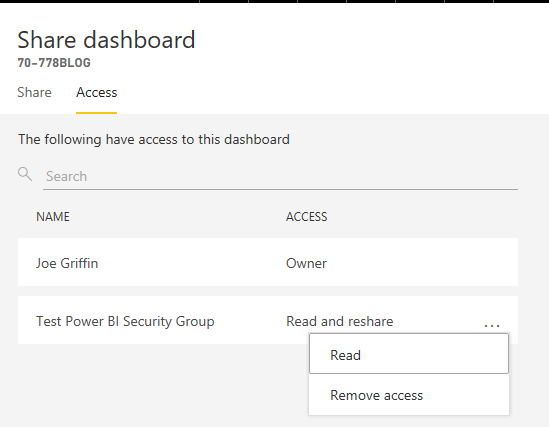
- Once the Dashboard is Shared, you can then navigate to the Access tab to review the list of Users/Security Groups that have access to your Dashboard. It is also possible to modify their access levels or remove access entirely by clicking on the ellipses button next to each Name:
Key Takeaways
- Workspaces act as a container for the various components that form a Power BI Reporting solution. Within a Workspace, you will find all of the Dashboards, Reports, Workbooks and Datasets that developers have published content to. Each User has a Workspace created for them in Power BI when they first access the service. Additional Workspaces can be added through Office 365 Groups or by installing a Power BI App from AppSource. Dashboards and Reports created within your a Users Workspace are shareable to other Users, provided that your account has a Power BI Professional license assigned to it.
- To help manage permissions to Dashboards/Reports in a more efficient manner, Administrators can create Security Groups on the same Office 365 Tenant where Power BI Online resides. These can contain multiple groups of Users, allowing administrators to minimise the amount of effort involved in managing Dashboard/Report access. Most crucially, this will also enable Users that do not have an Exchange Online mailbox to access Dashboards/Reports when they are shared out in this manner.
- Administrators have a whole host of options available to them within the Tenant settings area of the Admin Portal. These include, but are not limited to:
- Export and Sharing Settings
- Enable/Disable Content Sharing
- Enable/Disable Publish To Web
- Enable/Disable Export Reports as PowerPoint Presentations
- Enable/Disable Print Dashboards and Reports
- Content Pack and App Settings
- Integration Settings
- Custom Visuals Settings
- R Visuals Settings
- Audit and Usage Settings
- Dashboard Settings
- Developer Settings
- All of these settings can be enabled for a specific security group, the entire organisation (excepting specific security groups) or allowed for particular security groups, excluding all others in the organisation.
- Row-Level Security (RLS) allows report developers to restrict data, based on Roles. Row-level DAX evaluation formulas are used to achieve this, which filters the data that is returned, depending on a TRUE/FALSE logic test. To utilise the feature, you must define both the Roles and DAX formulas for each query within your data model. Then, after deploying your Report to Power BI Online, you then assign Users or Security Groups to the Role(s) created within Power BI Desktop. It is possible to view the effect of a Role at any time, within Power BI Desktop or Online, via the View As Role functionality. With the wide-array of DAX formulas available, including specific ones that return the details for the current user accessing a Report, it is possible to define very granular filtering within a Power BI report, to suit particular security or access models.
Putting some thought into Power BI’s security and access components early on when developing your solution will allow you to best take advantage of features such as RLS, which then benefit further when utilised alongside the other functionality described this week. The final post in the series next week will provide a more detailed description of Workspaces and how these can be used to create Apps for both internal and external consumption.

