
I’ve blogged somewhat frequently in the past about using Azure Data Factory (ADF) V2 alongside Dynamics 365 / the Common Data Service (CDS). The main focus with these posts has been in pointing out the “gotchas” to consider when using it. For example, we’ve reviewed the list of data type limitations when importing data into Dynamics 365 / CDS. ADF has also been the focus of several talks I delivered last year and, at the risk of making a plug too many, one that I will also present next week at the Scottish Summit (can’t wait!). Anyway, to get back on topic…it is enough to say that ADF, while an incredibly powerful and “better” tool compared to the likes of SSIS, is one that you need to understand the limitations for before you actively embrace it as a solution.
An example of a current limitation is no (native) way to execute or work with the Dynamics 365 / CDS Web API in any meaningful way. For example, if you wanted to run a Bulk Delete job after importing records into the application’s database, you have no way of quickly triggering this within your pipeline activity or data flow. That’s not to say that it is entirely impossible to achieve and, with a bit of effort, setup and careful consideration of any related security concerns, it is possible to work with the Web API within any stage of an ADF pipeline. This circumstance, therefore, allows you to extend ADF further to leverage additional functionality within Dynamics 365 / CDS Web API and, more crucially, carry out actions such as Delete requests. In this post today, I’ll show you how you can go about setting up your pipelines to achieve this requirement, reviewing all of the required setup needed and also assessing the potential security implications of using the solution in the first place.
Pre-Requisites
The solution outlined in this post relies on you first creating an Azure Active Directory app registration, with the relevant permissions to impersonate user accounts within Dynamics 365 / CDS. Also, it will be necessary to grant admin consent for these privileges. The screenshot below illustrates how these permissions should look if configured correctly:
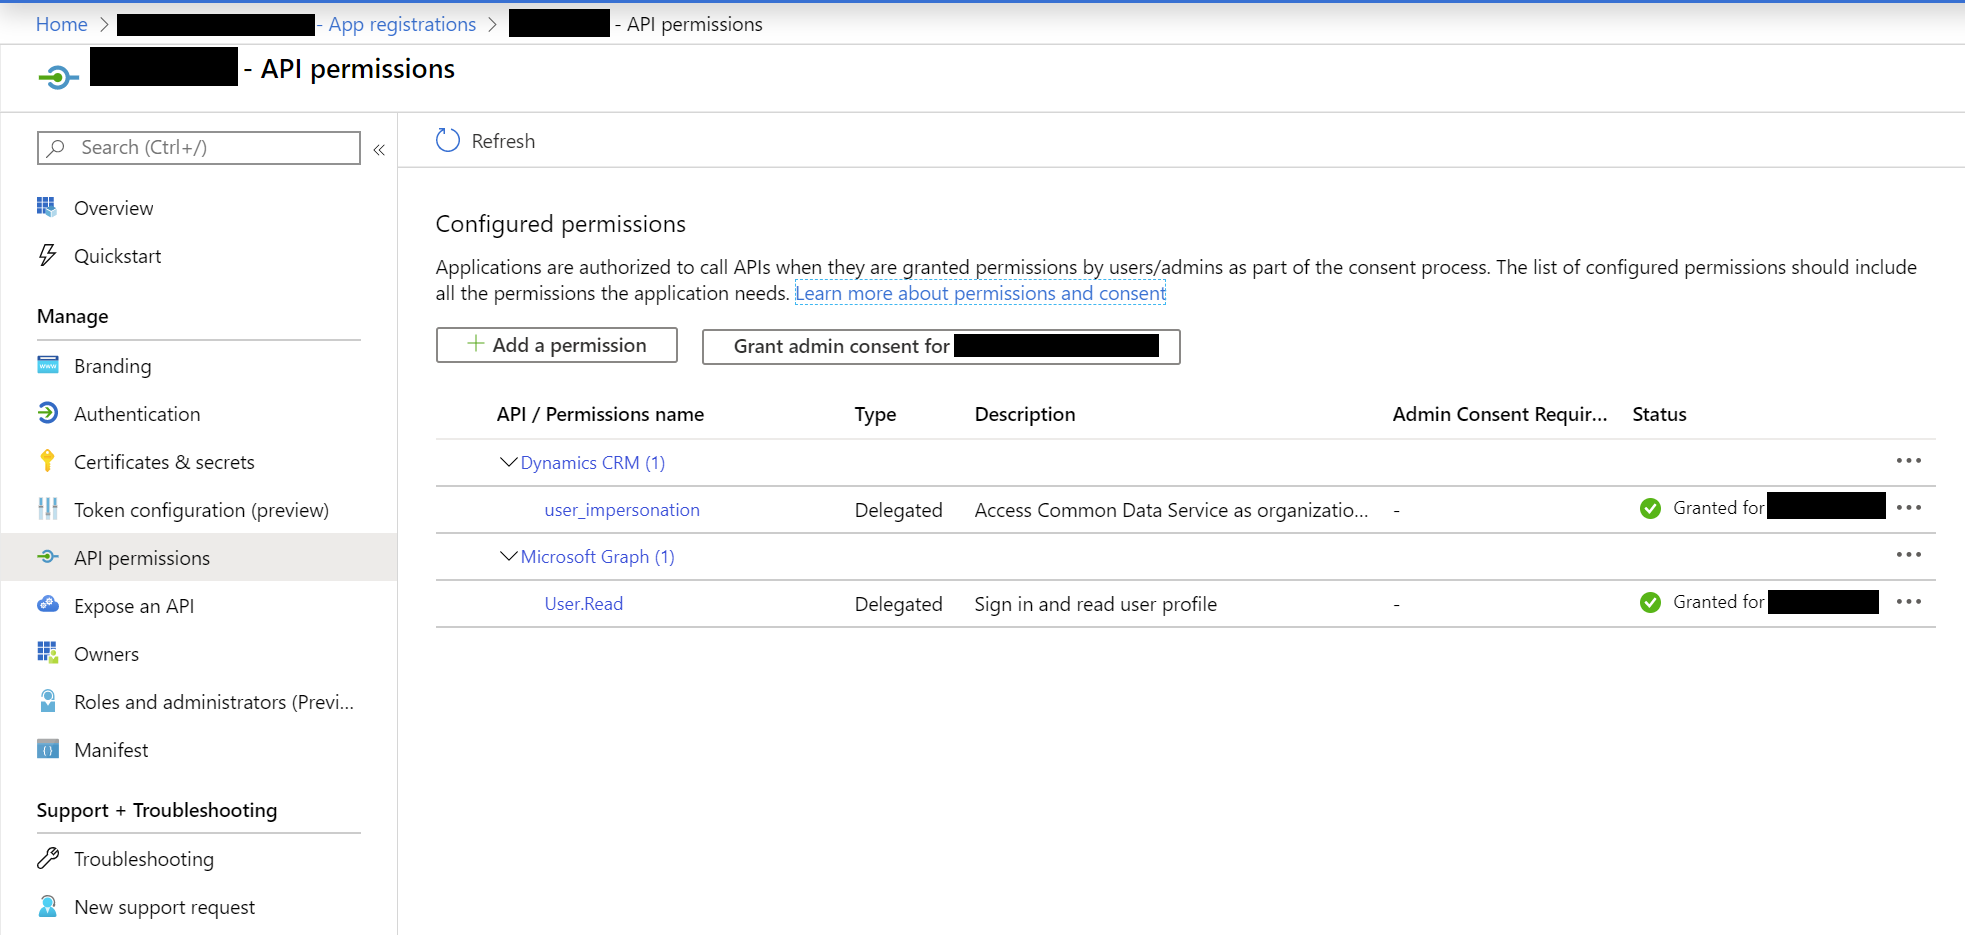
At this point, make a note of the Application (client) ID and Directory (tenant) ID values on the Overview tab. You will also need to generate a secret value, from the Certificates & secrets tab.
Next, you need to create a specific type of user account within Dynamics 365 / CDS - an application user. Note that, for those familiar with working with non-interactive user accounts, these are not the same thing and, thankfully, the configuration involves considerably less effort to implement. The setup steps in this article outline what’s involved, in far better detail than I could ever hope to replicate. Once set up, your new application user account should resemble the below:
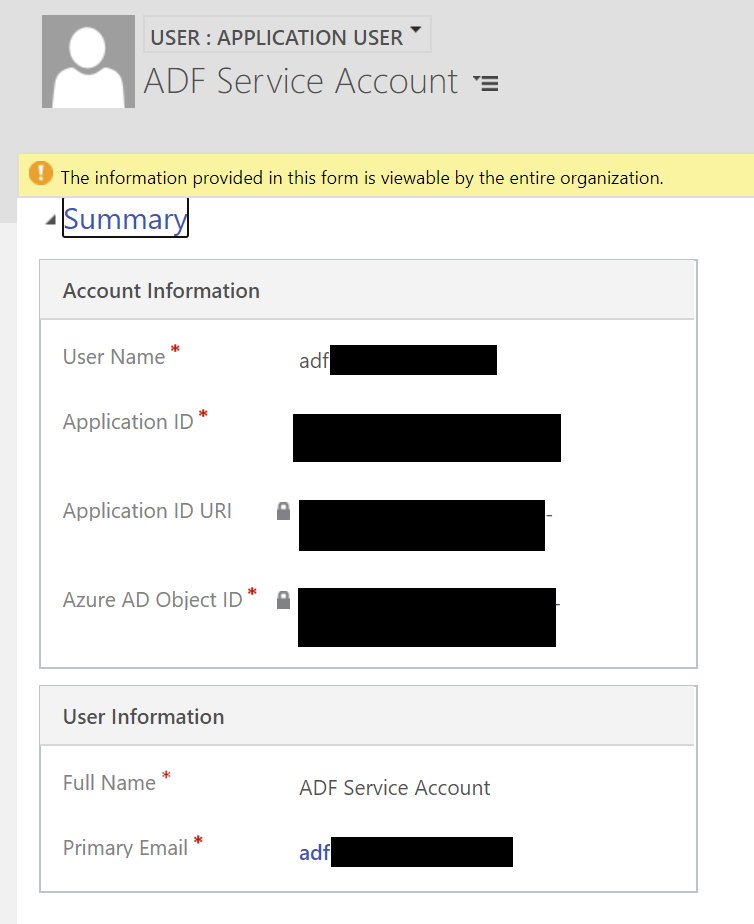
Make sure this account has been granted a security role with sufficient privilege to authenticate to the application and carry out any required tasks.
Now we can jump into ADF and create a pipeline. As the final piece in the setup/configuration, define the following string variables at the pipeline level:
- TenantID: This needs to contain the Directory (tenant) ID noted down earlier.
- AuthRequestBody: To generate the access token for authentication, it will be necessary to provide some information to the OAuth2 endpoint so that it can reply with the correct information. The value in this field will be a concatenation of the following values:
- client_id:
- grant_type: The value of this should always be client_credentials
- redirect_uri: This should match the Redirect URL defined within the AAD App Registration. In this case, we will use the value https://adf.azure.com
- resource: This is the URL for your Dynamics 365 / CDS instance, e.g. https://mycrm.crm11.dynamics.com
- client_secret: The secret value generated earlier.
- It will also be necessary to encode the string, given that it contains some illegal characters within the URL portions. Therefore, an example of how this string should look is as follows:
- client_id=8366439c-a94d-4a67-962c-0a9758405675&grant_type=client_credentials&redirect_uri=https%3A%2F%2Fadf.azure.com%2F&resource=https%3A%2F%2Fmycrm.crm11.dynamics.com%2F&client_secret=mysecretvalue
- D365URL: This should contain the URL for your Dynamics 365 / CDS instance, e.g. https://mycrm.crm11.dynamics.com/
The raw JSON definition for your pipeline should resemble the below at this stage:
{
    "name": "D365WebAPITest",
    "properties": {
        "activities": [],
        "variables": {
            "TenantID": {
                "type": "String",
                "defaultValue": "a113d749-5571-47f4-9441-ad04a8ccbd08"
            },
            "AuthRequestBody": {
                "type": "String",
                "defaultValue": "client_id=8366439c-a94d-4a67-962c-0a9758405675&grant_type=client_credentials&redirect_uri=https%3A%2F%2Fadf.azure.com%2F&resource=https%3A%2F%2Fmycrm.crm11.dynamics.com%2F&client_secret=mysecretvalue"
            },
            "D365URL": {
                "type": "String",
                "defaultValue": "https://mycrm.crm11.dynamics.com/"
            }
        },
        "annotations": []
    },
    "type": "Microsoft.DataFactory/factories/pipelines"
}
Generating the Access Token
Connections made to the Dynamics 365 / CDS Web API must always contain a valid access token as part of the Authorization header. The application will refuse any request that does not contain this token, as you may expect. Therefore, we must make a separate request to the OAuth2 endpoint for the AAD tenant in question to obtain this value. Within your ADF pipeline, add a Web activity, rename it to GetD365AccessToken and populate the Settings tab with the following details:
- URL: This should be populated with a dynamic expression value, that builds the correct URL from the TenantID variable specified earlier. The code for this is as follows:
- @concat(‘https://login.microsoftonline.com/', variables(‘TenantID’), ‘/oauth2/token’)
- Method: POST
- Headers: A single header value should be supplied, with the following key/value pair:
- Content-Type: application/x-www-form-urlencoded
- Body: This should contain the value from the AuthRequestBody variable specified earlier, meaning the formula for this should resemble the following:
- @variables(‘AuthRequestBody’)
The screenshot / JSON definitions below should indicate whether these have been added correctly or not:

{
	"name": "GetD365AccessToken",
	"type": "WebActivity",
	"policy": {
		"timeout": "7.00:00:00",
		"retry": 0,
		"retryIntervalInSeconds": 30,
		"secureOutput": false,
		"secureInput": false
	},
	"typeProperties": {
		"url": {
			"value": "@concat('https://login.microsoftonline.com/', variables('TenantID'), '/oauth2/token')",
			"type": "Expression"
		},
		"method": "POST",
		"headers": {
			"Content-Type": "application/x-www-form-urlencoded"
		},
		"body": {
			"value": "@variables('AuthRequestBody')",
			"type": "Expression"
		},
		"linkedServices": [],
		"datasets": []
	}
}
Making the Request
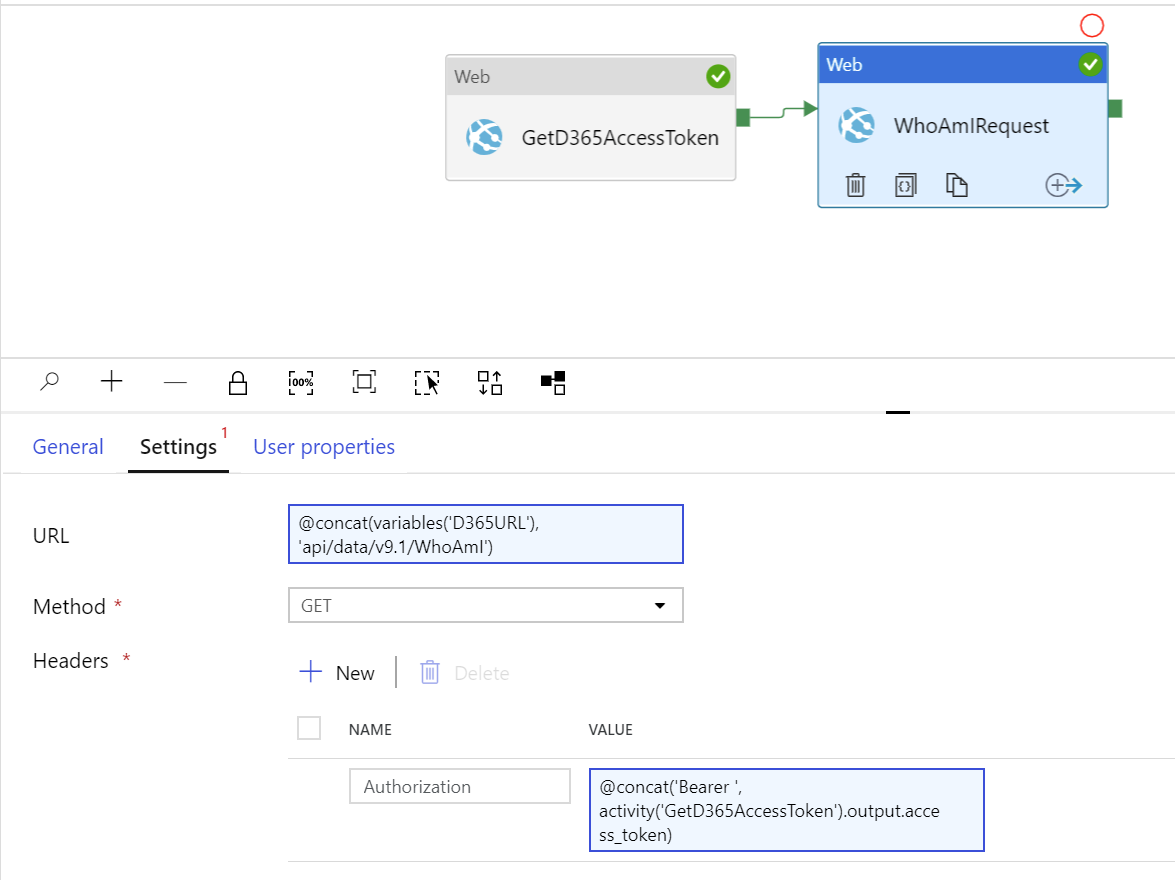
With the ability to generate and now pass through an access token, we have everything we need to build out a second, Web activity to perform an example request. In this situation, we will perform a simple WhoAmIRequest to return the details of the user accessing the Web API; which, in this case, would be the ADF Service Account created earlier. Create a new activity of this type, drag the green arrow from the previously created activity to the new one and then configure the new Web activity with the following properties:
- URL: This needs to contain a concatenated version of the URL variable supplied earlier, alongside the appropriate URL path to perform the WhoAmIRequest. Again, you can use the following expression to achieve this:
- @concat(variables(‘D365URL’), ‘api/data/v9.1/WhoAmI’)
- Method: GET
- Headers: Because ADF does not support access token authorisation as part of the available list of authentication options, we must instead pass the access token as a Header value. Configure a single header, with the following key/value pair, for this activity:
- Authorization: @concat(‘Bearer ‘, activity(‘GetD365AccessToken’).output.access_token)
The settings screen and JSON definition for your pipeline should reflect the below if done correctly:
{
    "name": "WhoAmIRequest",
    "type": "WebActivity",
    "dependsOn": [
        {
            "activity": "GetD365AccessToken",
            "dependencyConditions": [
                "Succeeded"
            ]
        }
    ],
    "policy": {
        "timeout": "7.00:00:00",
        "retry": 0,
        "retryIntervalInSeconds": 30,
        "secureOutput": false,
        "secureInput": false
    },
    "userProperties": [],
    "typeProperties": {
        "url": {
            "value": "@concat(variables('D365URL'), 'api/data/v9.1/WhoAmI')",
            "type": "Expression"
        },
        "method": "GET",
        "headers": {
            "Authorization": {
                "value": "@concat('Bearer ', activity('GetD365AccessToken').output.access_token)",
                "type": "Expression"
            }
        },
        "linkedServices": [],
        "datasets": []
    }
}
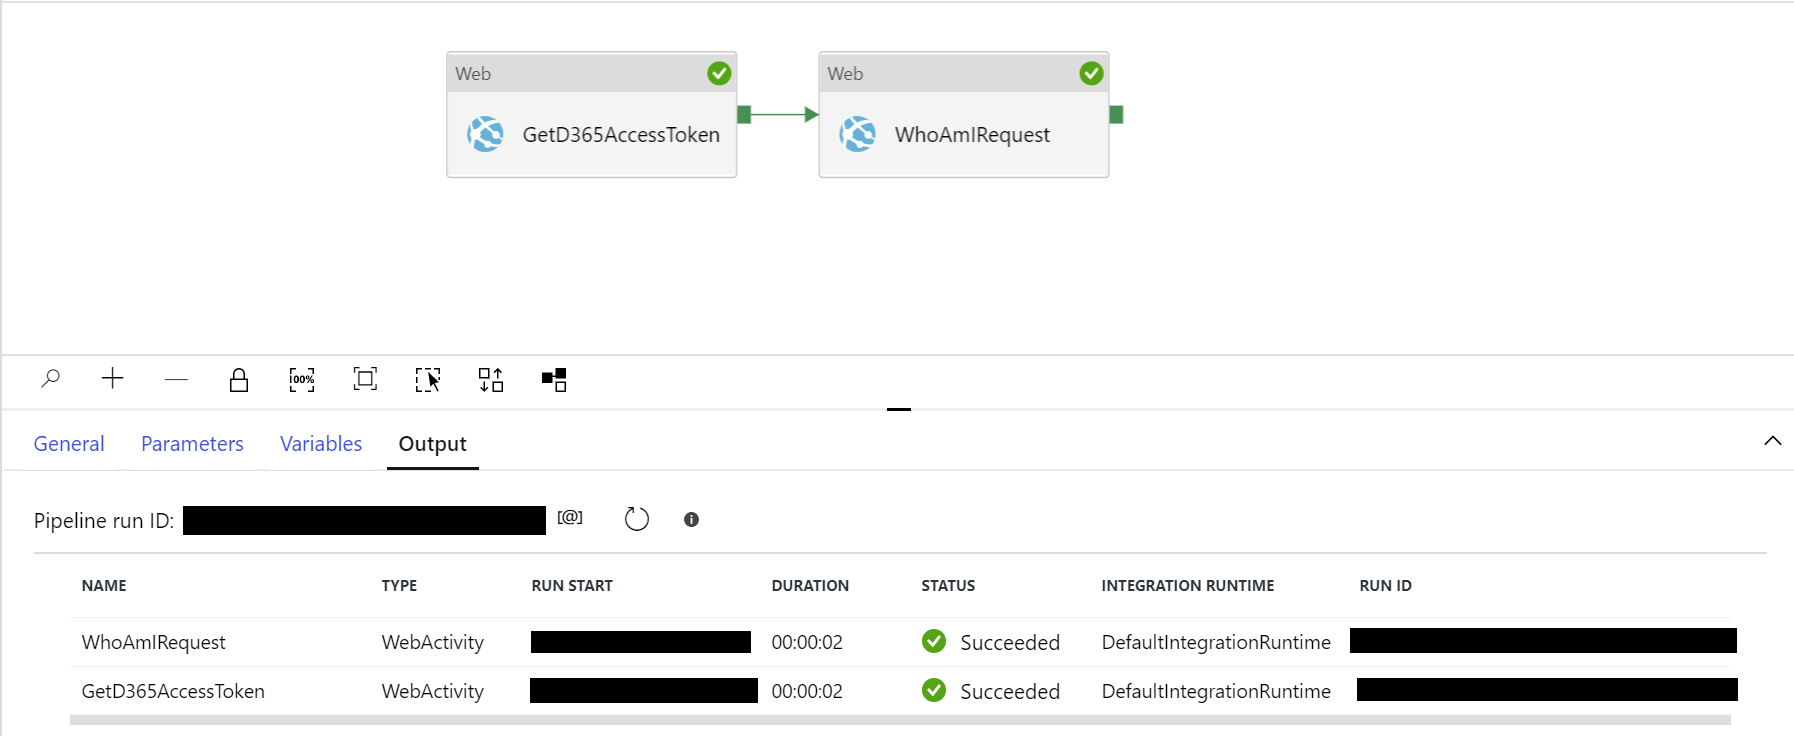
Seeing it all in action
With everything configured, you can now run the Debug command and verify that each activity completes and, most importantly, we get the details back from the WhoAmIRequest:
{
	"@odata.context": "https://mycrm.crm11.dynamics.com/api/data/v9.1/$metadata#Microsoft.Dynamics.CRM.WhoAmIResponse",
	"BusinessUnitId": "9941c9c6-f71e-ea11-a812-00224801bc51",
	"UserId": "fa36d220-e748-ea11-a812-000d3a0bad17",
	"OrganizationId": "4827d81f-172e-4d9d-b9b2-6db4e7c12490",
	"ADFWebActivityResponseHeaders": {
		...
	},
	"effectiveIntegrationRuntime": "DefaultIntegrationRuntime (UK South)",
	"executionDuration": 0,
	"durationInQueue": {
		"integrationRuntimeQueue": 1
	},
	"billingReference": {
		"activityType": "ExternalActivity",
		"billableDuration": {
			"Managed": 0.016666666666666668
		}
	}
}
The full JSON definition for the entire, working version of the pipeline is below:
{
    "name": "D365WebAPITest",
    "properties": {
        "activities": [
            {
                "name": "GetD365AccessToken",
                "type": "WebActivity",
                "dependsOn": [],
                "policy": {
                    "timeout": "7.00:00:00",
                    "retry": 0,
                    "retryIntervalInSeconds": 30,
                    "secureOutput": false,
                    "secureInput": false
                },
                "userProperties": [],
                "typeProperties": {
                    "url": {
                        "value": "@concat('https://login.microsoftonline.com/', variables('TenantID'), '/oauth2/token')",
                        "type": "Expression"
                    },
                    "method": "POST",
                    "headers": {
                        "Content-Type": "application/x-www-form-urlencoded"
                    },
                    "body": {
                        "value": "@variables('AuthRequestBody')",
                        "type": "Expression"
                    }
                }
            },
            {
                "name": "WhoAmIRequest",
                "type": "WebActivity",
                "dependsOn": [
                    {
                        "activity": "GetD365AccessToken",
                        "dependencyConditions": [
                            "Succeeded"
                        ]
                    }
                ],
                "policy": {
                    "timeout": "7.00:00:00",
                    "retry": 0,
                    "retryIntervalInSeconds": 30,
                    "secureOutput": false,
                    "secureInput": false
                },
                "userProperties": [],
                "typeProperties": {
                    "url": {
                        "value": "@concat(variables('D365URL'), 'api/data/v9.1/WhoAmI')",
                        "type": "Expression"
                    },
                    "method": "GET",
                    "headers": {
                        "Authorization": {
                            "value": "@concat('Bearer ', activity('GetD365AccessToken').output.access_token)",
                            "type": "Expression"
                        }
                    },
                    "body": ""
                }
            }
        ],
        "variables": {
            "TenantID": {
                "type": "String",
                "defaultValue": "a113d749-5571-47f4-9441-ad04a8ccbd08"
            },
            "AuthRequestBody": {
                "type": "String",
                "defaultValue": "client_id=8366439c-a94d-4a67-962c-0a9758405675&grant_type=client_credentials&redirect_uri=https%3A%2F%2Fadf.azure.com%2F&resource=https%3A%2F%2Fmycrm.crm11.dynamics.com%2F&client_secret=mysecretvalue"
            },
            "D365URL": {
                "type": "String",
                "defaultValue": "https://mycrm.crm11.dynamics.com/"
            }
        },
        "annotations": []
    },
    "type": "Microsoft.DataFactory/factories/pipelines"
}
Security
It is worth highlighting that aspects of the outlined solution involve the storing of secret values in plain text, which could present a security concern, depending on your requirements and the privileges granted within Dynamics 365 / CDS. In its current form, the configuration outlined in this post is suitable only for non-production development or for testing purposes only; therefore, use it at your own risk. To harden it further, consider implementing an Azure Key Vault resource, that you can then use to retrieve and securely store values within a variable each time the pipeline is run. Regardless of how you store your secret value, you should appropriately scope any privileges granted to the application user in Dynamics 365 / CDS; do not, for example, grant this account System Administrator privileges.
With the full ability to interact with the Dynamics 365 / Common Data Service Web API, it becomes possible to extend your Azure Data Factory solution to perform a variety of operations not supported by default. However, be sure to take care and ensure you implement appropriate security hardening before deploying it out into any production environments.