Although CRM Online/Dynamics 365 for Enterprise (D365E) does provide a plethora of different tools aimed at satisfying reporting requirements for users of the application, you are restricted in how data can be queried within the application. For example, you cannot just connect straight up to the applications SQL database and start writing stored procedures that perform complex data transformations or joins. Traditionally, to achieve this, you would need to look at one of the several tools in the marketplace that enable you to export your data out into a format that best pleases you; or even take the plunge and get a developer to write your own application that satisfies your integration requirements.
With the recent D365E release and in-line with Microsoft’s longstanding approach to how they approach customer data within their applications (i.e. “It’s yours! So just do what you want with it!), the parallel introduction of the Data Export Service last year further consolidates this approach and adds an arguably game-changing tool to the products arsenal. By using the service, relatively straightforward integration requirements can be satisfied in a pinch and a lot of the headache involved in setting up a backup of your organisation’s databases/LOB reporting application can be eliminated. Perhaps the most surprising and crucial aspect of all of this is that using this tool is not going to break the bank too much either.
In this week’s blog post, I’m going to take a closer look at just what the Data Export Service is, the setup involved and the overall experience of using the service from end-to-end.
What is the Data Export Service?
The Data Export Service is a new, free*, add-on for your CRM/D365E subscription, designed to accomplish basic integration requirements. Microsoft perhaps provides the best summary of what the tool is and what it can achieve via TechNet :
The Data Export Service intelligently synchronizes the entire Dynamics 365 data initially and thereafter synchronizes on a continuous basis as changes occur (delta changes) in the Microsoft Dynamics 365 (online) system. This helps enable several analytics and reporting scenarios on top of Dynamics 365 data with Azure data and analytics services and opens up new possibilities for customers and partners to build custom solutions.
The tool is compatible with versions 8.0, 8.1 and 8.2 of the application, which corresponds the following releases of CRM Online/D365E:
- Dynamics CRM Online 2016
- Dynamics CRM Online 2016 Update 1
- Dynamics 365 December Update
*You will still need to pay for all required services in Azure, but the add-on itself is free to download.
The Installation Process
Getting everything configured for the Data Export Service can prove to be the most challenging - and potentially alienating - part of the entire process. For this, you will need the following at your disposal:
- An active Azure Subscription.
- An Azure SQL Server configured with a single database or an Azure VM running SQL Server. Microsoft recommends a Premium P1 database or better if you are using an Azure SQL database, but I have been able to get the service working without any issue on S0 tier databases. This is an important point to make, given the cost difference per month can amount to hundreds of £’s.
- An Azure Key Vault. This is what will securely store the credentials for your DB.
- PowerShell and access to the Azure Resource Manager (AzureRM) Cmdlets. Powershell can be installed as an OS feature on Windows based platforms, and can now be downloaded onto OS X/Linux as well. PowerShell is required to create an Azure Key Vault, although you can also use it to create your Azure SQL Server instance/Windows VM with SQL Server.
It is therefore recommended that you have at least some experience in how to use Azure - such as creating Resource Groups, deploying individual resources, how the interface works etc. - before you start setting up the Data Export Service. Failing this, you will have to kindly ask your nearest Azure whizz for assistance 🙂 Fortunately, if you know what you’re doing, you can get all of the above setup very quickly; in some cases, less than 10 minutes if you opt to script out the entire deployment via PowerShell.
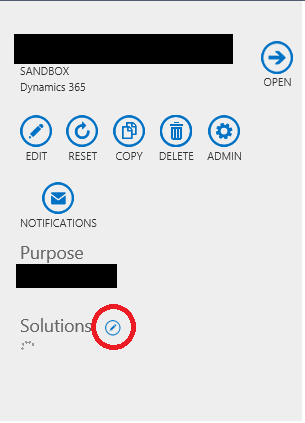
For your setup with D365E, all is required is the installation of the approved solution via the Dynamics 365 Administration Centre. Highlight the instance that you wish to deploy to and click on the pen icon next to Solutions:
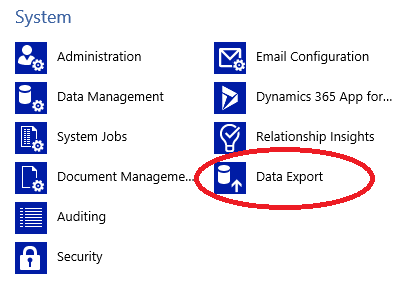
Then click on the Solution with the name Data Export Service for Dynamics 365 and click the Install button. The installation process will take a couple of minutes, so keep refreshing the screen until the Status is updated to Installed. Then, within the Settings area of the application, you can access the service via the Data Export icon:
Because the Data Export Service is required to automatically sign into an external provider, you may also need to verify that your Web Browser pop-up settings/firewall is configured to allow the https://discovery.crmreplication.azure.net/ URL. Otherwise, you are likely to encounter a blank screen when attempting to access the Data Export Service for the first time. You will know everything is working correctly when you are greeted with a screen similar to the below:
Setting up an Export Profile
After accepting the disclaimer and clicking on the New icon, you will be greeted with a wizard-like form, enabling you to specify the following:
- Mandatory settings required, such as the Export Profile Name and the URL to your Key Vault credentials.
- Optional settings, such as which database schema to use, any object prefix that you would like to use, retry settings and whether you want to log when records are deleted.
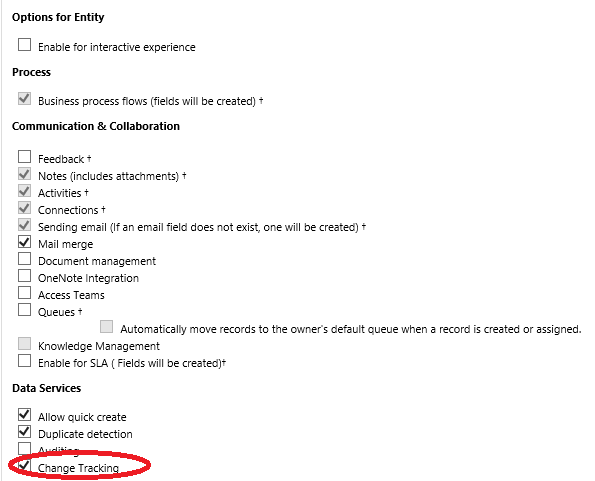
- The Entities you wish to use with the Export Service. Note that, although most system entities will be pre-enabled to use this service, you will likely need to go into Customizations and enable any additional entities you wish to utilise with the service via the Change Tracking option:
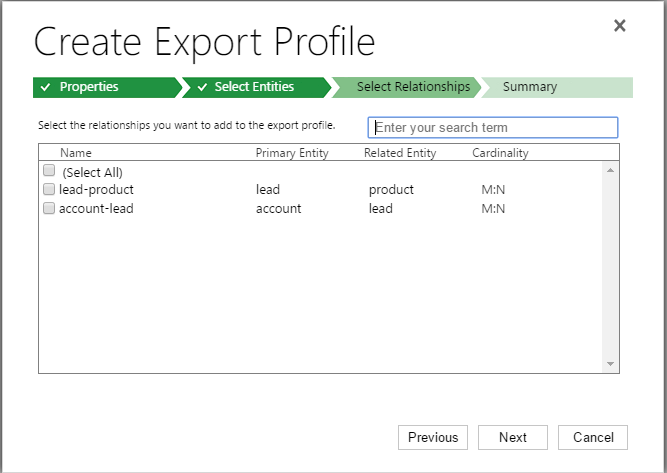
- Any Relationships that you want to include as part of the sync: To clarify, this is basically asking if you wish to include any default many-to-many (N:N) intersect tables as part of your export profile. The list of available options for this will depend on which entities you have chosen to sync. For example, if you select the Account, Lead and Product entities, then the following intersect tables will be available for synchronisation:
Once you have configured your profile and saved it, the service will then attempt to start the import process.
The Syncing Experience A.K.A Why Delta Syncing is Awesome
When the service first starts to sync, one thing to point out is that it may initially return a result of Partial Success and show that it has failed for multiple entities. In most cases, this will be due to the fact that certain entities dependent records have not been synced across (for example, any Opportunity record that references the Account name Test Company ABC Ltd. will not sync until this Account record has been exported successfully). So rather than attempting to interrogate the error logs straightaway, I would suggest holding off a while. As you may also expect, the first sync will take some time to complete, depending on the number of records involved. My experience, however, suggests it is somewhat quick - for example, just under 1 million records takes around 3 hours to sync. I anticipate that the fact that the service is essentially an Azure to Azure export no doubt helps in ensuring a smooth data transit.
Following on from the above, syncs will then take place as and when entity data is modified within the application. The delay between this appears to be very small indeed - often tens of minutes, if not minutes itself. This, therefore, makes the Data Export Service an excellent candidate for a backup/primary reporting database to satisfy any requirements that cannot be achieved via FetchXML alone.
One small bug I have observed is with how the application deals with the listmember intersect entity. You may get an errors thrown back that indicate records failed to sync across successfully, which is not the case upon closer inspection. Hopefully, this is something that may get ironed out and is due to the rather strange way that the listmember entity appears to behave when interacting with it via the SDK.
Conclusions or Wot I Think
For a free add-on service, I have been incredibly impressed by the Data Export Service and what it can do. For those who have previously had to fork out big bucks for services such as Scribe Online or KingswaySoft in the past to achieve very basic replication/reporting requirements within CRM/D365E, the Data Export Service offers an inexpensive way of replacing these services. That’s not to say that the service should be your first destination if your integration requirements are complex - for example, integrating Dynamics 365 with SAP/Oracle ERP systems. In these cases, the names mentioned above will no doubt be the best services to look at to achieve your requirements in a simplistic way. I also have a few concerns that the setup involved as part of the Data Export Service could be a barrier towards its adoption. As mentioned above, experience with Azure is a mandatory requirement to even begin contemplating getting setup with the tool. And your organisation may also need to reconcile itself with utilising Azure SQL databases or SQL Server instances on Azure VM’s. Hopefully, as time goes on, we may start to see the setup process simplified - so, for example, seeing the Export Profile Wizard actually go off and create all the required resources in Azure by simply entering your Azure login credentials.
The D365E release has brought a lot of great new functionality and features to the table, that has been oft requested and adds real benefit to organisations who already or plan to use the application in the future. The Data Export Service is perhaps one of the great underdog features that D365E brings to the table, and is one that you should definitely consider using if you want a relatively smooth sailing data export experience.


