
Recently, as our Gold Partner consultancy practice has gone live with enforcing security default policies on Azure Active Directory (AAD), we’ve had to grapple with some interesting “gotchas” that arose. Therefore, I thought it might be useful to do a post where I discuss and highlight some of the issues you might face when you enable security defaults for the first time on your tenant.
So, first of all, what are they?
With the rise of phishing attacks, the proliferation of breached lists containing, in some cases, millions of user name/passwords and general concerns that a cloud-first IT strategy naturally brings to the table, security becomes a real challenge. Ideally, organisations wish to ensure that they’re enforcing a “basic” set of options for each cloud identity, to reduce the risk that any attack may pose. Typically, the steps involved here would be distinct and laborious - enable and deploy multi-factor authentication (MFA) here, run some scripts to allow a secure mode of authentication over there etc. In short, trying to do the right thing becomes more of a chore and, as expected, is something that never gets addressed adequately.
That’s why Microsoft has introduced security defaults, a simple option that, once enabled on your AAD tenant, does the following:
- Enforces MFA for every user account on the tenant.
- Blocks users from using legacy authentication options when accessing Exchange Online, via older versions of Microsoft Outlook or using protocols such as POP3/IMAP.
- Requires that all actions targeting administrative API’s in Office 365 and Azure demand an additional MFA prompt
If you are an end-user of Microsoft products, there’s a good chance you wouldn’t have heard of them before, mainly if you are a new Microsoft customer. If you created your Office 365 / AAD tenant after October 2019, then these policies are already enabled by default. However, if you are a Microsoft Partner transacting within the Cloud Solutions Provider (CSP) programme, then you’ve probably already been told to apply these already. As is rightly the case, CSP partners will have full administrative access to their customer tenants so that they can manage services on Microsoft’s behalf. It’s, therefore, only right and fair that partners take necessary steps to protect customer data and prevent any reputational damage to Microsoft.
Deployment Teething Issues
Typically with any IT change, regardless of how innocuous it may seem, it’s always essential to test this in a separate environment before potentially disrupting any colleagues or partners across the business. In perhaps one of the more cavalier moments in my IT career, I enabled the policy on our tenant and assumed there would be no further issues…how wrong was I! In our case, we had to contend with two problems:
- MFA was not already enabled across the tenant, meaning that users immediately received prompts to set it up when logging into Office 365.
- All Outlook 2016 Desktop clients broke, prompting users to enter a password via a Basic authentication prompt; Outlook would reject this each time. Users were, therefore, unable to send/receive email messages.
As such, we had to look at quickly resolving both issues, to ensure colleagues could continue with their work unabated.
The Easy Bit: Enabling MFA
Anyone who has spent time managing Office 365 should be reasonably comfortable with this process and, if not, there are well-documented steps available to guide you through the process - both from an end-user perspective and for an administrator enabling it for the first time. Where possible, I recommend using the Authenticator app, available on Android and iOS - the main benefit of it being that it supports other MFA providers as well, such as Twitter or GitHub. Ensure that every user on your tenant has completed this step first before enabling security defaults for the first time.
The Tricky Bit: Suppressing Basic Authentication Prompts
This issue was the one that took considerably longer to figure out. We initially tried a few things to resolve this:
- Restarting the computer (this is an IT problem, after all, so you never know 🙂 )
- Removing the existing account details from Windows Authentication.
- Enabling a specific registry key to force Modern Authentication within Outlook 2016.
Finally, the only thing that worked for us was to enable Modern Authentication on our Exchange Online tenant via the following PowerShell script, as outlined in the following Docs article:
Set-OrganizationConfig -OAuth2ClientProfileEnabled $true
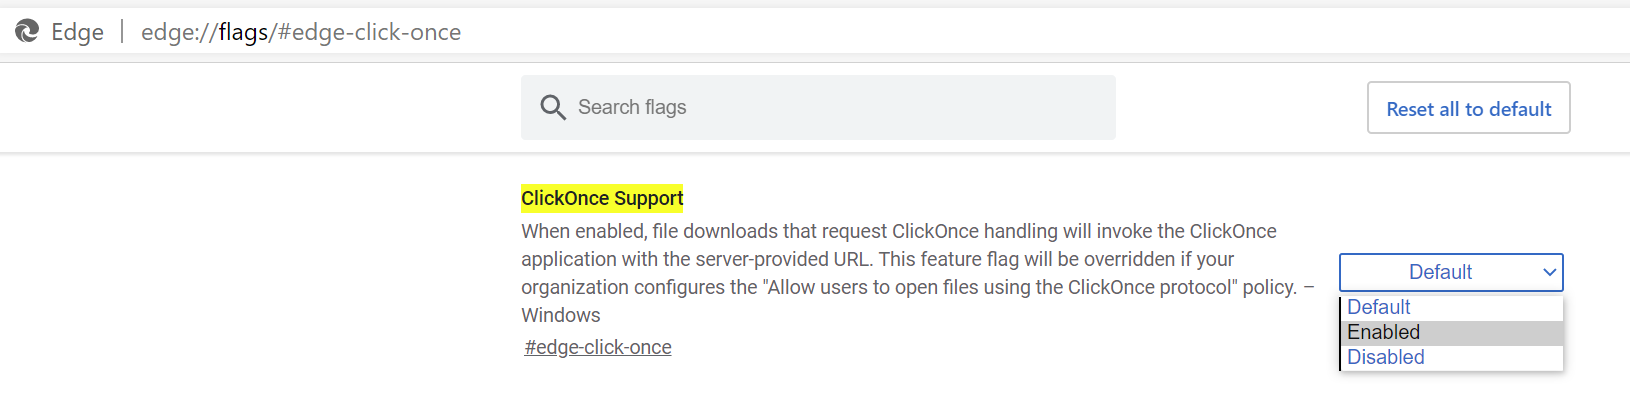
(Note, as part of this, it was necessary to download the Exchange Online Remote PowerShell Module, given that MFA was now in place. If you are also using Edge Chromium, you might need to enable ClickOnce Support by navigating to this link in your browser and setting the correct option: edge://flags/#edge-click-once)
Then, we had to complete the following steps on each machine, as otherwise the Basic Authentication prompts kept appearing:
- Close down Outlook 2016 completely.
- Navigate to the Control Panel -> Mail (Microsoft Outlook 2016).
- Select Data Files.
- Depending on the number of mailboxes involved, you may see one or several in the list that appears. Select each one, press the Open File Location… button, and then take a copy of each .ost file. Rename the copied file to append a _BACKUP to the end of its file name.
- Click Close on the Account Settings window.
- Select Show Profiles.
- There may be multiple profiles defined in the list. Select each one and press the Remove button. When a warning box appears, press Yes to dismiss it.
- Press OK to close the window.
- Open Outlook 2016 again. When prompted, enter the username for each email account that needs adding back on. You should now receive a “modern” authentication prompt (i.e. the Office 365 login window) as opposed to the Basic prompt. Once authentication completes successfully, your email account should download again without further issue.
- Keep or remove the backup files taken in step 4, depending on your preference.
When You Lose, Don’t Lose the Lesson
The above quote from the Dalai Lama seems particularly apt for this situation. The critical lesson here and - one which I should not have forgotten - is to always test your changes before applying them to any core business system. This simple step would have avoided much head-scratching and disruption to people in the process. Hopefully, if you’re in the same boat and considering enabling this policy on your tenant, this post gives you a flavour of what to prepare for. That way, you can ensure that your change request goes a hell of a lot better than mine… 😳🤣