
Welcome to the seventh post in my series, focused on providing a set of revision notes for the MB-400: Microsoft Power Apps + Dynamics 365 Developer exam. After a small hiatus to the series, it’s great to resume things again this week. Last time around, we saw how to leverage Business Rules within a model-driven app, as part of focusing on the following exam assessment area:
Configure Microsoft Flow
- configure a Flow
- configure actions to use CDS connectors
- develop complex expressions
Implement processes
- create and configure business process flows
- create and configure business rules
You can class all of the above tools as automation features within Dynamics 365 and the Power Platform, and today’s discussion around Business Process Flows aim to demonstrate how powerful this feature is in achieving this objective. We’ll do this by discussing the various capabilities available within Business Process Flows, and how you can go about using them with ease.
As with all posts in this series, the aim is to provide a broad outline of the core areas to keep in mind when tackling the exam, linked to appropriate resources for more focused study. Your revision should, ideally, involve a high degree of hands-on testing and familiarity in working with the platform if you want to do well in this exam.
Business Process Flows
Overview
In our discussion around model-driven Power Apps, we highlighted that apps of this type are, in effect, data-driven applications. As such, following an approved business process within them become necessary. Achieving this objective ensures you can guide end-users towards the correct outcome for, let’s say, a sales process and guarantee the population of accurate data to progress to the next stage. Consider another scenario involving a case management process; a service desk manager needs to ensure that a case proceeds according to any agreed SLA’s with an end customer and, where appropriate, they must monitor how long a case has resided within a specific stage. Without the ability to comfortably accommodate these scenarios, it becomes incredibly challenging to meet the expectations of the business and end customers.
Business Process Flow’s (or BPF’s) aim to address these concerns, by allowing developers to model out and enforce a business process effectively, which you can then apply at the entity record level within a model-driven app. As part of this, we can tailor many aspects of either an existing or new BPF and, also, integrate the tool alongside other features within the Power Platform. By default, when installing one of the 1st party apps from Microsoft (Sales, Service etc.), several out of the box BPF’s are installed automatically into your system. For example, the screenshot below illustrates a BPF called the Lead to Opportunity Sales Process within the system, which is associated with the Lead entity:
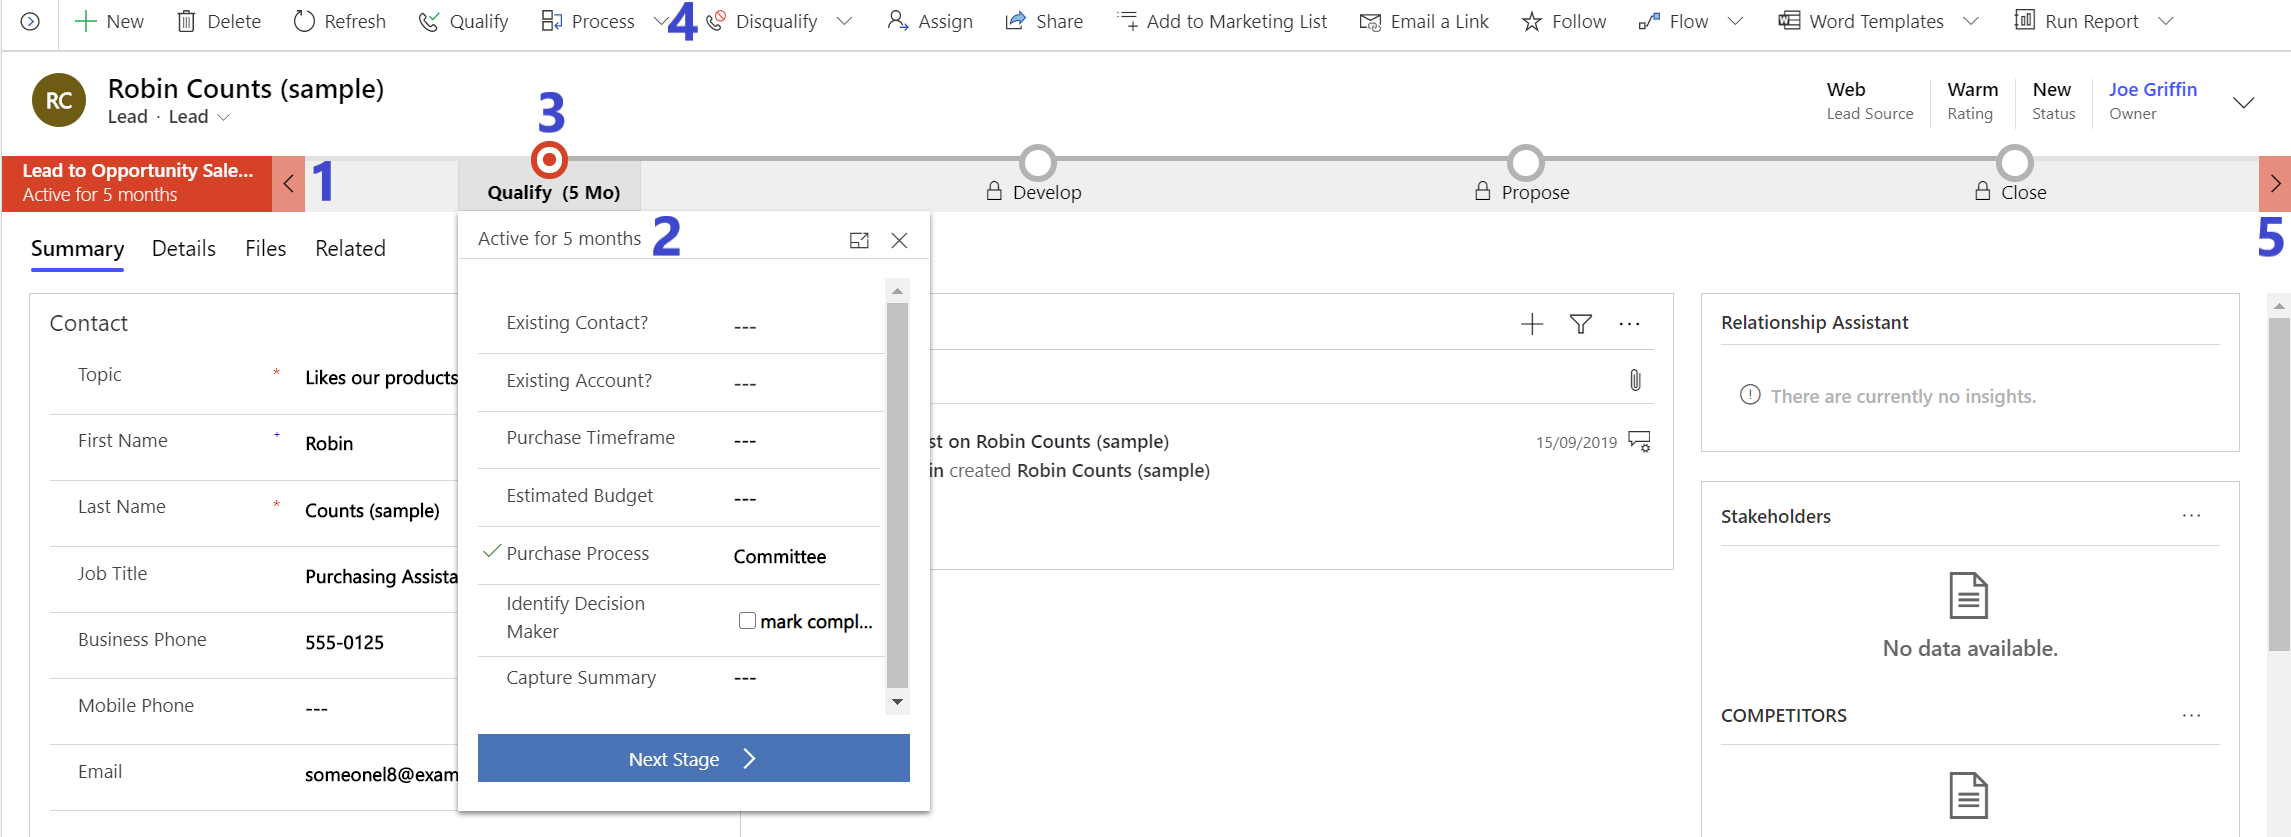
Users have access to the following features when using a BPF, indicated by the numbers above:
- Here, the user can view details about the name of the BPF and also how long the current process has been active for; in this case, for around five months.
- A BPF is structured by stages, which the user can click on to view the further details required to proceed to the next step. In this case, having expanded the Qualify stage, the user is prompted to provide additional information, such as Estimated Budget and details of any existing Contact or Account record. Users can expand any active/inactive stage to review the details required.
- The stage which is coloured is the current, active stage in the process; which, in this case, would be the Qualify stage. We can also see the amount of time the BPF has resided in this particular stage.
- Users have several options underneath the Process dropdown field on the ribbon. You can choose to switch another, available process or even abandon the current BPF entirely. Abandoned BPF’s will be marked clearly within the application, as indicated in the screenshot below:
- The arrows at either end of the BPF allow you to toggle the current, focused stage. Note that they do not move the process to the next step, but will enable you to preview the details needed as part of the next/previous stage.

Some other, useful features regarding BPF’s are worth highlighting at this stage:
- BPF’s can span multiple entities if required. In the example shown earlier, the BPF is designed to “crossover” from the Lead to the Opportunity entity, as you progress through each stage.
- Because BPF’s integrate alongside security roles, it is possible to dictate which process applies for a subset of users within the application.
- Most system entities are enabled for use alongside BPF’s, with some exceptions. Consult the documentation for further details. There are no restrictions on their usage for custom entities.
- BPF’s have some specific limitations, namely:
- An entity can only have ten active BPF’s at any one time. Consider deactivating any BPF’s that are no longer in use, should you hit this limit.
- A BPF is limited to a maximum of 30 stages.
- Although BPF’s have full multi-entity support, you are limited to using a maximum of 5.
All in all, BPF’s are incredibly easy to use and, as we will see next, we can also create them with startling ease too.
Business Process Flow Designer
Similar to Business Rules and the model-driven app designer, we have an interactive editor available to create or modify a BPF, illustrated below:
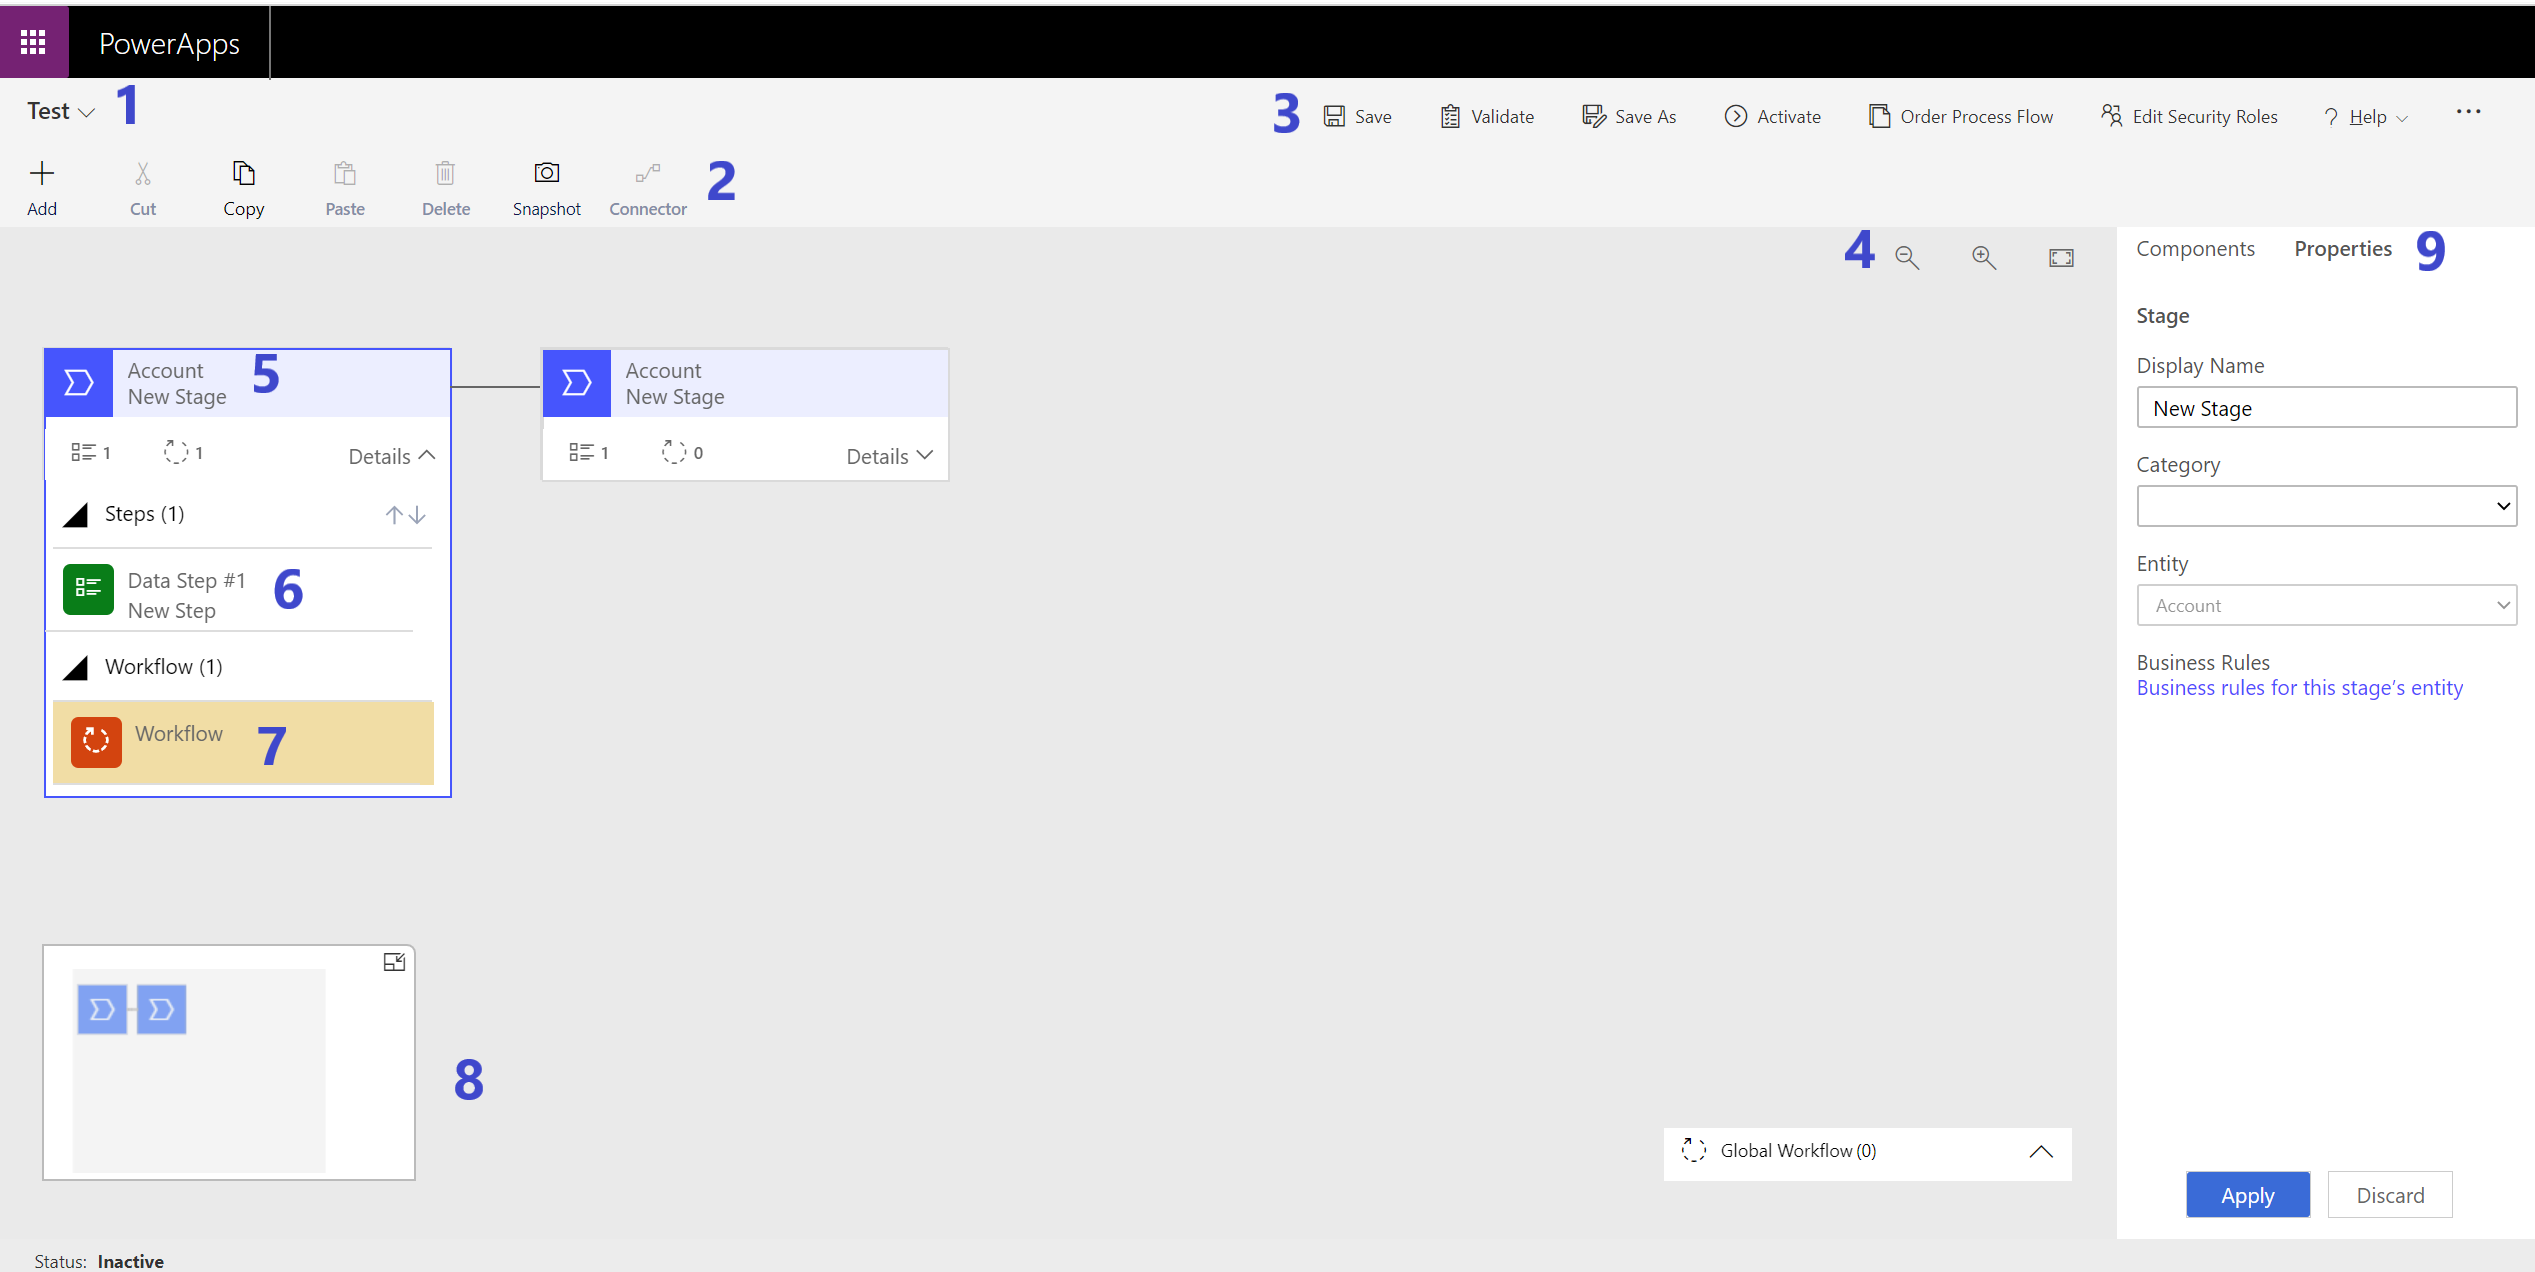
Again, I have numbered each relevant section and provided a description below regarding its purpose:
- Expanding the arrow here will allow you to modify the name and description of the BPF, alongside details regarding some of its fundamental properties (owner, Primary Entity etc.)
- The icons on here let you quickly add on an additional component to your BPF or perform standard operations, such as cut, copy, paste and delete. On these, it is worth highlighting that the familiar keyboard shortcuts for each action will also let you perform it as well. Finally, you can use the Snapshot button to download a .png image file of the BPF, which you can then include as part of any documentation or training materials.
- From here (in order left to right), you can save your BPF, validate its structure, save a new copy of it, activate it, modify its display order for users, grant/deny access to it or access some of the available help articles for Dynamics 365. Expanding the ellipses will also allow you to share an email link for the BPF, show any associated dependencies or view specific properties relating to it.
- These options let you zoom in/out and also adjust the view to fit the canvas of the visual editor.
- As discussed earlier, a BPF can contain several stages, represented like this on the canvas view. By default, a new BPF will always include a single stage. Clicking on it will allow you to modify its name, category and, for the second stage onwards, its associated entity. A stage can contain two subcategories of additional components, the first of which is…
- …the data steps, or fields to be populated. You can add multiple of these to each stage, and you have the ability also to define their order. The fields that are available for selection must exist on the entity associated with the current stage (i.e. it is not possible to reference related entity fields). Finally, you also can define a name for the step, that can differ from the display name of the field. The next type of component that you can add to a stage is…
- …a workflow step. We’ll discuss this component type in further detail shortly.
- Here, you can see a visual representation of your current BPF. You can hide this window by using the button on the top right.
- Finally, the right-hand pane allows you to access the Components toolbox or the Properties for the currently selected component. In this example, because we have the 1st stage selected, the Properties pane surfaces details that we can edit relating to it.
Developers who are familiar with creating Business Rules should have little difficulty starting to build out a BPF for the first time.
Component Overview
We’ve alluded to this topic already, but it is worth discussing in detail the full list of different component types that can be utilised within a BPF, as outlined below:

Clicking or dragging each component will add it into the appropriate area on the canvas designer. Let’s dive in and discuss each one:
- Flow:
- Stage: Requires no further explanation, I think. 🙂
- Condition: With this, you can specify branching rules that will modify how the Process proceeds for the user, based on conditions that you specify. Evaluation of conditions is performed on a similar basis to Business Rules, in that you can select one or multiple fields on the current entity to evaluate, as well as implementing some basic AND/OR evaluation logic. Once a condition is defined, you must then populate details for each subsequent stage, for when the condition evaluates to both true and false. Through the correct use of conditions, you can potentially consolidate several BPF’s into one and, ultimately, achieve the same outcome.
- Composition:
- Data Step: A concept mentioned earlier, data steps are the fields that the user must populate for a given stage.
- Workflow: Via this feature, it is possible to automatically trigger a workflow to execute, either when the stage commences or finishes. This feature could be useful if, for example, you would like to send an email out a sales manager after a user successfully qualifies a Lead. Workflows can only be used with a BPF if they have been activated and configured as on-demand, for the same entity that the current stage is targeting.
- Action Step: Operating on a similar basis to the Workflow component, this allows you to trigger an Action instead.
- Flow Step (Preview): Finally and - again - similar to the previous two-component types, it is also possible to trigger a Power Automate flow as well within a BPF stage. As a feature that is (at the time of writing) still in preview, it is generally not recommended for use within a production environment.
As such, BPF’s can be incredibly powerful when integrated alongside tools such as Workflows or Power Automate flows, allowing you to automate substantial aspects of a business process as a user is working through each appropriate stage. The emphasis here, from a developers standpoint, is to utilise these tools wherever possible and only resort to custom code if you are unable to achieve the business requirement natively within the platform.
Task Flows
Although not explicitly mentioned within the MB-400 exam specification (for reasons that will shortly become clear), it’s worth briefly touching upon the second type of BPF - a mobile task flow. These are created in the same manner as a BPF, except on creation, you specify the option indicated below:
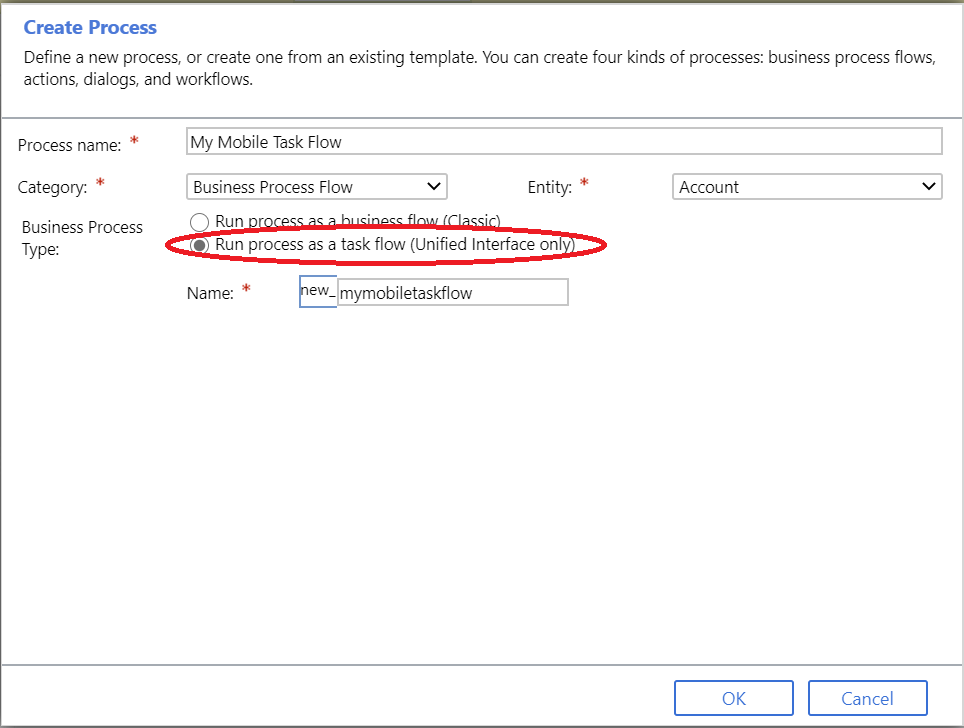
As the name suggests, mobile task flows let you define a process that the user has to follow to completion within the Dynamics 365 mobile application. For example, you could build a Lead capture task flow, that includes all fields required for population by salespeople on a trade event. Traditionally, they provided the only mechanism to include a guided, wizard-type experience within the mobile app.
Mobile task flows are missing from MB-400 specification for a simple reason - they are now deprecated and, as such, will be removed in a future version of the application. To meet the same functionality within the mobile apps, a standard BPF will now provide a fully immersive experience, that can meet the same needs as mobile task flows and more besides.
The Hidden Entity
The final thing to note with all BPF’s is that, upon creation, the system will automatically create a new entity. This entity will have the same name as the BPF in question and, for each active process that users create in the system, the system will create a corresponding record within this entity. The entity has several custom fields that capture a range of useful properties, several of which we can access easily within the application. For example:
- Active Stage (activestageid): The name/details of the current, active stage on the BPF instance.
- Active Stage Started On (activestagestartedon): The date on which a user selected the current, active stage for the BPF instance.
- Completed On (completedon): The date on which a user completed the BPF instance.
- Duration (duration): This field indicates the time between the start and completion date of the BPF instance.
Also, the system will create lookup fields to each appropriate entity record associated with the BPF.
Developers can freely utilise this entity as part of any bespoke solution they develop and also, if required, create additional fields, views etc. with no restrictions. I recommended that you always package up any BPF entity with the same solution where your BPF exists so that you can ensure the successful deployment of all applicable customisations.
Demo: Designing and Interacting with a Business Process Flow
To help familiarise yourself with some of the concepts discussed in this post, take a look at the below video, where I will show you how to create a BPF and interact with it as part of a model-driven app:
We’ve rounded up now our discussion of the functional Dynamics 365 and Power Platform components that you’ll need to have an awareness of for the MB-400 exam. In the next post in the series, we’re going to take a look at our first code-related topic in the series, as we evaluate client-side scripting options, involving JScript, TypeScript and the Web API.