
Welcome to the fifth post in my series, focused on providing a set of revision notes for the MB-400: Microsoft Power Apps + Dynamics 365 Developer exam. We’ve covered a lot of ground in the series so far, finishing up our discussion on model-driven apps and canvas apps over the past fortnight. While these tools are often great at getting your data into the system, they usually are not enough to satisfy a more comprehensive business process. In this scenario, the exam topic area Configure business process automation comes in to play, by covering the essential tools you’ll have to work with to ensure your business system adheres to a well-defined process. This exam area assesses candidates in the following topics:
Configure Microsoft Flow
- configure a Flow
- configure actions to use CDS connectors
- develop complex expressions
Implement processes
- create and configure business process flows
- create and configure business rules
In today’s post, we’ll look at the most powerful automation tool that we now have at our disposal as Power Platform / Dynamics 365 developers - Power Automate.
As with all posts in this series, the aim is to provide a broad outline of the core areas to keep in mind when tackling the exam, linked to appropriate resources for more focused study. Your revision should, ideally, involve a high degree of hands-on testing and familiarity in working with the platform if you want to do well in this exam.
Power Automate
Overview
Previously known as Microsoft Flow, Power Automate is the logical evolution of the traditional workflow experience within Dynamics CRM and - over time - we can anticipate Power Automate slowly replacing this functionality. As well as affording us near-total feature parity with workflows, Power Automate flows provide us with a modern and highly tailorable means to automate a business process, using the capabilities within Azure Logic Apps to power everything. Through the use of a visual editor, developers can build out an entire business process from start to finish. Also, via the implementation of traditional programming flow controls, it is possible to make incredibly diverse systems talk together in ways that you could not have imagined previously. Some of the benefits that Power Automate provide us include:
- Access to well-over 315+ connectors to a variety of different data sources and applications, including SQL Server, Salesforce, Twitter, MailChimp and SendGrid, to name a few.
- The ability to trigger flows based on specific trigger points or schedules.
- Through the implementation of an on-premise data gateway, data sources not exposed for access across the internet become surfaced for use within Power Automate.
- Integrates seamlessly with canvas Power Apps, thereby allowing you to trigger a flow based on a specific action point within a canvas app.
- Robust testing and debugging capabilities.
- Allowing you to implement simple or complex approval workflows.
- Full support for use alongside solutions, letting us quickly deploy Power Automate flows out to multiple environments and incorporate flow design as part of your Application Lifecycle Management (ALM) processes.
- When your solution needs to scale, you can very easily extract your flow and migrate it into Logic Apps, to take advantage of more enterprise-focused features.
Power Automate flows, as mentioned, are designed to fill the gap for workflows. But they can go so much further than that and, often, negate the need to look at implementing a plug-in or a custom workflow activities to achieve more complex integrations. Developers should always explore and attempt to use Power Automate flows wherever possible, before resorting to other solutions. Having full awareness of all the available connectors for Power Automate and also on the products specific limitations, from an execution standpoint, will help you best in making this judgement call.
Creating a Power Automate Flow
The Power Automate portal is your go-to destination for working with Power Automate. Accessible from within the Office 365 portal, within here you can:
- Manage any approvals assigned to you by other users.
- View, manage, edit or delete any flows created by you.
- Manage the various connectors setup for your account or within your organisation.
- Interact and work with the Common Data Service (CDS) database and solutions.
- View and utilise existing flow templates, covering common business scenarios.
- Access and leverage AI Builder capabilities.
From a Power Automate flow creation standpoint, the main focus of your time will be within the visual editor, as indicated below:
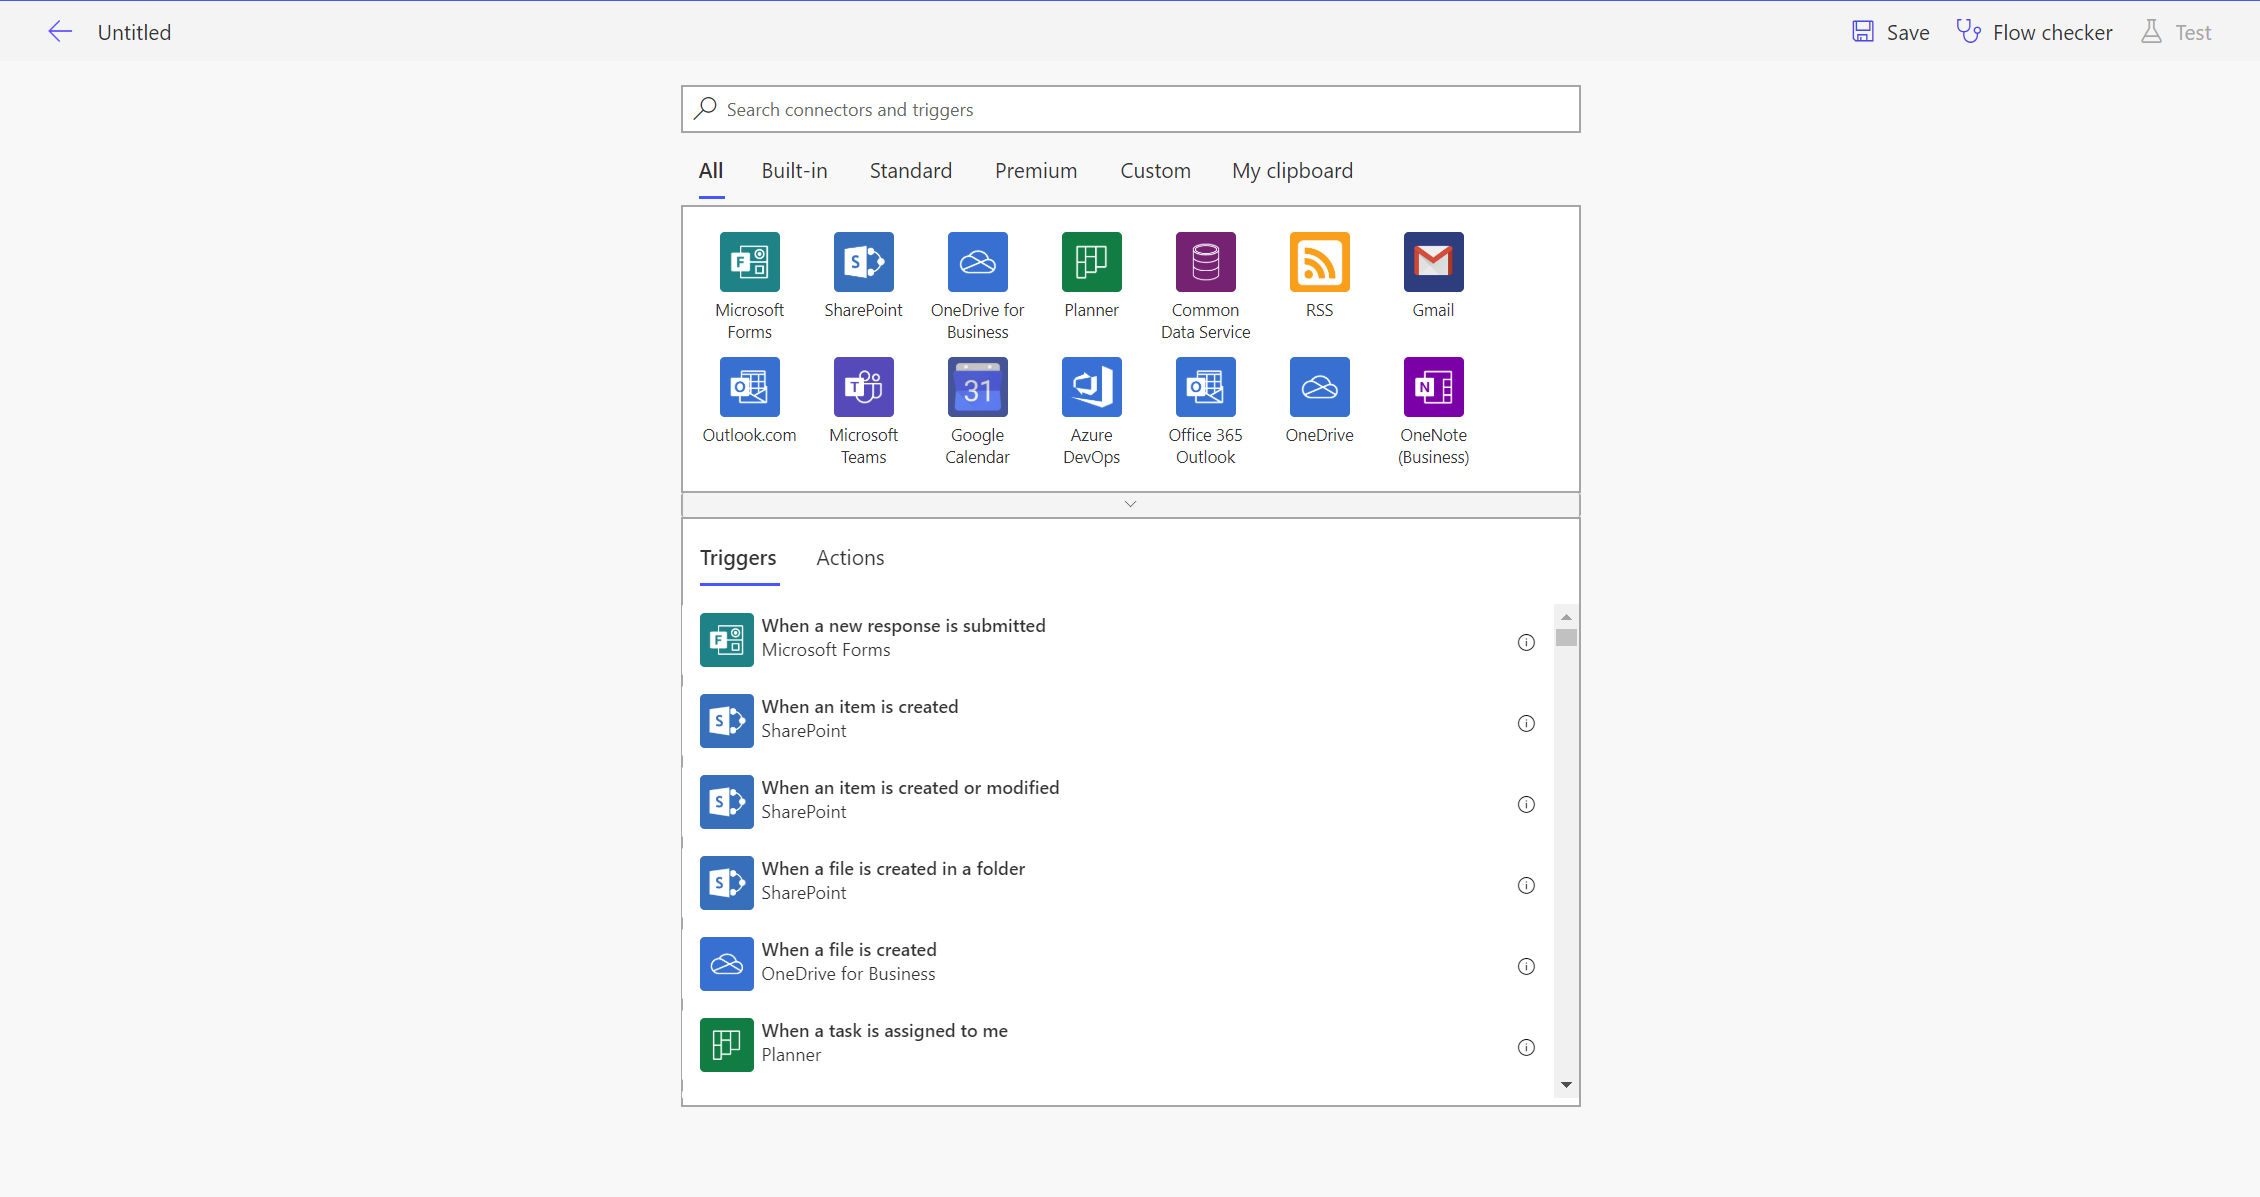
This experience provides a fully immersive mechanism for developing your flows, without needing to worry about installing additional tools onto your machine. After completing and saving your flow for the first time, it will start executing, based on the predefined trigger action chosen for it. You can then do the following with a completed flow:
- Share it to other users within the organisation.
- Submit it as a template to Microsoft, for inclusion within the template gallery.
- Export its definition as a .zip file or a Logic Apps template.
- View analytics relating to it and its execution, e.g. total runs per day, number of errors raised etc. This feature utilises Power BI tiles, providing an intuitive experience when analysing the metrics for your flow.
- Toggle whether your flow is on or off.
- View a list of all previous runs for the flow, including the input/output information for each step.
In short, whether you need to test, diagnose or figure out whether users in your organisations are still using a flow, there are tools here to help you along.
Power Automate flows are built up of various core components, all of which you will need to be familiar with for the exam:
Connectors
These are the fundamental components that make Power Automate such a versatile solution, by giving you the ability to connect up to various services or solutions, with a range of corresponding actions then made available for use. Typically, you will need to authenticate with each service using a valid username or password; once created, it is then stored and available to use across multiple flows, if required. Connections will also be shared out to users automatically whenever you do the same for the flow itself. Consider carefully what impact this may have from a permissions or data protection perspective.
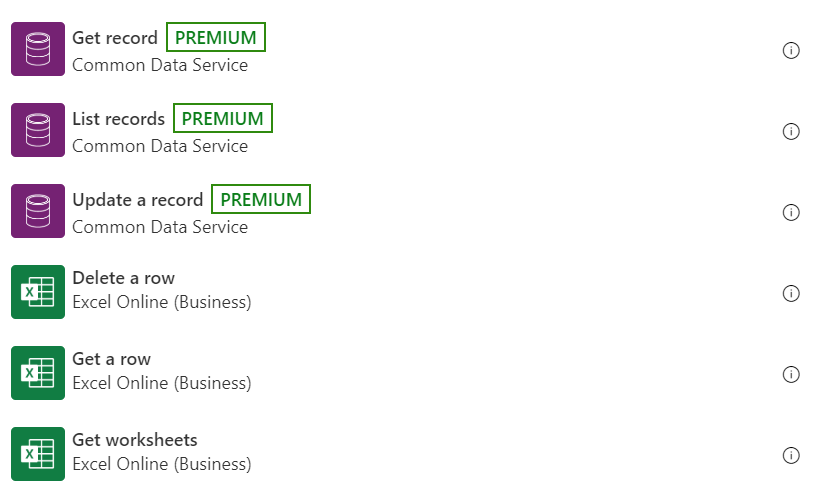
As mentioned earlier, the list of available connectors is vast and is growing all the time. Note also that, similar to Power Apps, Microsoft classifies some connectors as Premium. Connectors of this type will only be available to you if you have been assigned a paid Power Automate license and Microsoft mark these accordingly within the Power Automate portal:
Developers also can build custom connectors to either use within their current tenant or publish for availability to any Power Automate the world over. This topic, which has its specific exam area for MB-400, will be covered in further detail in a future post.
It is worth discussing the CDS connector in further detail at this stage - not only because its a topic for the exam, but also because it may lead to a degree of confusion when you first open Power Automate. The reason for this is that there are two CDS connectors available:
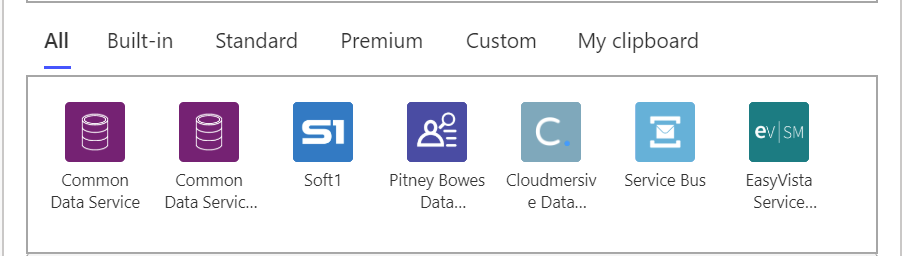
The first of these connectors is a solution-independent connector that has the following triggers/actions defined for it:
This connector allows you to connect to any CDS tenant, regardless of the Office 365 tenant it resides within. This connector is most useful when your flow will always target a single environment, there is no need to manage it formally within a solution, and you only need to perform basic CRUD operations targeting your CDS database.
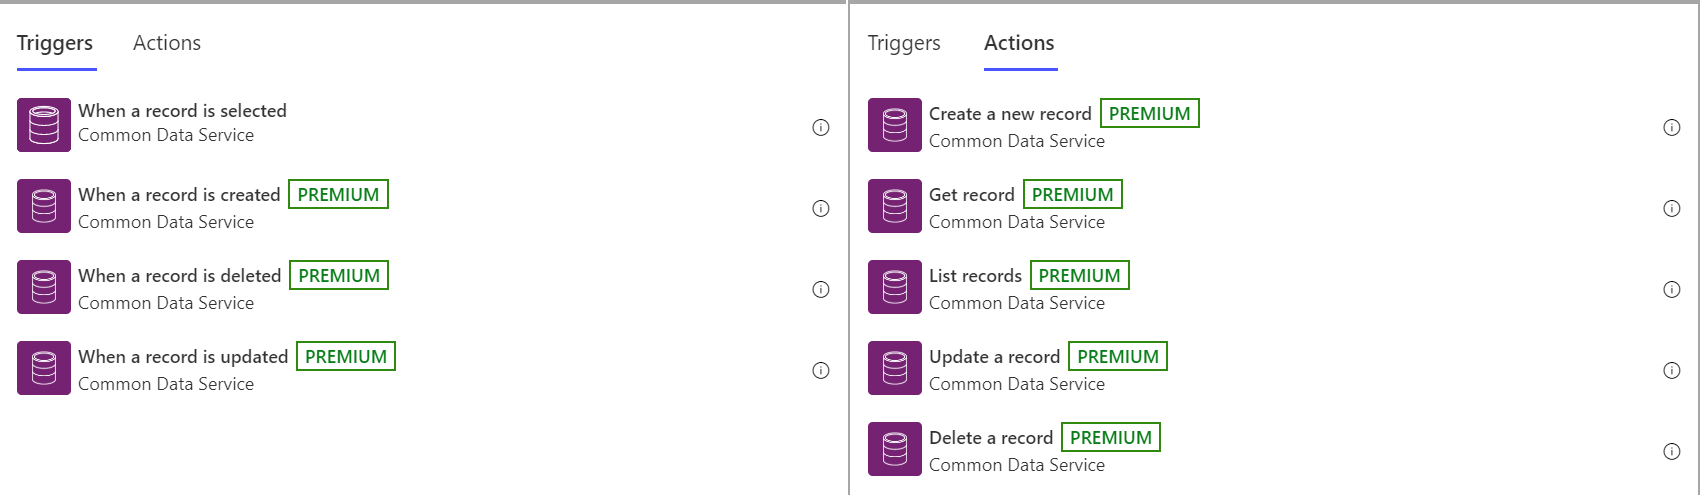
The second connector - titled Common Data Service (current environment) - is the complete opposite of the above, and should be used when you need to include your flow as part of a solution. Doing so will ensure the flow correctly detects the correct CDS environment to target after your solution has been imported successfully into your new environment. As such, there is a far greater list of available actions for this connector, and a single trigger action is provided that covers all potential scenarios within CDS:
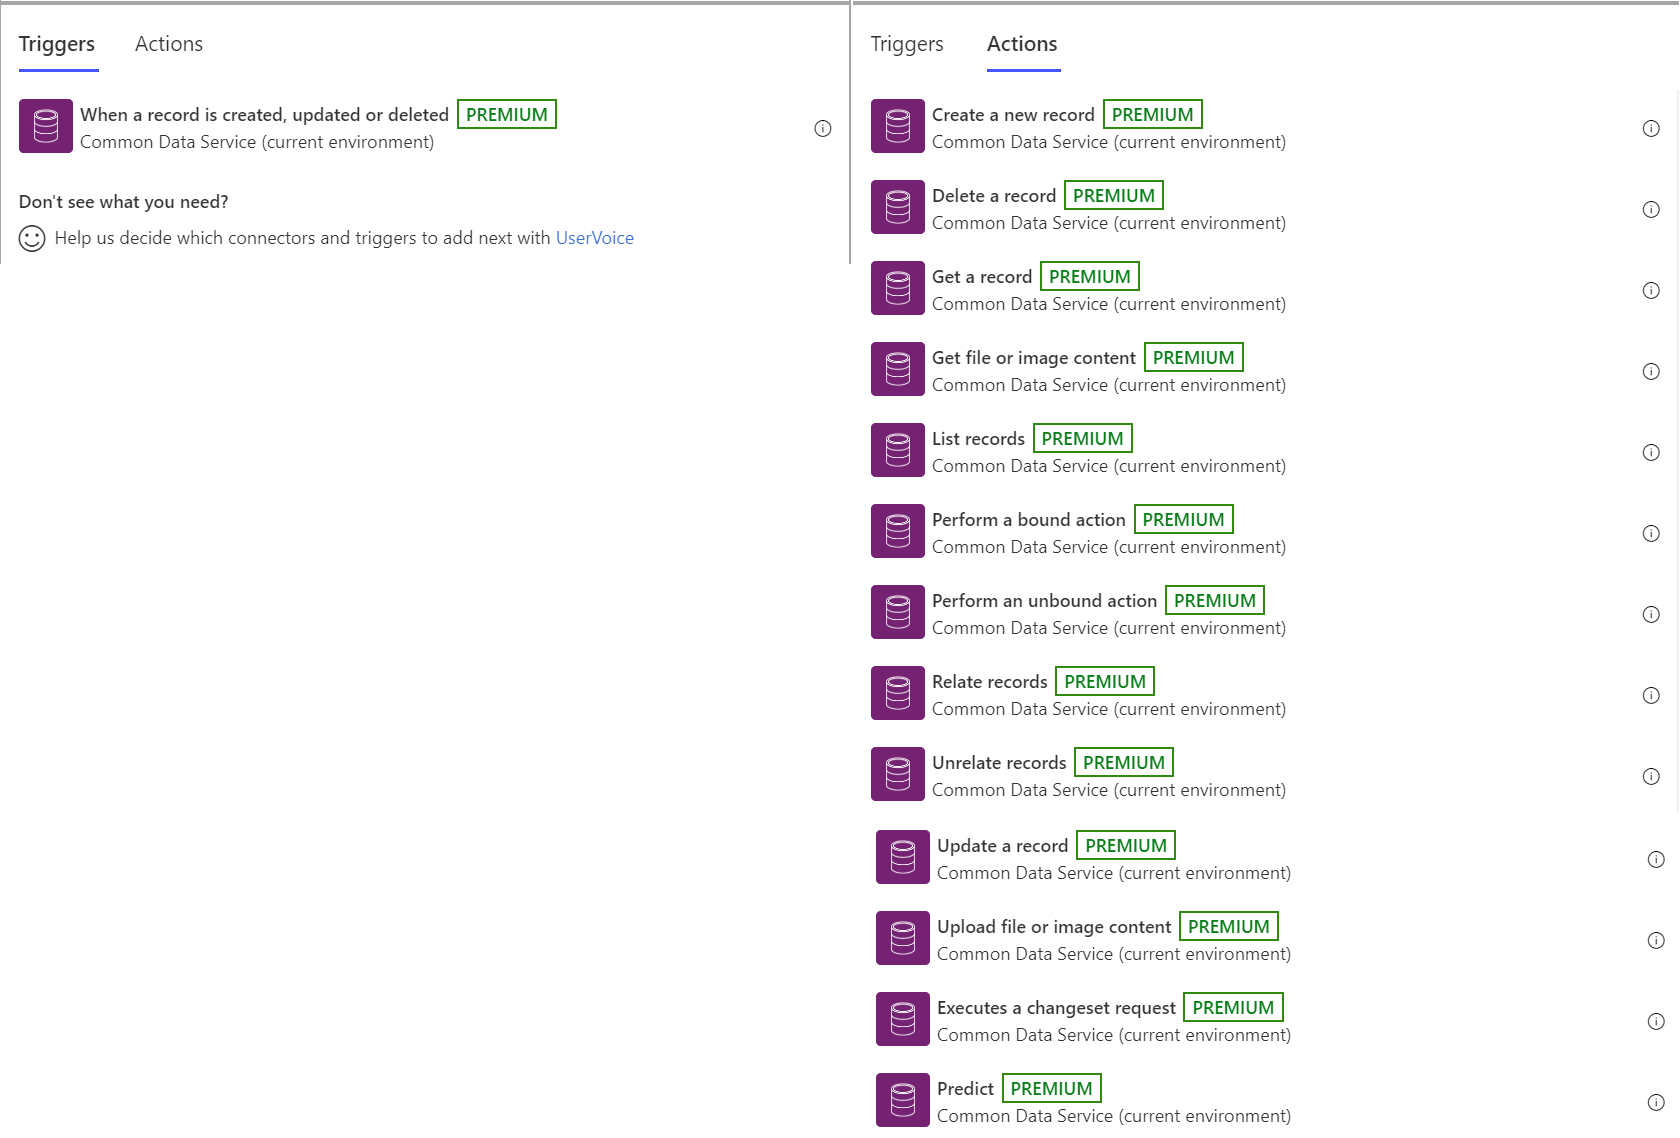
Wherever possible, you should be using the Common Data Service (current environment) connector and managing your flows within a solution. This will significantly simplify the process for rolling flows out into different CDS environments, should the need arise.
For the exam, I would recommend that you read up on the standard and also the current environment connector so that you are familiar with the capabilities within each one.
Triggers
In a nutshell, these are the things that start a Power Automate flow. A flow must always have a single trigger, and there are, broadly, three different types available to us:
- Action: These will typically occur based on an event within an application or system - for example, whenever a user creates a new record. Power Automate flow will poll the data source frequently to detect when this action step occurs and then kick off the flow accordingly. In the screenshot below, we can see an example of the CDS trigger for when a new record has been created:
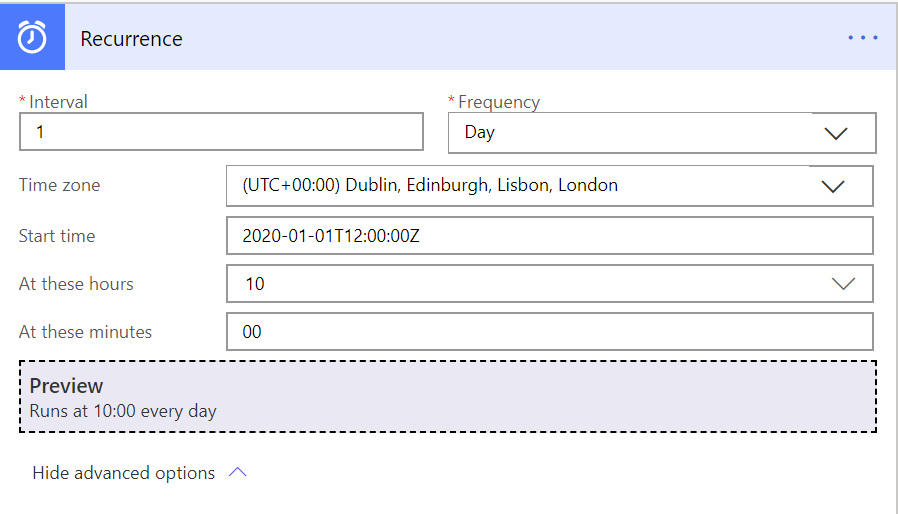
- Schedule: Flows of this type will run based on a pre-defined schedule. We have a high degree of control over the various settings here, including frequency, interval, time zone and start time. The example screenshot below illustrates a schedule that runs every day at 10 AM GMT:
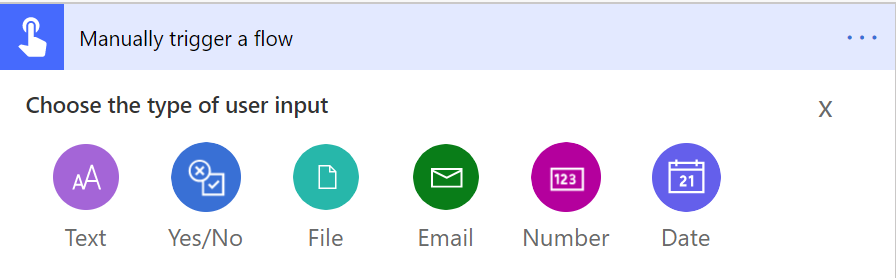
- Manual Trigger: Finally, it is possible only to execute a flow only when you need to. As part of this, it is possible to specify different user input parameters, which can then be further leveraged within the flow to modify its behaviour. The various types of user inputs available are illustrated in the example below:
- You can find out more about how to use this trigger type from the portal or via a mobile app on the Microsoft Docs website.

Actions
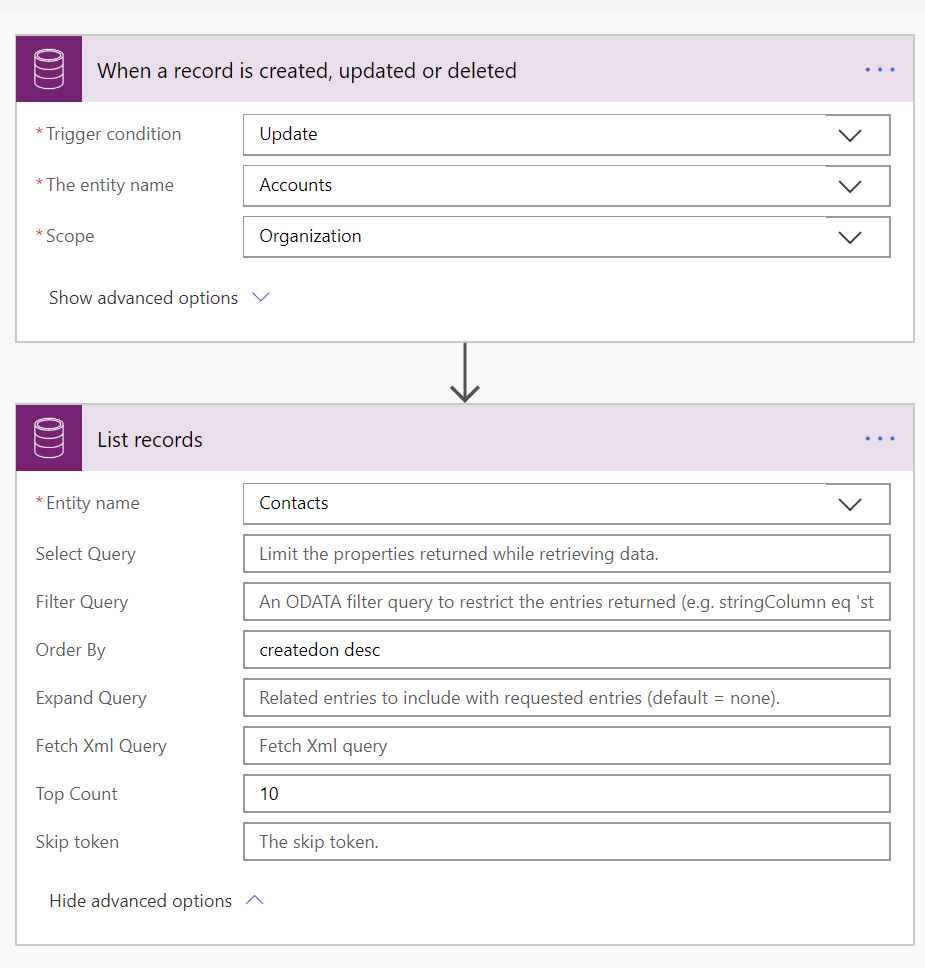
We’ve just discussed the component that starts your flow; actions lead on from this by dictating what your flow does. You must have at least one action in your flow, that leads on from your appropriate triggers. Depending on the connector you use, actions can range from performing simple CRUD type operations to more advanced tasks, such as sending an e-mail, creating a file or laying dormant until an approval is received. In the example below, we can see we have an action that retrieves the top 10 Contacts from the system, ordered by the createdon field in descending order, whenever an Account record is updated:
Control
Although technically an action type, it is worth studying the various control actions available to us, all of which allow us to implement programming-like logic flow into our Power Automate flows:
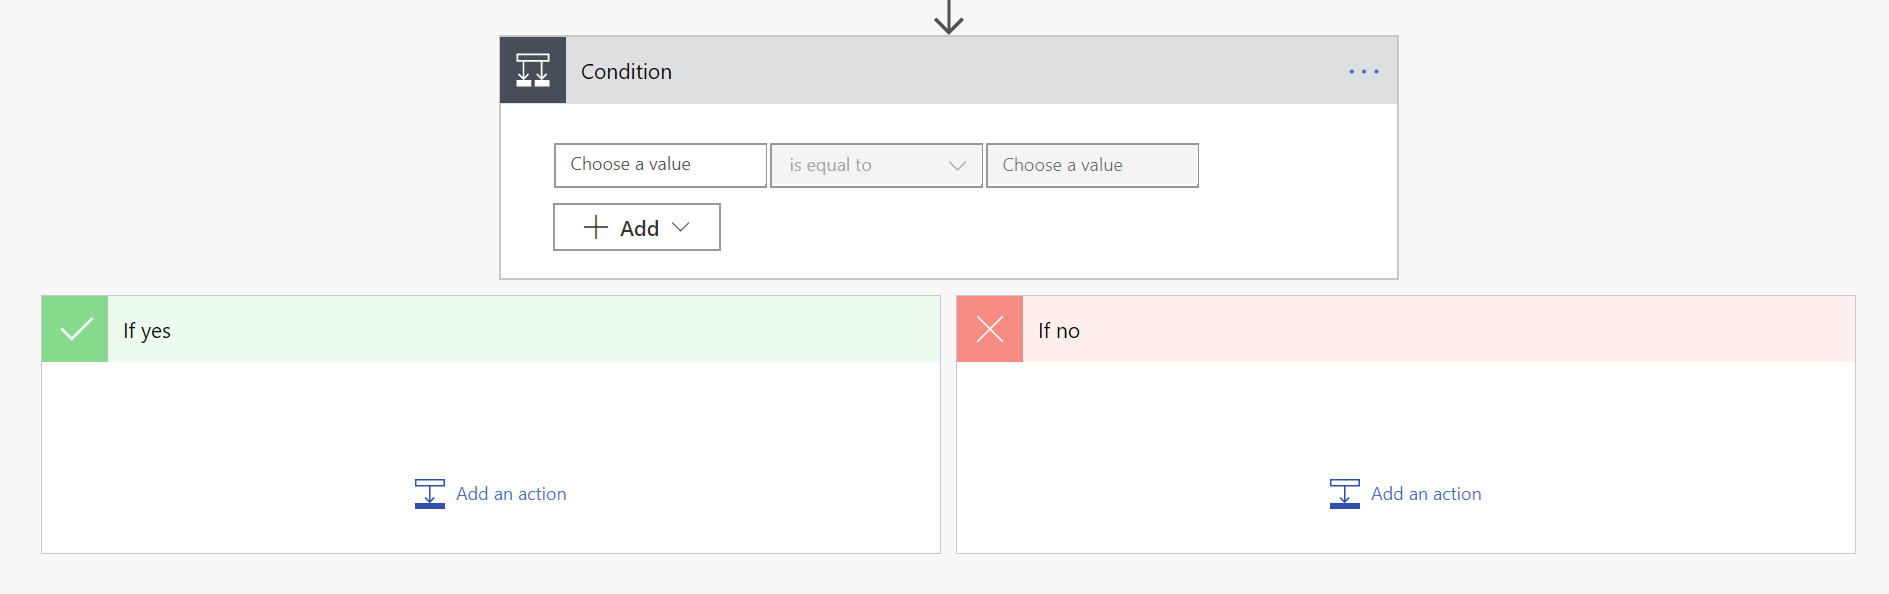
- Condition: These are akin to your traditional if programming tests, allowing you to perform different actions, based on whether the condition is met successfully or not. You can specify multiple conditions as part of this, using AND/OR logic, and also group conditions together if needed. An empty condition within Power Automate resembles the below:
- Apply to each: You will use this condition the type the most when processing multiple result sets, and then work on a similar principle as your traditional foreach programming loops. By specifying an appropriate collection or list of items, you can then execute one or multiple actions affecting each record. This control type can be useful if, for example, you need to update a list of CDS Contact records in bulk whenever an Account record is updated.
- Do until: This is useful for when you need to carry out an action until a condition is true, and they work on a similar basis as a while loop. You specify the control to keep checking each time any sub-actions complete and, once the condition is met, execution will stop. By using the built-in expression language within flow in conjunction with this (more on this shortly), it is possible to construct more complex conditions to evaluate continually.
- Scope: These are more of a visual helper tool, as opposed to something that can be linked back to a programming concept. They provide a mechanism to group multiple, related actions so that they can be collapsed/opened more easily within the visual designer. They are a purely optional component and - to be honest - I had to look up exactly what they were as part of writing this blog post. 😂
- Switch: Out of all of these, the name of this one very closely mirrors its equivalent C# programming feature. Using it, you can evaluate a specific value and then call action(s) based on this value. Finally, if it’s not possible to determine a matching value, you can instead execute a default action. Depending on your scenario, a Switch could be a far more natural solution to use compared with Conditions.
- Terminate: Finally, this action lets you immediately stop the flow, with a high degree of control over how to end it. Their nearest programming equivalent would be a throw, but the main difference here is that there are three different statuses that you can terminate a flow at:
- Failed
- Cancelled
- Succeeded
- You can also (optionally) display an error code or message as part of this. They can act as a useful means of forcing bespoke errors within a flow, if, for example, a business process or control has been violated by not including a specific field as part of creating a new record.
Control actions can be an incredibly powerful tool, allowing a single flow to carry out widely different actions, based on the data that traverses through it.
Working with Expressions
We saw in last weeks post how canvas apps have an expression language, allowing us to programmatically trigger actions or alter how an app behaves, using an easy to use a range of formulas. Power Automate works on a similar basis, by having a separate expression language, that is a useful tool when needing to perform a complex evaluation of conditions. The language derives from the Workflow Definition Language (WDL) used by Logic Apps, and it is possible to start working with expressions via a dedicated pop-up dialog window that appears:
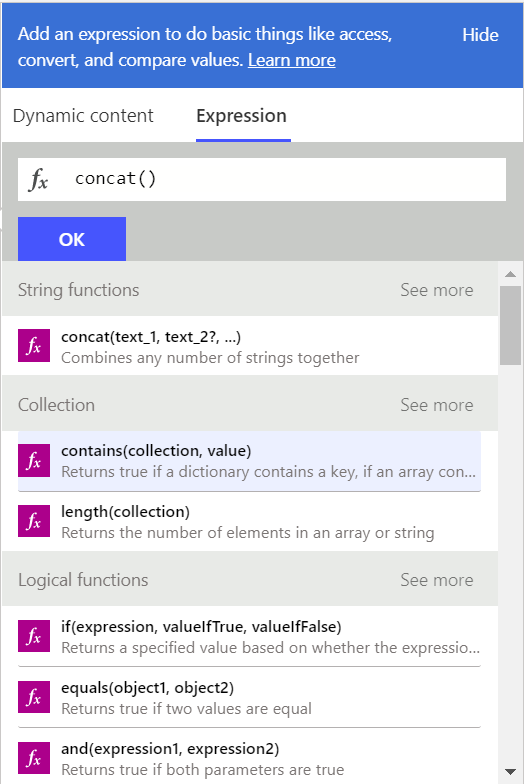
This view will display a list of the most commonly used expressions, along with their appropriate syntax, that you can then include in your flow by clicking each one, modifying it within the expression language bar and then pressing the OK button.
For the MB-400 exam, it is impossible to discuss, learn and demonstrate every possible function that is available to us - as indicated by the online reference guide, the number of currently available functions is well into the hundreds. Instead, it’s worth focusing on a few of the more commonly used ones in each category, so you can get a feel of what is broadly possible to achieve:
- concat: One of the many possible string functions available to us, this allows you to combine two or more strings. For example, using concat(“This “, “is “, “a “test.”) would return This is a test. Other functions in this category cover everyday situations such as converting a string to upper case or returning a selection of characters from a string.
- length: This will return a number, indicating the number of items/records within a collection that you specify. Note that as a collection function, this can only be used with arrays or strings that conform to a JSON structure. Within this category of functions, you can also do things such as union joins or returning the very first item in a collection.
- and: As a logical comparison function, this function will evaluate all values supplied to it and, if matching, return true; otherwise, false. The full range of logical comparison functions ranges from greater than, less than, or and even if statement evaluations, allowing us to fine-tune the conditional nature of our flows further.
- int: Allows you to convert a string into an integer value, provided it is a valid numeric value. There are conversion functions aplenty within Power Automate, of which int forms a part of, and other functions of this type allow us to create a brand new array value, decode base64 strings or create a URI-encoded version of a web URL.
- min: Based on evaluating an array or list of numeric values, this function will return the lowest value detected. Power Automate has many different mathematical functions at our disposal, allowing us to perform simple additions, divisions or even generate random numbers.
- utcNow: This function returns the current date and time within UTC format. It’s one of the many date and time functions available to us. Others include functions to add a specified number of days to a date, convert a date into any given timezone or return the day portion of a date.
- variables: Returns the value of a variable that you have specified within the flow, which can be useful for when you are performing conditional evaluations. This function is one of the workflow functions, with other functions available to return the individual results of actions within a scoped action, metadata relating to the flows execution or the output of an action. To find out more about working with variables, you can check out this very useful video Matt “The D365 Geek” Collins-Jones, where he will show you how to set a variable within a Power Automate flow.
- uriPath: For situations where you need to extract the path value of a URL (i.e. the bit after the domain portion, such as /mypage.html), this function will let you achieve this. There are other URI parsing functions available that do similar things, such as returning the host, port or query from a URL instead.
- removeProperty: Finally, this function will remove a specified property from a JSON object, returning the updated object for you to process further if required. This function is part of the small list of JSON/XML manipulation functions, with additional functions available to add or update the properties in a JSON object instead or execute simple XPath queries on an XML document.
Experienced developers should have little difficulty from grappling the type of functionality available here, which should closely mirror what you will typically find in languages, such as C#. This factor only emphasises further the importance of considering flow early on as part of designing your solution.
Demo: Creating a Power Automate Flow
To get a feel for how to work with Power Automate flows, check out the video below:
Power Automate is a worthy topic for many blog posts and videos, and I wouldn’t worry too much about becoming an expert for the MB-400 exam. Just take time to familiarise yourself with the use cases and broad capabilities they bring to the table. In next week’s post, we’ll round up our discussion on processes by looking at Business Rules, an amazing tool that can help you get further mileage out of your model-driven Power App.