
Welcome to the sixteenth post in my series focused on providing a set of revision notes for the PL-400: Microsoft Power Platform Developer exam. In the last post, we saw how developers could leverage C# code as part of plug-ins to implement complex business logic within Microsoft Dataverse. We can now examine another extensibility component within the Extend the platform section of the exam as we discuss how to Create custom connectors. For this, Microsoft expects candidates to demonstrate knowledge of the following subjects:
Create custom connectors
- create a definition for the API
- configure API security
- use policy templates to modify connector behavior at runtime
- expose Azure Functions as custom connectors
- create custom connectors for public APIs by using Postman
Depending on the type of system you wish to integrate alongside the Power Platform, a custom connector may suit your needs, thereby allowing you to leverage an existing API you have constructed or an entirely new one. What’s more, developers can then take these custom connectors and expose them out to other organisations or perhaps even to every other Power Platform user the world over. In short, they are a compelling feature to leverage. So let’s take a look at what they are all about and how you can get started with them.
As with all posts in this series, the aim is to provide a broad outline of the core areas to keep in mind when tackling the exam, linked to appropriate resources for more focused study. Ideally, your revision should involve a high degree of hands-on testing and familiarity with the platform if you want to do well in this exam.
Custom Connectors Overview
As we have seen when evaluating both canvas Power Apps and Power Automate flows, developers can use well over 325+ standard connectors, covering various Microsoft and other third-party systems, such as Salesforce, SAP and Oracle Database. This should give you everything you need to get disparate systems talking to each other within the Power Platform… in most situations. Custom connectors are there to provide additional headroom for when this is not possible to achieve. Powered by Azure API Management underneath the hood, Custom Connectors provide a guided, visual mechanism of exposing an entirely custom API, alongside its various operations, as an additional connector for the following services:
- Canvas Power Apps
- Power Automate Flows
- Logic Apps
Developers can then utilise these in much the same manner as the other connectors discussed previously. For example, you can define trigger actions from your API, pull in entire datasets or perform core operations, such as updating an existing record. The capabilities within your current API ultimately dictate all of this, so, in some situations, developers may need to author a new API themselves and use services such as Azure Functions or Azure Web Apps to host it. Further discussion on how to do this is beyond the scope for this blog post and, indeed, the exam itself; candidates should instead focus their attention on the various supported options for connectors and - most crucially - the outline steps for creating one, which the below diagram summarises well:
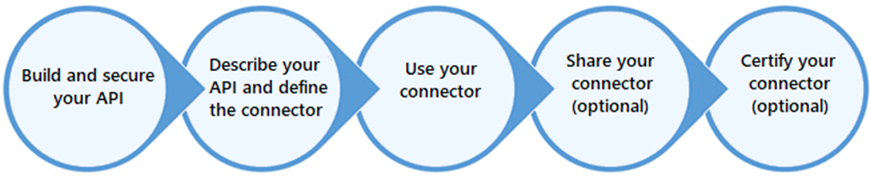
The sections that follow will dive into these steps in further detail…
Supported Scenarios
…but first, we should touch upon some of the situations where you may need to consider using a custom connector:
- Integrating with On-Premise APIs: As custom connectors fully support using the on-premises data gateway, they provide the securest and most streamlined mechanism for making any internal APIs accessible for use within your cloud systems.
- Incorporating REST / SOAP APIs: It is worth noting that custom connectors only support APIs of these particular types. Specifically, canvas Power Apps and Power Automates can only work with HTTP REST APIs; Logic Apps support SOAP APIs too. For situations where your existing API does not meet these requirements, it will be impossible for you to use them with custom connectors.
- Sharing an API within an Organisation: For situations where you envision only contacting an API a single time within, let’s say, a Power Automate flow, using an HTTP action step may be the most prudent (and fastest) option to consider. Going beyond this, if you think you will need to share out or utilise the same action steps across multiple flows and, also, you wish to provide a simplified means of accessing the same set of actions, a custom connector will fit your needs.
- ISV Solution Development: Many of the custom connectors available today have their origin as internally developed ones, which have then been certified by Microsoft and published for general use. By doing this, ISV developers can help to drive further usage of their existing solutions and even introduce them to an entirely new audience.
Reviewing Custom Connector Creation Options
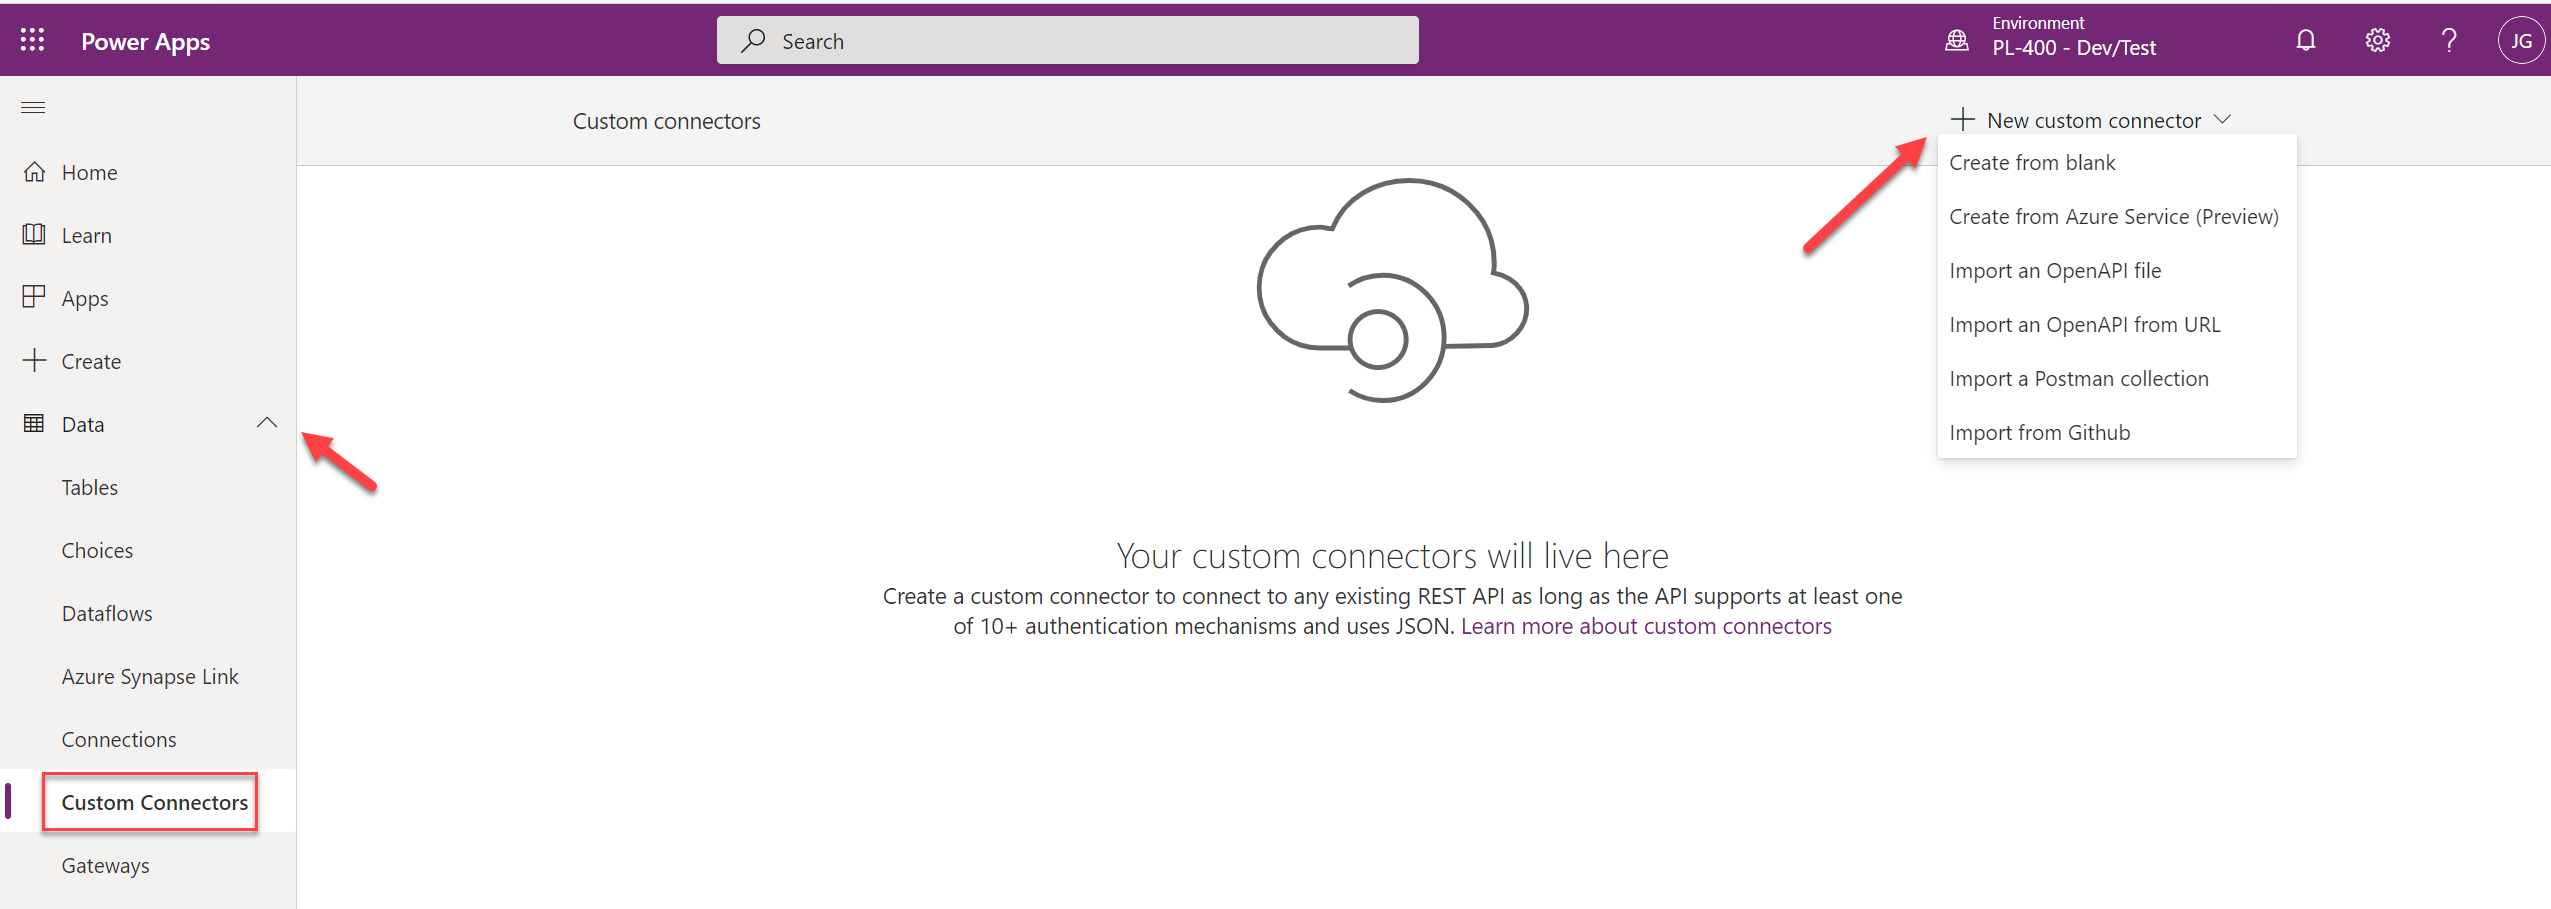
Developers have a few different options available to them when creating a custom connector. But, almost always, you will start from within the Power Apps Maker Portal. Then, by navigating to Data -> Custom Connectors, you can locate the appropriate option to kick off their creation:
The best thing about this is that we don’t necessarily need to reinvent the wheel, provided we have existing definitions of our API’s already built out. At the time of writing this post, developers can utilise the following, if available:
- Postman: If you’ve never used this tool before and find yourself regularly poking into numerous API’s, then this tool could help you out. In short, the app provides you with a local “sandbox” to mock-up, execute and inspect the results of various HTTP actions. It has numerous valuable features, such as being able to store requests in collections, handling multiple different types of authentication, and providing online synchronisation capabilities. From a custom connector standpoint, you can use Postman to build out the various action requests that your API exposes out and then import these in as a collection file into the Power Apps Maker Portal. Note as part of this that only V1 Postman collections are supported. There’s a great article on the Postman website that shows you how to get started with collections.
- OpenAPI: Similar in some respects to a Postman collection, an OpenAPI definition is instead intended as a complete declaration of all the capabilities stored within an API, using an open standard. Developers would typically generate this for their API to provide other developers with a valuable resource when working with the API in question. Thankfully, if you use Azure API Management as the backend for your API, you can quickly generate the appropriate specification using the Azure Portal. It is also possible to build this directly into your ASP.NET Core app if that is what your API is using; I’m sure it’s possible to do the same for other languages/stacks too, but I’ll leave that to you to find out. 😀
- GitHub: Best for situations where you have built out a connector already or wish to leverage an existing, certified connector, you can very quickly bring it in from a GitHub repository of your choosing.
For the options listed in the screenshot above, it’s worth focusing on each of these in more detail:
- Create from blank: Using this option, you must define each of the individual elements of your API, such as its security, actions and triggers. If you are unsure where to start and don’t have an appropriate Postman/OpenAPI definition at your disposal, then this will be the most suitable option to choose.
- Import an OpenAPI file: With this, you can import the OpenAPI JSON definition file from your local computer.
- Import an OpenAPI from URL: If your definition is instead available as part of a publicly accessible URL, use this option to import it instead.
- Import a Postman Collection: This choice bears some similarities to the OpenAPI options, as it will let you import a JSON collection file generated from Postman. As mentioned earlier, make sure you export this as a V1 definition from the Postman app.
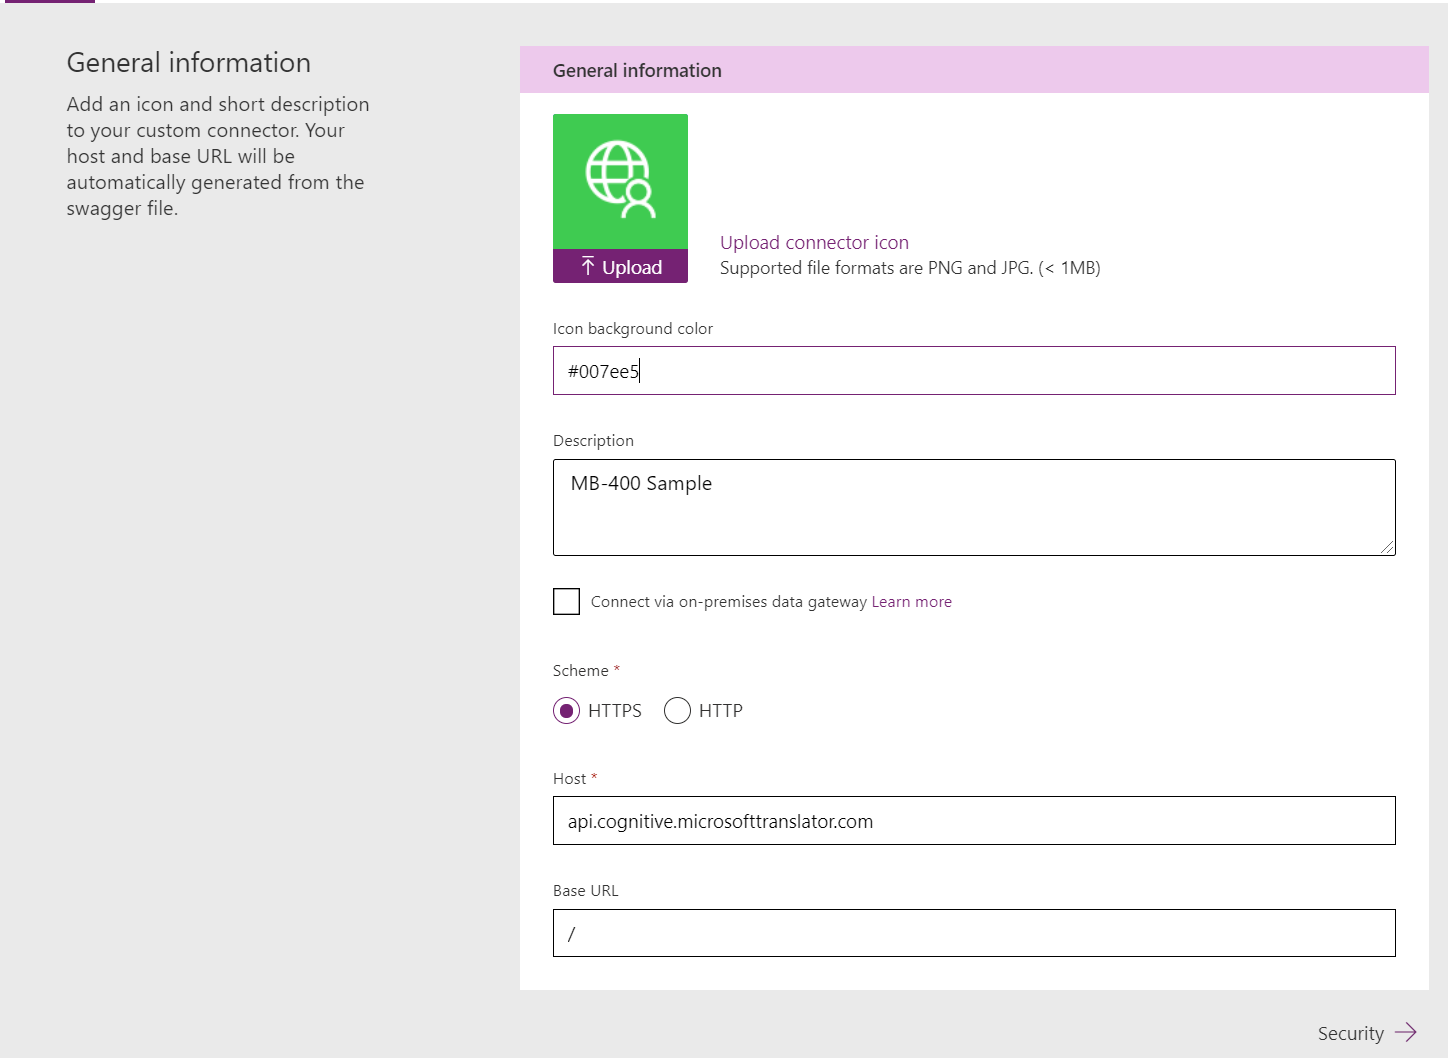
Regardless of which option you select, you can then populate some standard settings for your connector, such as its display name, image and description. At this point, you can also override the URL scheme, the host URL and the Base URL, if required:
Handling API Security
A custom connector can be secured using multiple mechanisms. These authentication profiles do not store sensitive credentials within the connector. Instead, they define the authentication options that users of the connector must set when using your custom connector for the first time. In this manner, it’s possible to connect to multiple instances of your API on the same tenant, using different credentials. A custom connector can support the following four types of authentication methods:
- No Authentication: Best for when you are exposing a publically available API that requires no underlying authentication. This option, quite obviously, provides zero security for your API.
- Basic Authentication: Utilising the same authentication method as the defined HTTP standard, here you outline details of the user name and password parameter labels that users must provide for your custom connector. I would typically advise against using Basic Authentication wherever possible, as it doesn’t afford the best security for your custom connector or API itself.
- API Key: Here, you provide the details for an API Key that the custom connector includes as part of either the header or as a query parameter on the URL itself. Many of the Azure Cognitive Services API’s use API Key’s as their authentication mechanism. API Key’s suffer from the same security failings as Basic Authentication and, as such, should be avoided unless necessary.
- OAuth 2.0: The recommended and most secure option for your custom connector, and also one that integrates neatly alongside Azure Active Directory (AAD) and a variety of other services, such as Google and Facebook. To see an example of how to set this up using an Azure App Registration for an Azure Function, you can consult the following Microsoft Docs article. In short, though, using AAD OAuth 2.0 requires you to set up an app registration on the appropriate tenant, which then exposes out the details you can use when defining your profile.
Working with Policy Templates
If you’ve had some experience working with Azure API Management or have been following my blog religiously, this topic might feel somewhat familiar. To fine-tune how your custom connector ultimately interacts with your API, you can perform various manipulation activities as each action/trigger gets fired. These are brought together within a list of re-usable templates that cover common operations that may be necessary and, from an Azure API Management standpoint, map back to the various policy definitions that this service supports. The list below provides an overview of the types of actions policy templates support:
- Set host URL: Using this, you can replace the URL for the request with an entirely new one.
- Route request: Let’s you route the action to a completely different path on the same URL from the one specified.
- Set HTTP header: Allows you to append, skip or replace a Header value as part of the API request. For example, you could supply a Cache-Control value to help improve performance when the custom connector uses your API.
- Set query string parameter: Allows you to append, skip or replace a query parameter value as part of the API request. For example, if your API is an OData endpoint, you might want to append a default $top query parameter to limit the number of returned results each time.
At the time of writing this post, there are also a couple of additional policy templates available marked as Preview, which allows you to do things such as converting objects into arrays and vice-versa. Microsoft will not assess candidates on preview features within exams, so it is unlikely that you will need to know about these as part of your exam prep.
Demo: Creating a Custom Connector for an Azure Function
To help you better understand the process involved in building out a custom connector, check out the video below, where we will build out one that integrates alongside an Azure Function app:
That pretty much wraps it up for the basics on custom connectors, which should be all you need to know for the exam. In the next post, we’ll look at how you can leverage the Microsoft Dataverse Web API to perform various operations and manage more complex workloads.