
Welcome to the fourth post in my series focused on providing a set of revision notes for the PL-400: Microsoft Power Platform Developer exam. In last week’s post, we finished our discussion concerning the first exam area by reviewing the Power Platform’s various extensibility points. With this concluded, we can now move onto the next area of the exam - Configure Common Data Service - which has a 15-20% total weighting and comprises of the following topics:
Configure security to support development
- troubleshoot operational security issues
- create or update security roles and field-level security profiles
- configure business units and teams
Implement entities and fields
- configure entity and entity options
- configure fields
- configure relationships and types of behaviors
Implement application lifecycle management (ALM)
- create solutions and manage solution components
- import and export solutions
- manage solution dependencies
- create a package for deployment
- automate deployments
- implement source control for projects including solutions and code assets
Rather than address these in order, we’ll approach the last subject - implement application lifecycle management (ALM) - first, because solutions are the first thing a developer will typically create. Read on to find out more about solutions and how you can use them to manage and deploy the work you build out in the Power Platform!
As with all posts in this series, the aim is to provide a broad outline of the core areas to keep in mind when tackling the exam, linked to appropriate resources for more focused study. Ideally, your revision should involve a high degree of hands-on testing and familiarity working with the platform if you want to do well in this exam.
Solutions Overview
Solutions are almost certainly a mandatory requirement when building any customisations involving the Power Platform and Microsoft Dataverse (AKA the Common Data Service). As well as being a container for all the custom components we develop, they are also useful in:
- Uniquely identifying your components compared to other developers, projects or external functionality, when used in conjunction with a Solution publisher/prefix.
- Providing a precise and controlled mechanism for deploying out changes across multiple environments, either in their entirety or via patches.
- Enabling you to work with a subset of components
Let’s dive now into the central topics of Solutions that developers need to grasp as a minimum.
Managed versus Unmanaged Solutions
There are two types of solutions that the platform supports - managed and unmanaged. By default, all solutions exist in an unmanaged state upon creation; only by exporting a solution for the first time do you have the option of making it managed. The key differences between both types of solutions are:
- Unmanaged
- Solutions of this type are removable from an environment, but all underlying components/changes will remain; these will have to be removed or reverted manually.
- Developers can freely modify components within an unmanaged solution.
- Recommended for exporting solutions to other development/testing environments or for storing as part of a source control system (e.g. Git)
- Managed
- Solutions of this type are removable from an environment. This action will permanently delete all underlying components, including any table data.
- Typically, other developers will be unable to modify elements within a managed solution, unless we’ve enabled this via each components managed property.
- When importing an updated managed solution to an environment, the import operation will overwrite all existing components within the current managed solution.
- Recommended when deploying a final, thoroughly tested solution into a production environment.
Developers should always be mindful of how the platform exposes out unmanaged/managed components as part of solution layering. The following Microsoft Docs article provides an excellent summary and visualisations explaining how Microsoft Dataverse applies solutions within an environment. You can also use the solution layering feature to inspect how components have been affected by multiple solutions.
Solution Publishers & Prefixes
When creating a solution, developers should always specify a solution publisher. Doing so helps to identify components belonging to a particular organisation or business area and avoids a bad practice situation where customisations are prefixed using new_. It’s possible to define a new publisher and prefix when creating a solution, providing we can supply the following details:
- Display Name
- Name
- Prefix
- Option Value Prefix
As a rule of thumb, generally, a single publisher/prefix is sufficient for one organisation. However, you may choose to sub-categorise further via business area/function (e.g. Contoso Marketing, Contoso Sales etc.)
Demo: Creating and Deploying a Managed Solution
To understand how to create, add components to and deploy a solution within a managed state, watch the video below to view the steps involved:
Solution Patches
There may be one or several business-critical changes in specific scenarios that need to be rushed out, without necessitating a full update of all components within a solution. Solution Patches provide a mechanism to deploy out small modifications within an overall solution, targeting only the segments that require changing. This action creates a new, separate solution, containing only the underlying components that need pushing out. Later on, all patched solutions can be “rolled up” into the master solution as part of a regular update or upgrade.
I’ve blogged previously on working with solution patches; although these steps refer to the classic interface, they will be mostly the same within the new Power Apps experience. The following Microsoft Docs article provides more up to date information regarding their functionality.
Understanding the Solution Packager Tool
Developers today will be well used to working with a source control/version control system (VCS) as part of their daily work to manage changes across the software solutions they build-out. By and large, the most popular of these tools today is Git, but others are available as well, such as Team Foundation Version Control (TFVC). All of them help to promote better practices when it comes to developing software and, wherever possible, should be a primary consideration when starting a project.
The great thing about working with the Power Platform is that we can support this objective. Developers can take an exported solution file and expand the raw contents of this, into a logical, hierarchical format, for storage within your source control provider of choice. The vast majority of customisations we perform to the platform are defined within XML files, allowing for specific changes to tables, forms or columns to be tracked as we commit changes. Below is an example of one of these files, the Solution.xml file, which records details about a solution, its name, version, publisher and other details:
<?xml version="1.0" encoding="utf-8"?>
<ImportExportXml version="9.1.0.27031" SolutionPackageVersion="9.1" languagecode="1033" generatedBy="CrmLive" xmlns:xsi="http://www.w3.org/2001/XMLSchema-instance">
  <SolutionManifest>
    <UniqueName>PL400DemoSolution</UniqueName>
    <LocalizedNames>
      <LocalizedName description="PL-400 Demo Solution" languagecode="1033" />
    </LocalizedNames>
    <Descriptions />
    <Version>1.0.0.2</Version>
    <Managed>0</Managed>
    <Publisher>
      <UniqueName>contosomanufacturingltd</UniqueName>
      <LocalizedNames>
        <LocalizedName description="Contoso Manufacturing Ltd." languagecode="1033" />
      </LocalizedNames>
      <Descriptions>
        <Description description="Publisher for Contoso" languagecode="1033" />
      </Descriptions>
      <EMailAddress xsi:nil="true"></EMailAddress>
      <SupportingWebsiteUrl xsi:nil="true"></SupportingWebsiteUrl>
      <CustomizationPrefix>con</CustomizationPrefix>
      <CustomizationOptionValuePrefix>18138</CustomizationOptionValuePrefix>
      <Addresses>
        <Address>
          <AddressNumber>1</AddressNumber>
          <AddressTypeCode>1</AddressTypeCode>
          <City xsi:nil="true"></City>
          <County xsi:nil="true"></County>
          <Country xsi:nil="true"></Country>
          <Fax xsi:nil="true"></Fax>
          <FreightTermsCode xsi:nil="true"></FreightTermsCode>
          <ImportSequenceNumber xsi:nil="true"></ImportSequenceNumber>
          <Latitude xsi:nil="true"></Latitude>
          <Line1 xsi:nil="true"></Line1>
          <Line2 xsi:nil="true"></Line2>
          <Line3 xsi:nil="true"></Line3>
          <Longitude xsi:nil="true"></Longitude>
          <Name xsi:nil="true"></Name>
          <PostalCode xsi:nil="true"></PostalCode>
          <PostOfficeBox xsi:nil="true"></PostOfficeBox>
          <PrimaryContactName xsi:nil="true"></PrimaryContactName>
          <ShippingMethodCode>1</ShippingMethodCode>
          <StateOrProvince xsi:nil="true"></StateOrProvince>
          <Telephone1 xsi:nil="true"></Telephone1>
          <Telephone2 xsi:nil="true"></Telephone2>
          <Telephone3 xsi:nil="true"></Telephone3>
          <TimeZoneRuleVersionNumber xsi:nil="true"></TimeZoneRuleVersionNumber>
          <UPSZone xsi:nil="true"></UPSZone>
          <UTCOffset xsi:nil="true"></UTCOffset>
          <UTCConversionTimeZoneCode xsi:nil="true"></UTCConversionTimeZoneCode>
        </Address>
        <Address>
          <AddressNumber>2</AddressNumber>
          <AddressTypeCode>1</AddressTypeCode>
          <City xsi:nil="true"></City>
          <County xsi:nil="true"></County>
          <Country xsi:nil="true"></Country>
          <Fax xsi:nil="true"></Fax>
          <FreightTermsCode xsi:nil="true"></FreightTermsCode>
          <ImportSequenceNumber xsi:nil="true"></ImportSequenceNumber>
          <Latitude xsi:nil="true"></Latitude>
          <Line1 xsi:nil="true"></Line1>
          <Line2 xsi:nil="true"></Line2>
          <Line3 xsi:nil="true"></Line3>
          <Longitude xsi:nil="true"></Longitude>
          <Name xsi:nil="true"></Name>
          <PostalCode xsi:nil="true"></PostalCode>
          <PostOfficeBox xsi:nil="true"></PostOfficeBox>
          <PrimaryContactName xsi:nil="true"></PrimaryContactName>
          <ShippingMethodCode>1</ShippingMethodCode>
          <StateOrProvince xsi:nil="true"></StateOrProvince>
          <Telephone1 xsi:nil="true"></Telephone1>
          <Telephone2 xsi:nil="true"></Telephone2>
          <Telephone3 xsi:nil="true"></Telephone3>
          <TimeZoneRuleVersionNumber xsi:nil="true"></TimeZoneRuleVersionNumber>
          <UPSZone xsi:nil="true"></UPSZone>
          <UTCOffset xsi:nil="true"></UTCOffset>
          <UTCConversionTimeZoneCode xsi:nil="true"></UTCConversionTimeZoneCode>
        </Address>
      </Addresses>
    </Publisher>
    <RootComponents>
      <RootComponent type="1" schemaName="account" behavior="2" />
      <RootComponent type="1" schemaName="contact" behavior="1" />
      <RootComponent type="1" schemaName="task" behavior="1" />
      <RootComponent type="60" id="{8448b78f-8f42-454e-8e2a-f8196b0419af}" />
    </RootComponents>
    <MissingDependencies>
      <MissingDependency>
        <Required key="0" type="60" displayName="Account" parentDisplayName="Account" solution="msdynce_AppCommon (9.0.4.0066)" id="{8448b78f-8f42-454e-8e2a-f8196b0419af}" />
        <Dependent key="0" type="60" displayName="Account" parentDisplayName="Account" id="{8448b78f-8f42-454e-8e2a-f8196b0419af}" />
      </MissingDependency>
    </MissingDependencies>
  </SolutionManifest>
</ImportExportXml>
To help us extract these files, we can turn to the Solution Packager tool, included as part of the Microsoft.CrmSdk.CoreTools NuGet package. This command-line utility allows us to manually or programmatically automate the unpacking and repackage of solutions and is straightforward to work with. For example, the script below would unpack the solution file PL400DemoSolution_1_0_0_2.zip into a custom folder path we specify:
SolutionPackager.exe /action:Extract /zipfile:“D:\PL-400\Solution Packager Demo\PL400DemoSolution_1_0_0_2.zip” /folder “D:\PL-400\Solution Packager Demo\PL400DemoSolution”
Here’s an example of how this would look within an Azure DevOps Git repository:
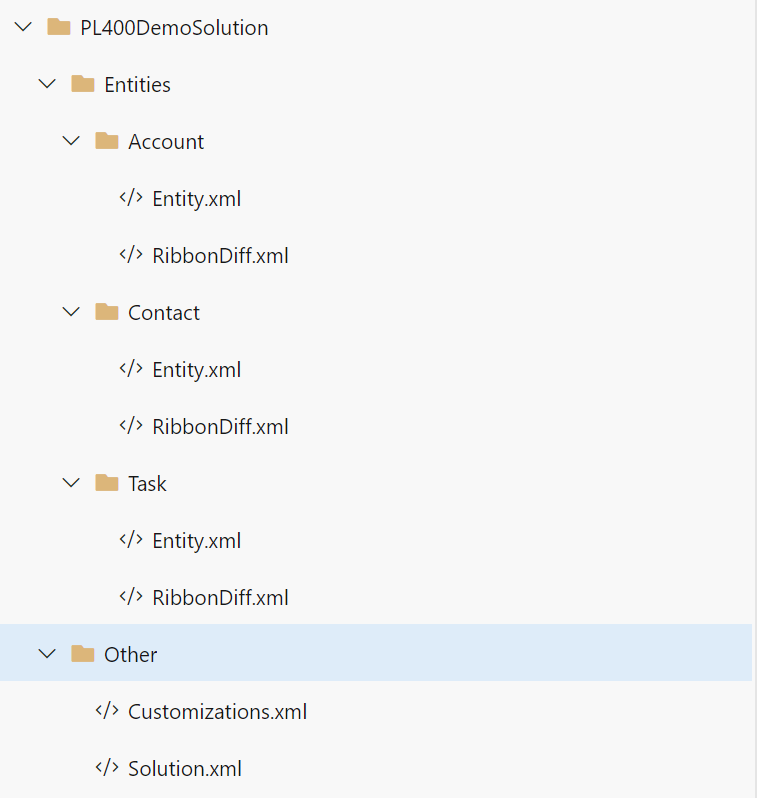
The Solution Packager is a tool that, as developers, we’ll invariably end up using at some stage, so having a good grasp of what it can do and the various options it supports will hold you in good stead for the exam.
Demo: Working with the Solution Packager Tool
To see how to install and use the Solution Packager tool, check out the video below, where I take you through each step:
Automating Deployments Using Azure DevOps
Running the Solution Packager tool on each occasion you make a change to your solution(s) will, over time, become a tedious affair. That’s why your primary objective should always be to achieve a degree of automation if and when you use it. Fortunately, using the capabilities built-in as part of Azure Pipelines makes this easy to do. And it’s one of the scenarios that Microsoft anticipates us to deal with as part of our daily work, meaning that we have tooling at our disposal to negate the need to author custom scripts (for the most part).
To begin automating the extraction and deployment of your solutions to other environments, you should, first of all, check out the Microsoft Power Platform Build Tools for Azure DevOps, a set of handy pipeline tasks available from the Visual Studio Marketplace. Within here, there are numerous different tasks exposed, that allow us to perform operations such as:
- Modify the version of a solution
- Extract, and then unpack, the contents of a solution file à la the example above.
- Validate the quality of your solution using the Solution Checker.
- Create, remove, backup or copy an existing environment.
When using any of the tasks within these build tools, it is vital to call the Power Platform Tool Installer task first. Doing so will allow for all required dependencies to be downloaded onto the build agent as your pipeline runs. This tool’s actions are callable in any manner you see fit, from both a build or a release pipeline. My general recommendation is to ensure you author your pipelines using YAML wherever possible. Doing so will allow you to track changes most efficiently, and unlock additional capability, at the expense of having to author out your build definitions manually. With powerful scheduling capabilities and the ability to trigger actions based on approvals, both the Microsoft Power Platform Build tools, and Azure DevOps can help you work smarter, and take out the stress and - sometimes - uncertainty when working with the Power Platform at scale.
Although Microsoft expects us to have a good awareness of what we’ve spoken about above for PL-400, attempting to cover complicated subjects such as authoring build and release pipelines is impossible as part of a single blog post, and not relevant for the exam. If you’re interested in learning more about these subjects, then check out the following learning paths from the Microsoft Learn site:
Demo: Extracting and Deploying Solutions using Azure DevOps
To help you better understand how to work with Azure DevOps to achieve ALM within the Power Platform, check out the video below. In it, I’ll show you how to build and release a solution using Azure DevOps and the Microsoft Power Platform Build Tools for Azure DevOps:
ALM within the Power Platform is a central component that could throw the wheels off your adoption in the long-term if not considered and implemented carefully. I hope this post has provided a good introduction and justifications behind its usage. Next time around, we’re going to see how we can customise tables within Microsoft Dataverse. See you then!