The rise in virtualisation within IT has profoundly altered the landscape of how servers and applications are deployed across the globe. Whereas in the past you would need to rely on multiple, physical hardware servers, you can now achieve similar levels of performance via the use of a single hardware server with virtualised versions of your operating systems deployed onto it. This is, in a nutshell, how “the cloud” effectively operates and even organisations who are not yet using a cloud computing environment may have virtualisation occurring somewhere within their infrastructure. The number of vendors who now offer solutions within this space grows every year, and more longstanding software providers have significantly adjusted their traditional offerings to take virtualisation into account.
Microsoft is one of these organisations, having moved more with the tide in recent years - to the extent that you can virtualise additional Windows operating systems on top of a physical hardware server at no additional cost. For those who are a bit shaky on terminology, like me, these are referred to as “Hyper-V Guest Operating Systems” or just “guests”. The situation as it stands currently means that the two editions of Windows Server 2016 (which can be upgraded to rather straightforwardly, you may be pleased to hear) offer very clear guest usage rights - up to 2 for Standard and unlimited for the Datacenter edition. This can offer numerous benefits for your business:
- Facilitates the quick deployment of additional virtual machine instances for additional production workloads, testing or development.
- Enables you to drive maximum benefit from your hardware investment by utilising as much virtual compute power as required.
- Greatly simplifies the process of activating your copies of Windows, as guest OS’s will be activated based on your host machine license key.
As with anything, there is a small learning curve involved in deploying a solution of this nature, but those who are reasonably comfortable working with Windows Server should find the journey relatively smooth.
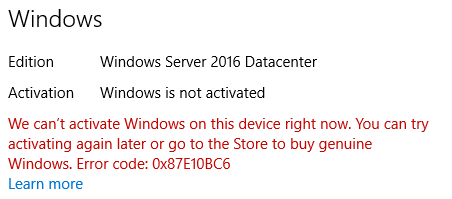
I had a strange issue recently when setting up a lab environment, where I could not activate any guest Windows Server Datacenter Edition servers via the standard way (i.e. through the Settings page). As a result, I was getting the following errors/messages displayed constantly when working on the machine:
Clicking on the Change product key option does nothing, and you have no apparent way of forcing Windows to activate or to modify the Product Key supplied at installation. So how do you go about activating your copy of Windows?
It turns out this error is due to the Product Key being entered incorrectly on initial setup. I (incorrectly) assumed that Hyper-V guest OS’s on a Windows Server 2016 Datacenter host did not require a Product Key and would automatically activate upon installation. This assumption was made on the basis that the Windows 2016 installation wizard now lets you skip adding a Product Key. So, instead of entering a key, I simply pressed Next and let the install proceed as normal. The correct course of action should have been to supply the appropriate Automatic Virtual Machine Activation (AVMA) key, which essentially “tells” Windows to look at the host operating system to confirm whether it is licensed accordingly. A full list of the AVMA codes for Windows Server 2012 R2 and Windows Server 2016 can be found on TechNet, with the appropriate license keys for Server 2016 reproduced below:
- Datacenter: TMJ3Y-NTRTM-FJYXT-T22BY-CWG3J
- Standard: C3RCX-M6NRP-6CXC9-TW2F2-4RHYD
- Essentials: B4YNW-62DX9-W8V6M-82649-MHBKQ
So, to avoid having to completely re-install Windows, we need to find some way in which we can update the OS to use the correct the license key. Fortunately, there is a way, if you are prepared to “get dirty” with the command prompt 🙂
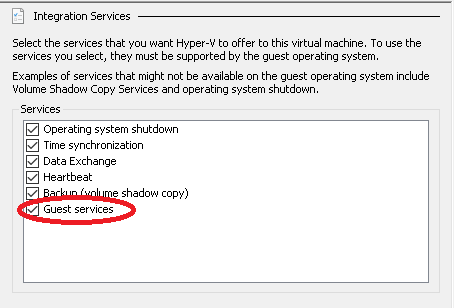
First of all, you will need to ensure that your Hyper-V Manager is configured for Guest services. This can be done straightforwardly enough by going into Settings… on your virtual machine and verifying the appropriate box is ticked on the Integration Services tab. This will need to be done for each virtual machine that requires activation:
Next, because we are prevented from modifying the Product Key via the GUI interface, we must resort to using the slmgr command to remove the current key and add the appropriate AVMA key. As an interesting aside, this is actually a Visual Basic script file and ranks for me as one of the most surprising instances I’ve found of Visual Basic being used within a Microsoft product!
Log onto the virtual machine in question and open an elevated command prompt, executing the following command to remove the current license key:
slmgr -upk
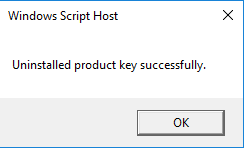
After a few seconds, a pop-up message box will confirm that this has completed successfully:
Then, run the following command to install your AVMA key. In the example below, we are using the Datacenter key to activate a Datacenter edition guest:
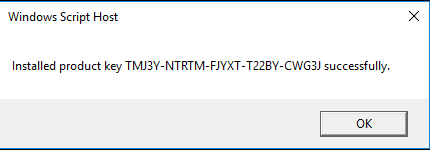
slmgr -ipk TMJ3Y-NTRTM-FJYXT-T22BY-CWG3J
As above, we will get confirmation back that the script has completed successfully:
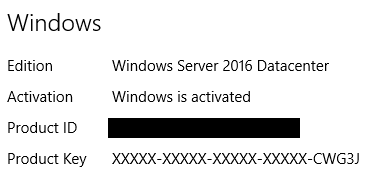
Straight away, you should notice that the Activate Windows message vanishes from the screen and this is confirmed by going into settings - happy days! 🙂
Although it is a little bit frustrating that there is no way in which the product key can be modified from within the Settings page (I am assuming that this is a bug; let me know in the comments below if you have encountered the same problem), it is good that we have an alternative mechanism in place for ensuring that Windows can be activated correctly. The lesson is well learned: when deploying out a new guest Hyper-V Server instance, be sure to enter the correct AVMA key at setup to avoid any of the rigmarole illustrated above.
