
Welcome to post number six in my series, focused on providing a set of revision notes for the MB-400: Microsoft Power Apps + Dynamics 365 Developer exam. In last week’s post, we looked at how you can use Power Automate as the ultimate workflow and automation tool within the Power Platform. Power Automate flows only scratches the surface at what is available from a process automation standpoint within Dynamics 365 and the Power Platform, a statement which the relevant exam assessment area makes all too obvious:
Configure Microsoft Flow
- configure a Flow
- configure actions to use CDS connectors
- develop complex expressions
Implement processes
- create and configure business process flows
- create and configure business rules
As we can see, we also have Business Rules, and Business Process Flows included in this category. As components inextricably bound to the Common Data Service and model-driven Power Apps experience, Dynamics 365 / CRM developers will be most familiar with how they work; but that doesn’t mean a quick refresher wouldn’t go amiss! 🙂 In today’s post, we’ll first take a look at Business Rules and explain why they should always be a developer’s best friend when extending model-driven app forms.
As with all posts in this series, the aim is to provide a broad outline of the core areas to keep in mind when tackling the exam, linked to appropriate resources for more focused study. Your revision should, ideally, involve a high degree of hands-on testing and familiarity in working with the platform if you want to do well in this exam.
Business Rules
Overview
In days gone past, when there was a need to carry out more complex, logic-based actions directly on a model-driven Power App form, client-side scripting via JScript form functions would have been the only mechanism to satisfy this requirement. Examples of the types of things I mean by this include setting the value of a form’s field, based on when another field changes, showing/hiding fields or even displaying error messages when a user violates a business condition. Given the specialist knowledge area involved, having to bring in someone with required technical knowledge to achieve, what I certainly see at least as, basic requirements, can introduce a degree of complexity and technical/monetary cost into a project or as part of its ongoing maintenance.
For this reason, from Dynamics CRM 2013 onwards, Microsoft has provided system customisers to satisfy some of the common scenarios highlighted above, via the use of Business Rules. These offer a built-in and supported mechanism to implement client-level or even platform-level operations when certain conditions are satisfied. They are technically classed as a Process by the application and, like classic Workflows, must always be bound to a single Entity on creation. From an execution standpoint, they almost certainly interact and work with the same client-side API’s Microsoft expose to developers writing JScript form functions, but with a reduced risk of causing potential end-user errors when you implement them. They can also negate the need for prolonged testing or factoring in as part of a system upgrade, as they should “just work” in all circumstances. In short, an effective Dynamics 365 or Power Platform developer should use and push Business Rules to their absolute limit, before even considering writing a single line of JScript. This is a topic I have banged on about evangelised over previously on the blog and it is worth repeating more than ever, particularly in the context of the MB-400 exam.
Business Rule Visual Editor
Business Rules are created in the Power Apps portal by navigating to your target Entity and selecting the Business Rules tab. From here, the visual editor will load, represented in the screenshot below:

The editor contains many buttons and areas that it’s worth getting more familiar with, so you can fully appreciate the capabilities of Business Rules. Each one has been numbered and explained in detail in the list that follows:
- Expanding the arrow here will allow you to define a name (mandatory) and a description for your Business Rule. I highly recommend always to provide a useful description of any Business Rule, to assist any future users of the system or to even give your memory a jog down the road. 🙂
- From this area, you can save your Business Rule, validate its current structure to highlight any warnings/errors, define the scope of the Business Rule (discussed in more detail shortly) or access some of the available help articles for Dynamics 365.
- The icons on here let you quickly add on an additional component to your Business Rule or perform standard operations, such as cut, copy, paste and delete. On these, it is worth highlighting that the familiar keyboard shortcuts for each action will also let you perform it as well. Finally, you can use the Snapshot button to download a .png image file of the Business Rule, which you can then include as part of any documentation or training materials.
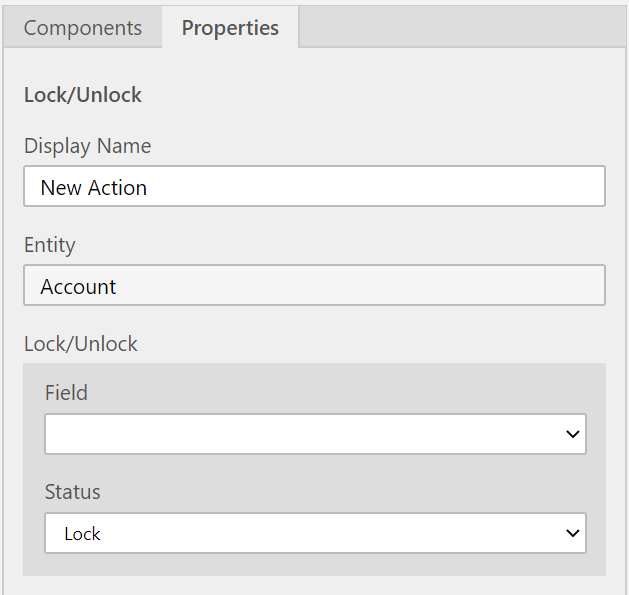
- The central part of the visual editor allows you to select, drag & drop or re-order any added components via the use of your computer mouse. Selecting each component will also display its underlying properties within the area highlighted in 6 on the screenshot. For example, the properties tab for the Lock/Unlock action resembles the following:
- Here, you can toggle between the Components and Properties tab.
- The Components tab, when selected, will display a list of all possible components you can add to your Business Rule. The next section will discuss all of these in further detail.
- Traditionally, Business Rules would be specified and built out using a text-based view, defined within IF…THEN…ELSE logic. This experience is persisted as part of the new visual editor experience, to provide a precise and straightforward mechanism for you to validate the logic of your Business Rule.
- Finally, the options here let you zoom in/out and also adjust the view to fit the canvas of the visual editor.
Available Components
A Business Rule is made up of one, several or many components, depending on the complexity of the business logic that needs to occur. These are defined under the two categories of Flow and Actions. Within the visual editor, you will see a handy “toolbox” on the Components tab, that lists everything we can double click/drag and drop onto a Business Rule:
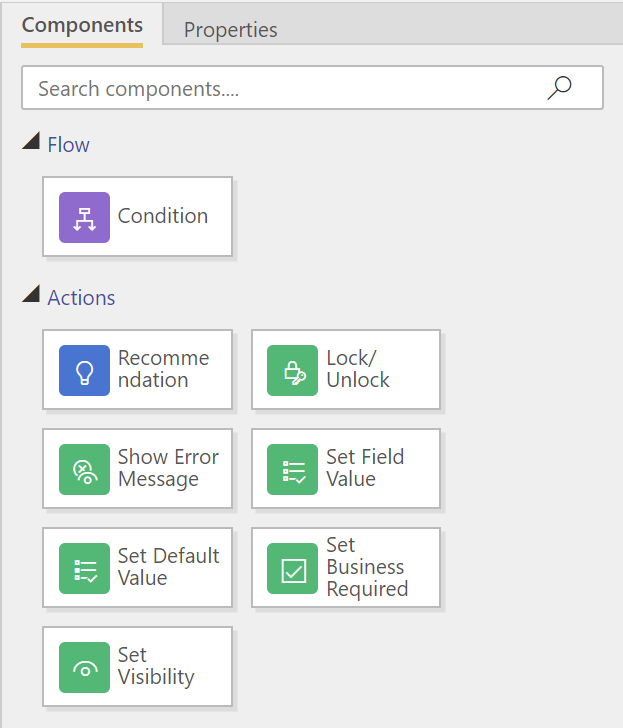
A description of each of these is found below:
- Conditions: As the central component within all Business Rules, at least one of these must exist. From there, you can define multiple rule sets; these represent the specific field on the current entity whose value you wish to evaluate. You have a range of operators at your disposal when performing evaluations, primarily dictated by the data type of the selected field. For example, a text field has operators such as Contains, Equals, Begins with etc. When multiple rule sets are defined, you must also indicate the type of grouping to apply to the evaluation - AND or OR. It is not possible to specify more granular grouping rules underneath this level.
- Recommendations: In certain situations, you may wish to guide users towards populating a form in a specific manner, based on other inputs that have been made to the record so far. This component type meets this requirement by allowing you to show custom text to the user, alongside a button. Once pressed, the Business Rule will then apply any number of updates to other fields on the form. It is then left up to the user to decide whether they accept the recommendation or to ignore it entirely.
- Lock/Unlock: With this, you can set or remove a fields read-only property on the form.
- Show Error Message: By selecting a field and specifying a custom message, it is possible to display any bespoke error message, that will bind itself to the field chosen.
- Set Field Value: Perhaps one of the most potent components at our disposal, this allows you to auto-populate other fields on the form when our stated conditions are met. You can configure this component in one of three ways, based on the Type value you specify - you can choose to provide a custom value (Value), set the field to match another on the form (Field) or even remove all data from a field (Clear).
- Set Default Value: This works on a similar premise as the Set Field Value component, with the exception that it does not include a Clear option and is instead designed to populate a field automatically when creating a new record.
- Set Visibility: Using this component type, you can toggle whether a field appears or is hidden from the user.
As highlighted earlier, each component has its own set of distinct properties that you must specify for it to work correctly. It’s worth spending some time familiarising yourself with these properties, and also on how they behave on an entity form once published.
Scope
An important concept to grasp relating to Business Rules is the circumstances around their application, which is dictated by its Scope. Depending on the value of this property, your Business Rules logic could be executed as expected or not at all. You should, therefore, consider which value to select with this property, to ensure your Business Rule always runs as expected. The list of possible values you can choose for this include:
- Specific Form: A list of all available forms for the entity will display in the dropdown box, meaning it is possible to scope a Business Rule to a single form only.
- All Forms: Does exactly what it says on the tin 🙂
- Entity: As we’ve seen so far, the majority of available components for a Business Rule relate strictly to a form itself. Having a Business Rule with a scope of Entity will ensure that the appropriate action occurs, regardless of whether the user updates the record via a form, Power Automate flow or SDK call. While potentially a powerful mechanism of enforcing business logic across an entire CDS instance, consider carefully the impact this action may have in conjunction with your broader solution.
Demo: Creating a Business Rule
In the video below, see how it is possible to create a simple Business Rule and how it then behaves within a model-driven app:
I’ll be taking a brief hiatus in this series for the next few weeks, but keep your eyes peeled soon for the next post, where we’ll be finishing up our discussion on processes by taking a look at Business Process Flows.