
Welcome to the twelfth post in my series focused on providing a set of revision notes for the PL-400: Microsoft Power Platform Developer exam. Last time, we finished our discussion regarding the various business process automation tools in the Power Platform by reviewing Business Rules, and Business Process Flows. Today, we take a look at our first topic that involves us writing code. 🤓 This delay may seem strange for an exam aimed towards developers, but it underlines the importance of considering and leveraging functional solutions, as opposed to technical solutions, in the Power Platform, wherever possible. The following exam area we look at today is titled Extend the user experience, which has a total weighting of 10-15% in the exam and whose first subject area covers the following topics:
Apply business logic using client scripting
- create JavaScript or Typescript code that targets the Client API object model
- register an event handler
- create client-side scripts that target the Dataverse Web API
Learning how to write code using JavaScript or Typescript, or even cover off every single method/function exposed within a model-driven apps Web API, would be impossible as part of a single blog post. Therefore, we will instead focus on the fundamental aspects unique to the Power Platform, with specific reference towards the steps involved to deploy out a form function successfully. I, therefore, recommend you have a good general awareness of the fundamental principles behind JavaScript or TypeScript before reading this post any further. And, as with all posts in this series, the aim is to provide a broad outline of the core areas to keep in mind when tackling the exam, linked to appropriate resources for more focused study. Ideally, your revision should involve a high degree of hands-on testing and familiarity working with the platform if you want to do well in this exam.
Form-Side Scripting: Why and When We Need It
In an earlier post in the series, we discussed the usage cases and features available as part of Business Rules. It’s important to reference back to this for two reasons. First of all (and did you know?), underneath the hood, Business Rules implement many of the form-side scripting features available to developers using JavaScript or TypeScript. Therefore, much of the functionality they can achieve - showing/hiding fields, changing their business requirement, etc. - is also available to developers writing form scripts. Secondly, you should always fully utilise and exhaust the capabilities of Business Rules before contemplating writing a single line of code. They provide you with a fully supported and far more straightforward way of accomodating basic requirements relating to form presentation and automating basic tasks.
Impressive though they are, there will be occasions where a Business Rule is just not going to cut it. Consider the following requirements:
- You need to dynamically change the display label of a field based on whether a particular value exists on the current record.
- The general structure of the form needs to be modified, depending on what type of form is loaded (i.e. a new record form, a read-only form, etc.).
- You need to execute a Web API query to obtain details from another record in the system.
- When a user saves a record, you need to perform some additional validation and, if required, prevent the save action from occurring and present an error to the user.
For these “advanced” scenarios, it’s impossible to utilise a Business Rule effectively to meet the requirements, meaning we must instead resort to writing custom code. Again, and I cannot stress this enough, your typical development workflow when evaluating what the business is asking for is first to review and confirm, without a shadow of a doubt, that you cannot address the requirement via a Business Rule; once you have done this, you then have my (and indeed Microsoft’s) blessing to start typing code 😉
What is the Web API?
To help with automating critical operations when working within the application and communicating into the application from an external system, Microsoft provides us with an OData version 4 compliant endpoint, through which developers can execute a variety of HTTP requests. As well as exposing key CRUD (Create, Read, Update and Delete) operations, developers can also use the Web API to execute batch operations, impersonate another user or call functions or actions. Developers can use any language of their choice to interact with the Web API when being called externally from the application. An example of a request to create a new Account record, provided courtesy of Microsoft, can be seen below:
POST [Organization URI]/api/data/v9.0/accounts HTTP/1.1
Content-Type: application/json; charset=utf-8
OData-MaxVersion: 4.0
OData-Version: 4.0
Accept: application/json

{
    "name": "Sample Account",
    "creditonhold": false,
    "address1_latitude": 47.639583,
    "description": "This is the description of the sample account",
    "revenue": 5000000,
    "accountcategorycode": 1
}
Typically, a developer may use tools such as Postman when building out their sample requests, as this provides some useful options to ease you along.
Within the context of developing client-side scripts, Microsoft provides a shorthand mechanism of working with the Web API to carry out everyday functions. Although the methods exposed here are not extensive compared with dealing with the Web API directly, developers do not need to worry about authentication when working with the Web API in this way. Therefore, you should arguably be able to accommodate most requirements using Xrm.WebApi.
Putting together these types of requests can be tedious and take some time to build each time. Fortunately, there is a great community tool available from Jason Lattimer, called the CRM REST Builder. The builder provides a graphical interface that you can use to build your code snippets each time and then test them within the browser. You can see a screenshot of it below, where I’ve built out a sample request to query some Contact records and how the resulting code snippet looks when generated:
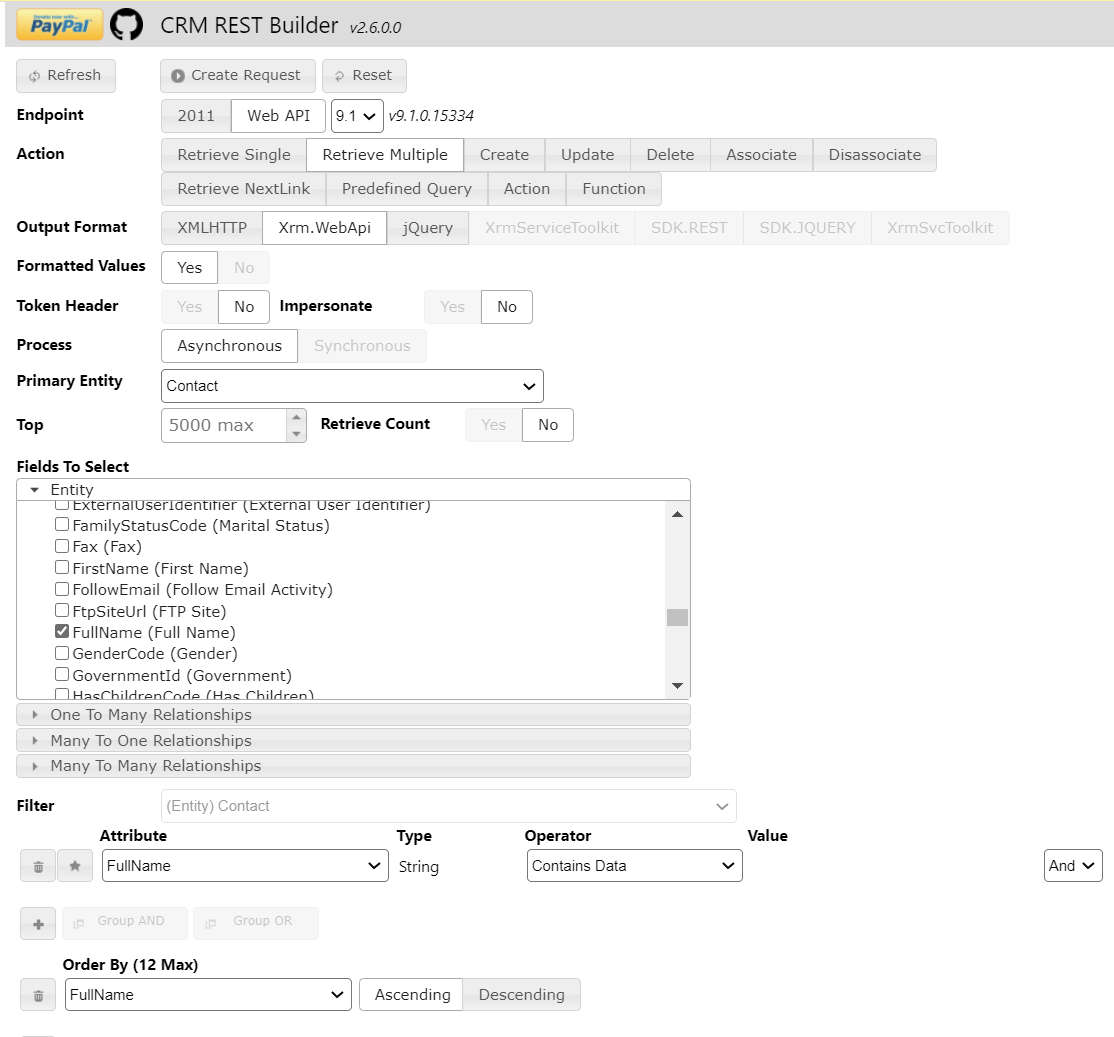
Xrm.WebApi.online.retrieveMultipleRecords("contact", "?$select=fullname&$filter=fullname ne null&$orderby=fullname asc").then(
    function success(results) {
        for (var i = 0; i < results.entities.length; i++) {
            var fullname = results.entities[i]["fullname"];
        }
    },
    function(error) {
        Xrm.Utility.alertDialog(error.message);
    }
);
For the exam, having a good awareness of the various operations you can perform against the Web API, the format of requests, how responses back are formatted and, finally, how to write OData queries targeting the Web API endpoint will hold you in good stead.
executionContext: Attention Dynamics CRM Developers!
Those with a previous background developing for on-premise Dynamics CRM deployments should take particular note here. In earlier versions of this application, developers would be most familiar with the various Xrm methods to perform common actions. For example, the following form function would allow you to change the display labels on a composite address control using the Xrm.Page.getControl method:
function changeAddressLabels() {

    Xrm.Page.getControl("address1_composite_compositionLinkControl_address1_line1").setLabel("Address 1");
    Xrm.Page.getControl("address1_composite_compositionLinkControl_address1_line2").setLabel("Address 2");
    Xrm.Page.getControl("address1_composite_compositionLinkControl_address1_line3").setLabel("Address 3");
    Xrm.Page.getControl("address1_composite_compositionLinkControl_address1_city").setLabel("Town");
    Xrm.Page.getControl("address1_composite_compositionLinkControl_address1_stateorprovince").setLabel("County");
    Xrm.Page.getControl("address1_composite_compositionLinkControl_address1_postalcode").setLabel("Postal Code");
    Xrm.Page.getControl("address1_composite_compositionLinkControl_address1_country").setLabel("Country");
    Xrm.Page.getControl("address2_composite_compositionLinkControl_address2_line1").setLabel("Address 1");
    Xrm.Page.getControl("address2_composite_compositionLinkControl_address2_line2").setLabel("Address 2");
    Xrm.Page.getControl("address2_composite_compositionLinkControl_address2_line3").setLabel("Address 3");
    Xrm.Page.getControl("address2_composite_compositionLinkControl_address2_city").setLabel("Town");
    Xrm.Page.getControl("address2_composite_compositionLinkControl_address2_stateorprovince").setLabel("County");
    Xrm.Page.getControl("address2_composite_compositionLinkControl_address2_postalcode").setLabel("Postal Code");
    Xrm.Page.getControl("address2_composite_compositionLinkControl_address2_country").setLabel("Country");
}
In early 2020, Microsoft announced that the Xrm methods, including the one referenced above, are now deprecated. Also, attempting to use these methods within model-driven apps will likely cause errors. To get around this, developers can now take advantage of the Client API form context object, accessible from within any form. By using this, we can rewrite the above code to something that will be fully supported moving forward:
function changeAddressLabels(executionContext) {

	//Get formContext

	var formContext = executionContext.getFormContext();

	//Check to see if the control is on the form and, if so, rename it accordingly.

	if (formContext.getControl("address1_composite_compositionLinkControl_address1_line1"))
		formContext.getControl("address1_composite_compositionLinkControl_address1_line1").setLabel("Address 1");
	if (formContext.getControl("address1_composite_compositionLinkControl_address1_line2"))
		formContext.getControl("address1_composite_compositionLinkControl_address1_line2").setLabel("Address 2");
    if (formContext.getControl("address1_composite_compositionLinkControl_address1_line3"))
		formContext.getControl("address1_composite_compositionLinkControl_address1_line3").setLabel("Address 3");
	if (formContext.getControl("address1_composite_compositionLinkControl_address1_city"))
		formContext.getControl("address1_composite_compositionLinkControl_address1_city").setLabel("Town");
	if (formContext.getControl("address1_composite_compositionLinkControl_address1_stateorprovince"))
		formContext.getControl("address1_composite_compositionLinkControl_address1_stateorprovince").setLabel("County");
    if (formContext.getControl("address1_composite_compositionLinkControl_address1_postalcode"))
		formContext.getControl("address1_composite_compositionLinkControl_address1_postalcode").setLabel("Postal Code");
    if (formContext.getControl("address1_composite_compositionLinkControl_address1_country"))
		formContext.getControl("address1_composite_compositionLinkControl_address1_country").setLabel("Country");
    if (formContext.getControl("address2_composite_compositionLinkControl_address2_line1"))
		formContext.getControl("address2_composite_compositionLinkControl_address2_line1").setLabel("Address 1");
    if (formContext.getControl("address2_composite_compositionLinkControl_address2_line2"))
		formContext.getControl("address2_composite_compositionLinkControl_address2_line2").setLabel("Address 2");
    if (formContext.getControl("address2_composite_compositionLinkControl_address2_line3"))
		formContext.getControl("address2_composite_compositionLinkControl_address2_line3").setLabel("Address 3");
    if (formContext.getControl("address2_composite_compositionLinkControl_address2_city"))
		formContext.getControl("address2_composite_compositionLinkControl_address2_city").setLabel("Town");
	if (formContext.getControl("address2_composite_compositionLinkControl_address2_stateorprovince"))
		formContext.getControl("address2_composite_compositionLinkControl_address2_stateorprovince").setLabel("County");
	if (formContext.getControl("address2_composite_compositionLinkControl_address2_postalcode"))
		formContext.getControl("address2_composite_compositionLinkControl_address2_postalcode").setLabel("Postal Code");
	if (formContext.getControl("address2_composite_compositionLinkControl_address2_country"))
		formContext.getControl("address2_composite_compositionLinkControl_address2_country").setLabel("Country");
}
Microsoft has not yet announced a timeline for eventually removing the Xrm methods permanently from the application. Still, it would be best not to use it as part of any new projects or work moving forward.
Exposed Event Handlers
Understanding the various event handlers we can “hook” into when developing client-side scripts is crucial. Event handlers summarise a particular action a user carries out against a form - saving a record, changing the value of a field or opening/expanding a form tab. As users carry out each of these actions, developers can then execute their desired logic within their code. At the time of writing this post, the following event handlers are made available for use:
- OnChange: Each attribute (column) that exists on a form supports this event handler, which triggers as soon as a user changes a value and clicks on another control. Although it’s possible to call a function with your logic directly using the OnChange event, Microsoft advises that you use the addOnChange or removeOnChange methods to add or remove form functions, respectively.
- OnLoad: Rather self-explanatory perhaps, but as soon as a form or its data has fully loaded for a user, you can then call function(s) to perform your desired logic. It’s worth noting that there are technically two separate OnLoad events - one that fires as soon as the form itself loads and a second once all underlying data loads for the first time or refreshed/updated. Again, Microsoft provides specific functions, such as formContext.data.addOnLoad(), to allow you to bolt on or remove your logic accordingly.
- OnSave: Again, no prizes for guessing what this does 😀 Developers can bolt on their custom logic, using the addOnSave and removeOnSave methods whenever a user or some custom code attempts to save the record. It’s worth thoroughly reading and understanding all of the potential situations under which this can occur, including ones automatically determined by the systems auto-save functionality. A robust capability with this event handler is the ability to prevent the save action from completing when a user violates a particular business condition.
- PreSearch: This event handler is limited to lookup field controls only. You can only use this in conjunction with a single method - addCustomFilter - to dynamically alter the list of records a user can select.
- OnResultOpened: Limited for use within the knowledge management area of Dynamics 365 Customer Service, you can use this event handler to execute functions when a user opens a knowledge article from the search box or via a pop-out action. Similar to all other event handlers, you are provided with a function to add and remove functions to execute.
- OnSelection: Again, this is a specific knowledge management event handler for when a user selects a knowledge base article with the appropriate methods to add and remove functions.
- PostSearch: Finally, and once again, specifically concerning knowledge management capabilities, you can use this event handler to execute custom logic as soon as results return via a knowledge article search. And - you guessed it - the addOnPostSearch and removeOnPostSearch methods allow you to control when and where your custom functions execute.
As you can see, all event handlers support the ability to add/remove one or multiple functions that the platform will then execute accordingly. This should be your preferred mechanism to use at all times.
Developers are free to add as many as 50 event handlers for each event that occurs on a form; however, I would caution any solution that utilises so much custom code on one form. If you find yourself in this situation, I would encourage you to instead look at other options, such as a canvas Power App or a Power Apps Component Framework (PCF) control. More on this subject in the next post in this series 🙂
Deploying a Form Script
So knowing how to write JavaScript form functions and having a good awareness of the various event handlers that are exposed gets you pretty much there and ready to start building out your first form script. However, you need to first understand the importance of Web Resources as part of all this. For a long time now, Web Resources have provided developers with the mechanism to deploy out several different types of custom components - whether they be images, HTML files and, as you might expect, JavaScript files. A typical deployment process for a new JavaScript file will involve the following steps:
- Navigate to your target solution within the Power Apps portal.
- Select New -> Other -> Web Resource. The New Web Resource window will then load within the “classic” interface.
- Provide a helpful name and description value for the new Web Resource, and ensure the Type is set to Script (JScript). The Text Editor button should appear.
- After pressing the Text Editor button, type in or copy/paste your JavaScript into the window and press OK.
- Save and then publish the Web Resource.
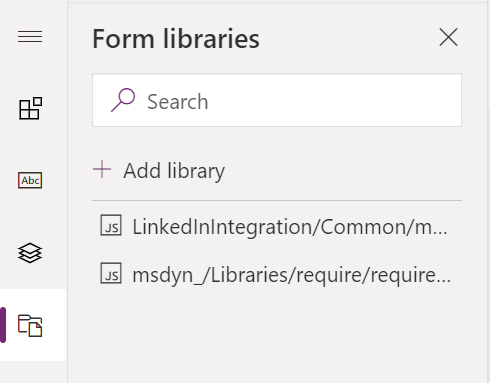
Although you have now successfully uploaded your JavaScript file into the application, it will not be doing anything in this state. We must next navigate to the table form where we would like it to be triggered from and add on the Web Resource discussed in the previous steps under the Form libraries area on the left-hand side of the screen:
Next, we can then select the Events tab on the right-hand side of the screen to attach our function to our desired event:
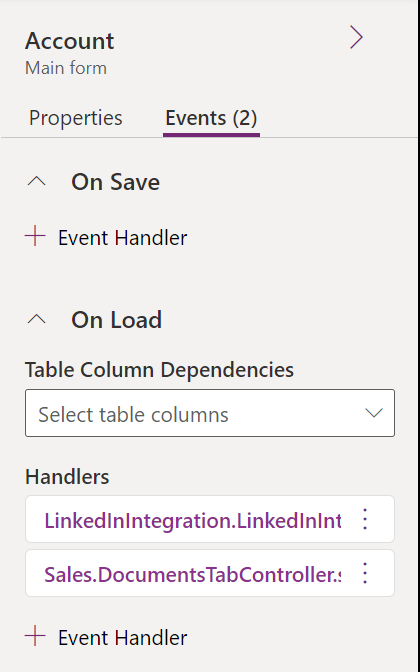
Here, we must specify several options:
- The name of the library, i.e. the Web Resource.
- The name of the function to call.
- If the function is consuming the execution context, then the Pass execution context as first parameter option must be ticked.
- If any additional static parameter values need specifying for the form function, you can also define these here as a comma-separated list.
If we want to enforce dependencies between the function and the fields it relies on, we can do this by navigating into the “classic” form designer instead. Doing so will prevent other users from accidentally removing these fields from the form.
After we then publish the form with all the latest changes, the newly created form function will then start triggering when the appropriate event handler occurs - nice!
Common Form Functions
It is impossible to go into detail regarding every single client-side function that you can utilise. Instead, I wanted to highlight some of the more commonly used ones that you may find yourself using often. I’ve deliberately chosen to exclude any function(s) that can be accomplished via a Business Rule instead, for the reasons I’ve already alluded to earlier in this post.
- formContext.data
- formContext.data.entity
- getEntityReference: This allows you to capture a lookup (array) object containing details of the currently loaded row. This function is useful if you wish to store details about the current record locally to then populate as part of a lookup field later on.
- getId: Returns the Globally Unique Identifier (GUID) value of the currently loaded record.
- formContext.data.process
- setActiveProcess: This allows you to change the currently selected Business Process Flow (BPF) to a different one, provided the user has access to it.
- moveNext / movePrevious: Both of these functions allow you to move the user forwards or backwards on a BPF forcibly
- formContext.ui
- getFormType: Returns a value indicating the type of form the user is currently on. For example, you can determine whether a user is creating a row, updating an existing one or viewing a row that exists in a read-only state.
- setFormNotification: This lets you display an informational warning or error message to a user. Use of this function is generally preferred instead of alert(), particularly given that it comes with some nice options.
- formContext.ui.formselector: Contains three functions - getId, getLabel and navigate - which, when used in conjunction, allows you to change which form is presented to an end-user dynamically.
- formContext.ui.process
- setVisible: Allows you to toggle the visibility of a BPF on a form.
- formContext.ui.tabs
- setDisplayState: Allows you to toggle whether a tab is shown or collapsed on the form.
- formContext.ui.sections
- setVisible: Using this, you can determine whether a form section remains visible to a user or not.
- Xrm.WebApi
- retrieveRecord: In situations where you need to validate information on a related row within the application, you can use this function to return details regarding this, using an OData system query.
To do well in the exam, you need to have a broad understanding of all potential form scripting capabilities, so I urge you to study the complete list of available functions in greater detail and experiment further with their usage.
Demo: Deploying a Basic JavaScript Form Function
In the video below, we’ll take a pre-authored JavaScript form function and demonstrate how this can be deployed out and debugged within the application:
The sign of an excellent Power Platform developer is when they use JavaScript / TypeScript form functions appropriately, after exhausting all other available options, such as Business Rules or Power Automate. Take care not to always resort to a code-first solution when building on top of the Power Platform. Next in the series, we’ll see how we can use the Power Apps Component Framework (PCF) to extend our Power Apps further.