When contemplating migrating data into Dynamics 365 Customer Engagement (D365CE), a necessary task will involve determining the appropriate data field mapping that needs to occur from any existing system you are working with. Whether this means an on-premise version of the application (or its earlier iteration, such as Dynamics CRM), a competitor product or even a SQL Server database instance, this exercise is essential for several reasons, as it will:
- Act as a proxy Fit/Gap exercise for any potential work required within the application to add missing fields for data capture.
- Enable you to begin the necessary data template preparations, based on the fields needed from your source system and D365CE.
- Allow organisations to determine whether specific database/application fields are still required at all and, if not, simplify things by removing them entirely.
As part of this work as well, it is also likely that you will determine which tool you would like to use to manage the whole data import exercise. For simple requirements, which require minimal data transformation activities, the out of the box data import facility will more than likely suit your requirements. Alternatively, if you are feeling somewhat confident with your Power Query capabilities, you could even take the Common Data Service import tool for a whirl (which I anticipate which eventually replace the out of the box experience). For more complex Extract, Transform and Load (ETL) requirements, though, it is likely that you will need to turn to more sophisticated tools available from vendors such as Scribe Online or Kingswaysoft. Another viable option for consideration is Azure Data Factory V2 (ADF) which, as we have seen previously on the blog, has a fully supported connector available and ready to use as an import destination or data source. Although there is likely some development time that needs to be invested into developing a solution using this product, it is by far a much cheaper alternative compared to the vendor solutions already discussed and, for development teams actively embracing DevOps, provides a far more significant, integrated experience.
When first getting familiar with the D365CE connector within the service, a necessary step will involve importing the data schema - basically, the list of fields and their appropriate data types - from the application. This process is straightforward, thanks to the Import schema option available to us when configuring our dataset, which produces the following schema when connecting to the Account entity within the application:

And, as with everything within ADF, our schema definition is also defined and viewable as a JSON object behind the scenes, as indicated in the (adapted) example below:
{
    "name": "CDS_Account",
    "properties": {
        "linkedServiceName": {
            "referenceName": "CDSLinkedService",
            "type": "LinkedServiceReference"
        },
        "folder": {
            "name": "CDS"
        },
        "type": "DynamicsEntity",
        "structure": [
            {
                "name": "address2_addresstypecode",
                "type": "Int32"
            },
            {
                "name": "merged",
                "type": "Boolean"
            },
            {
                "name": "statecode",
                "type": "Int32"
            },
            {
                "name": "emailaddress1",
                "type": "String"
            },
            {
                "name": "openrevenue_state",
                "type": "Int32"
            },
            {
                "name": "name",
                "type": "String"
            },
            {
                "name": "opendeals",
                "type": "Int32"
            },
            {
                "name": "address1_postalcode",
                "type": "String"
            },

			...

        ],
        "typeProperties": {
            "entityName": "account"
        }
    },
    "type": "Microsoft.DataFactory/factories/datasets"
}
This circumstance is all well and good if we intend to import data into all of these fields within our pipeline. However, if we only attempt a partial field mapping and miss out any fields not defined within the data source schema, your pipeline will generate a “Column

In addition to this, as you may have noticed already, the connector has a very specific list of fields that it returns and, more crucially, not all of them - only 62 out of the potential 153 fields on the Account entity by default - and no custom fields which may have been created within the instance (even those marked as Business Required). So does this mean that ADF is limited to only importing data into the 62 fields provided by default using the Import schema option? Thankfully, the answer to both of these is a resounding “No!” and we can customise the schema of our D365CE connector to our heart’s content, thereby allowing us:
- Delete any field not required as part of our mapping by selecting the appropriate fields and then pressing the Delete button. For example, the screenshot shows how it is possible to remove the merged and address2_addresstypecode fields from within the ADF interface:
- Alternatively, you can remove the appropriate mappings from within the underlying JSON definition. Therefore, an updated version of the above example would, therefore, resemble the following after modification:

{
    "name": "CDS_Account",
    "properties": {
        "linkedServiceName": {
            "referenceName": "CDSLinkedService",
            "type": "LinkedServiceReference"
        },
        "folder": {
            "name": "CDS"
        },
        "type": "DynamicsEntity",
        "structure": [
            {
                "name": "statecode",
                "type": "Int32"
            },
            {
                "name": "emailaddress1",
                "type": "String"
            },
            {
                "name": "openrevenue_state",
                "type": "Int32"
            },
            {
                "name": "name",
                "type": "String"
            },
            {
                "name": "opendeals",
                "type": "Int32"
            },
            {
                "name": "address1_postalcode",
                "type": "String"
            },

			...

        ],
        "typeProperties": {
            "entityName": "account"
        }
    },
    "type": "Microsoft.DataFactory/factories/datasets"
}
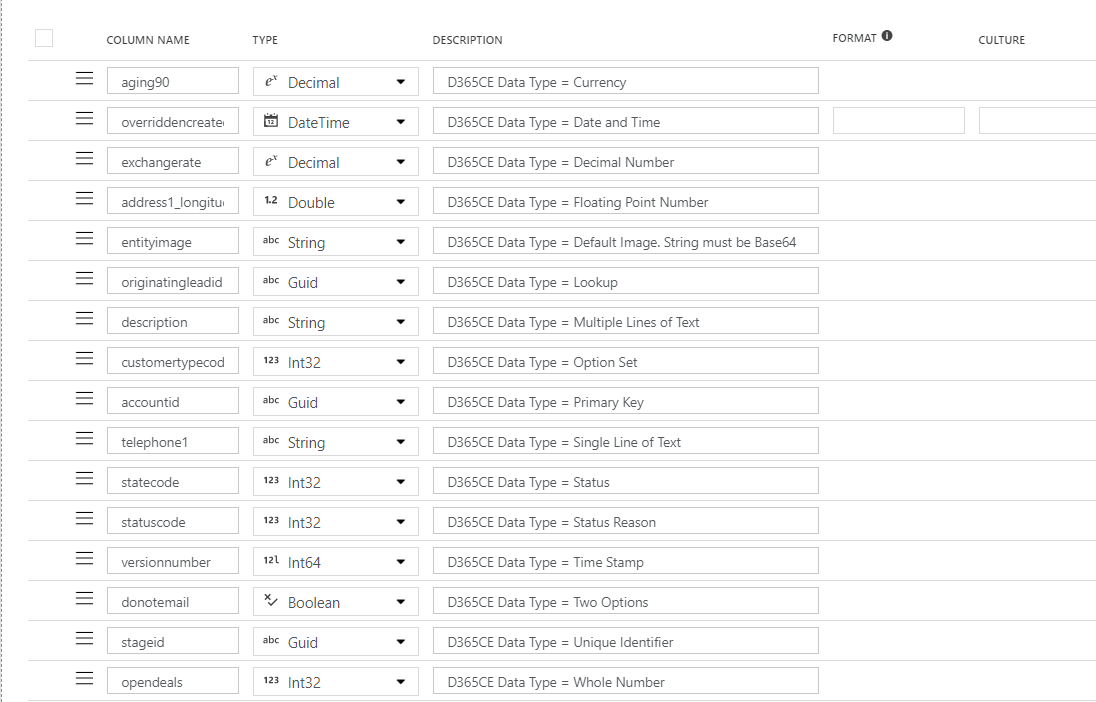
- Add on any missing system or custom fields that are required as part of our import process using the New column button. When defining each field, it is important that the Name value is used for each field and that the correct data type is selected. The example screenshot below provides an example of all the possible field types that can be added on in this manner:
- And, for those who prefer working with code, the JSON definition for a schema containing only these fields would look like this:
{
    "name": "CDS_Account",
    "properties": {
        "linkedServiceName": {
            "referenceName": "CDSLinkedService",
            "type": "LinkedServiceReference"
        },
        "folder": {
            "name": "CDS"
        },
        "type": "DynamicsEntity",
        "structure": [
            {
                "name": "aging90",
                "type": "Decimal",
                "description": "D365CE Data Type = Currency"
            },
            {
                "name": "overriddencreatedon",
                "type": "DateTime",
                "description": "D365CE Data Type = Date and Time"
            },
            {
                "name": "exchangerate",
                "type": "Decimal",
                "description": "D365CE Data Type = Decimal Number"
            },
            {
                "name": "address1_longitude",
                "type": "Double",
                "description": "D365CE Data Type = Floating Point Number"
            },
            {
                "name": "entityimage",
                "type": "String",
                "description": "D365CE Data Type = Default Image. String must be Base64"
            },
            {
                "name": "originatingleadid",
                "type": "Guid",
                "description": "D365CE Data Type = Lookup"
            },
            {
                "name": "description",
                "type": "String",
                "description": "D365CE Data Type = Multiple Lines of Text"
            },
            {
                "name": "customertypecode",
                "type": "Int32",
                "description": "D365CE Data Type = Option Set"
            },
            {
                "name": "accountid",
                "type": "Guid",
                "description": "D365CE Data Type = Primary Key"
            },
            {
                "name": "telephone1",
                "type": "String",
                "description": "D365CE Data Type = Single Line of Text"
            },
            {
                "name": "statecode",
                "type": "Int32",
                "description": "D365CE Data Type = Status"
            },
            {
                "name": "statuscode",
                "type": "Int32",
                "description": "D365CE Data Type = Status Reason"
            },
            {
                "name": "versionnumber",
                "type": "Int64",
                "description": "D365CE Data Type = Time Stamp"
            },
            {
                "name": "donotemail",
                "type": "Boolean",
                "description": "D365CE Data Type = Two Options"
            },
            {
                "name": "stageid",
                "type": "Guid",
                "description": "D365CE Data Type = Unique Identifier"
            },
            {
                "name": "opendeals",
                "type": "Int32",
                "description": "D365CE Data Type = Whole Number"
            }
        ],
        "typeProperties": {
            "entityName": "account"
        }
    },
    "type": "Microsoft.DataFactory/factories/datasets"
}
Once customised in this manner, the pesky validation error message shown earlier will vanish entirely and you open up a whole range of additional functionality, such as being able to:
- Map to any custom field defined within your D365CE entities.
- Define the Globally Unique Identifier (GUID) of the record imported into the application to, for example, match the same GUID value it has within your source dataset.
- Utilise the overridencreatedon field to set a custom value for the Created On field to match its original value within your source dataset. This can be particularly useful as part of a migration from an on-premise Dynamics CRM deployment, and you are reliant on this field for reporting or for any custom business logic within the application.
With a bit of tinkering, ADF once again, I feel, proves its worth and is a tool I would recommend you take a look at for any data integration requirements involving D365CE