
In most scenarios, a software release will involve several steps that require consistent completion each time you are pushing out an update to your application. That is why tools such as Azure DevOps can have a significant benefit for organisations if implemented correctly, as they can not only give you the confidence to release updates more frequently but also massively reduce the risk of a failed software deployment due to human error. An adequately defined release pipeline within Azure DevOps allows you to set up each of the required steps as part of any application deployment, all of which are executed based on a specified order. With a vast array of different tasks available out of the box, ranging from PowerShell script tasks through to Amazon Web Services deployments, developers can have the confidence that an Azure DevOps release pipeline can fit in with whatever workloads involved.
Despite the endless, monotonous repetition associated with software deployments, there may be occasions where you want to go a little bit freestyle and modify how tasks execute, based on dynamic values supplied at the time of release. Fortunately, there is a way you can do this within Azure DevOps, via the use of release variables and custom task conditions. The range of additional functionality this opens up is vast and, in today’s post, we’ll see how it is possible to get started using them with minimal effort.
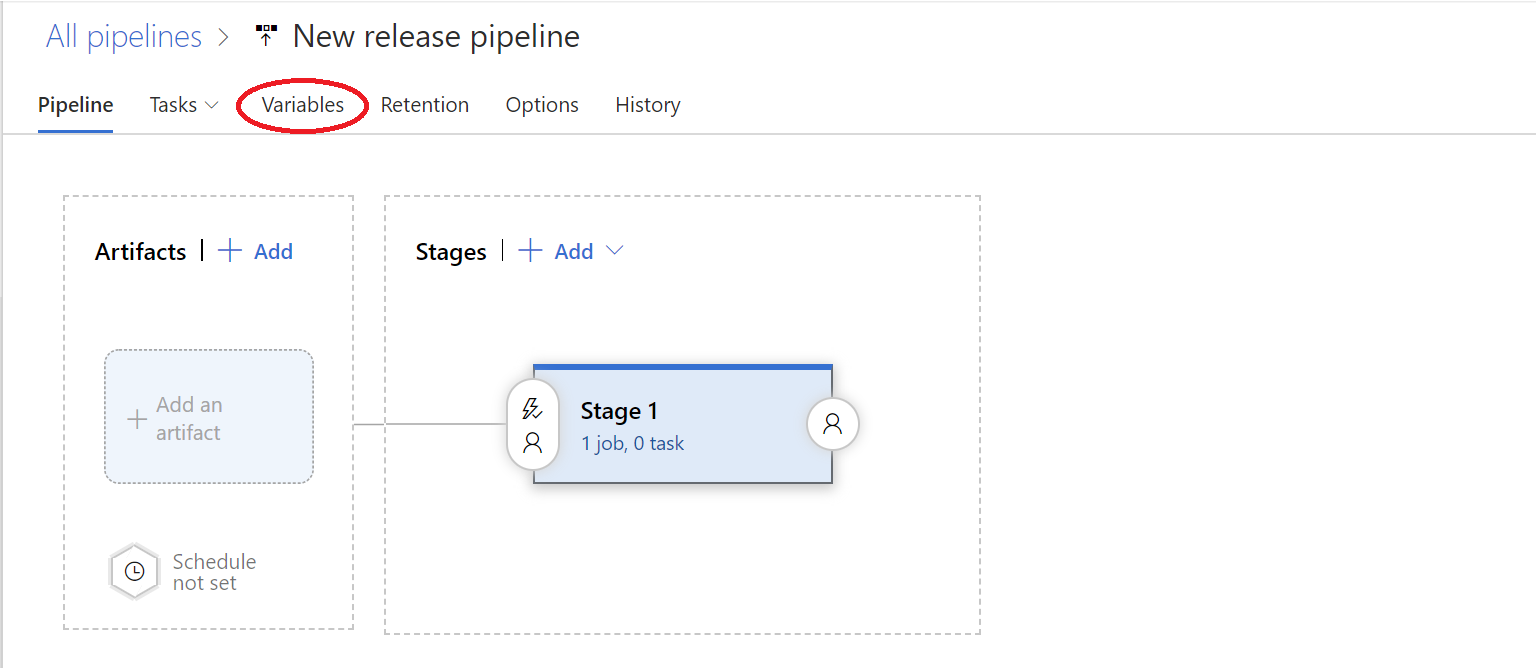
Setting up Release Variables
A release variable is defined from the Variables tab when creating a new release pipeline:

From here, you then specify the following settings:
- Name: Ideally a descriptive name for the variable.
- Value: The default value for the variable. This property can be overridden at release time, as we’ll see shortly.
- Padlock: This tells AzureDevOps whether the Value provided is hidden from view once defined. This setting can be particularly useful if, for example, you are setting connection string or password values at release level.
- Scope: This defines in which part of your release pipeline the variable is accessible from - either from any stage (Release) or within a single one only (Stage 1, for example).
- Settable at release time: Again, fairly self-explanatory 🙂 Let’s you specify whether the release creator can override the variable value when creating a new release.
Passing Release Variable Values to a Task
Once defined, a variable is accessible within any scoped task within your pipeline. For example, if you set a variable called MySQLDBPassword, you can access its value by using the following syntax:
$(MySQLDBPassword)
So, to pass this to an Azure SQL Database Deployment task as the database login password, we would provide the following value in this field:

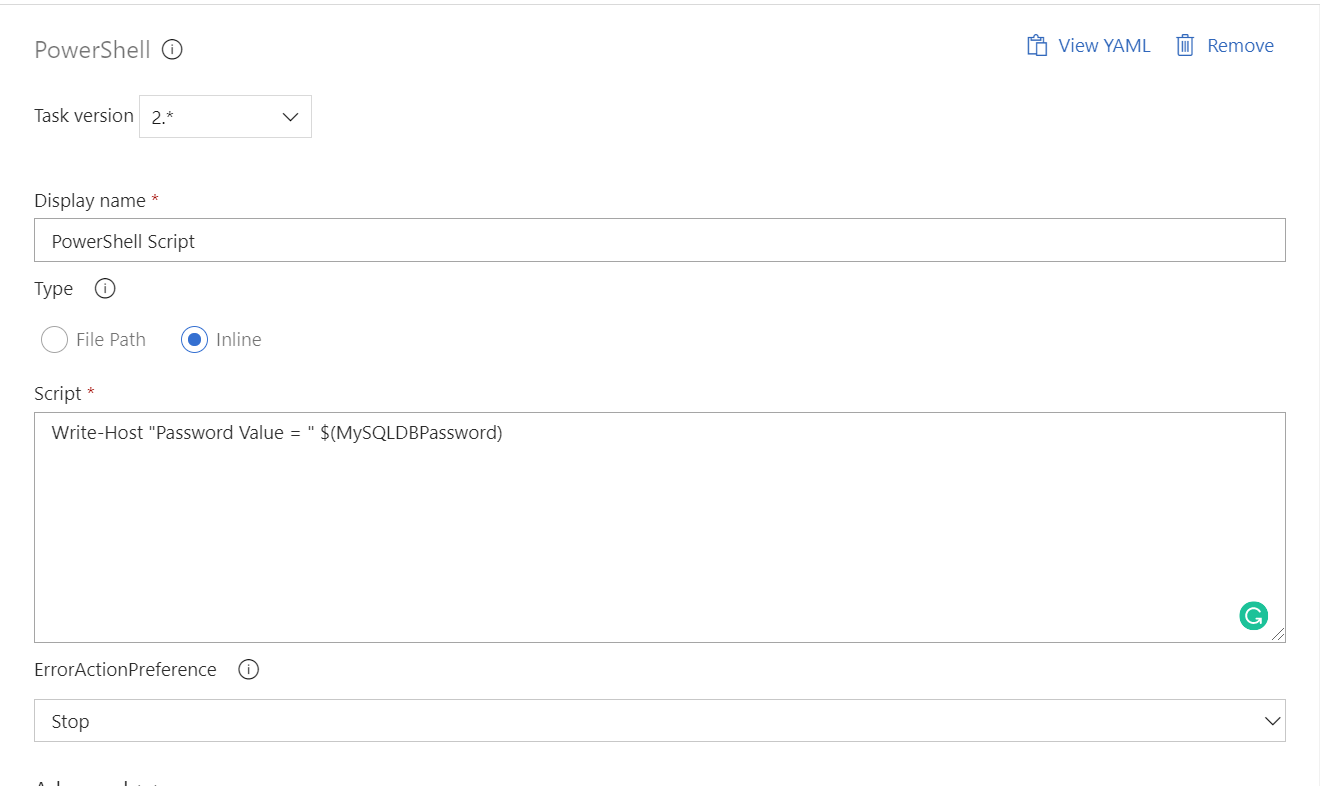
Alternatively, we can write out the value of the variable into a PowerShell task:
When this task is then executed during a release, we observe the following behaviour in its logs:
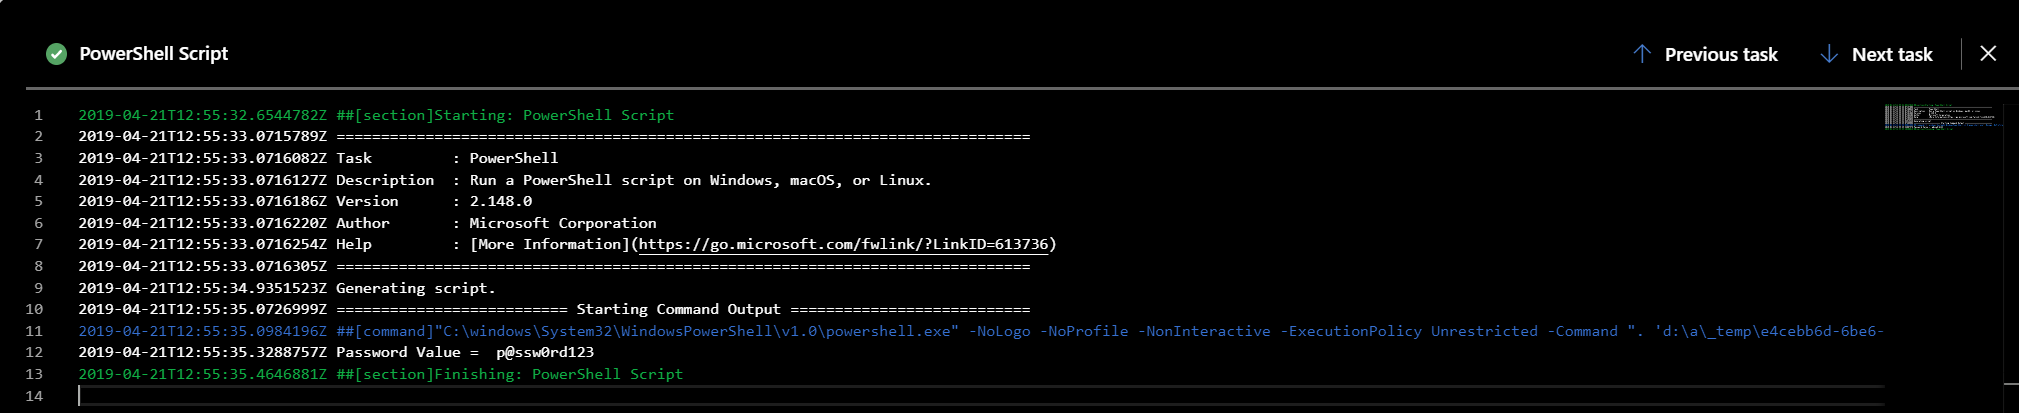
As a consequence, variable values can be passed to almost any task property. Also, for sensitive values, they represent the most prudent route to go down to ensure that passwords and connection strings are handled securely.
Defining Release Variables On A New Release
We saw earlier the specific setting Settable at release time for release variables. If enabled, when creating a new release, you will be allowed to override its original, supplied value. So, by modifying the MySQLDBPassword variable from earlier to enable this property, we now get the following options exposed as part of creating a new release:
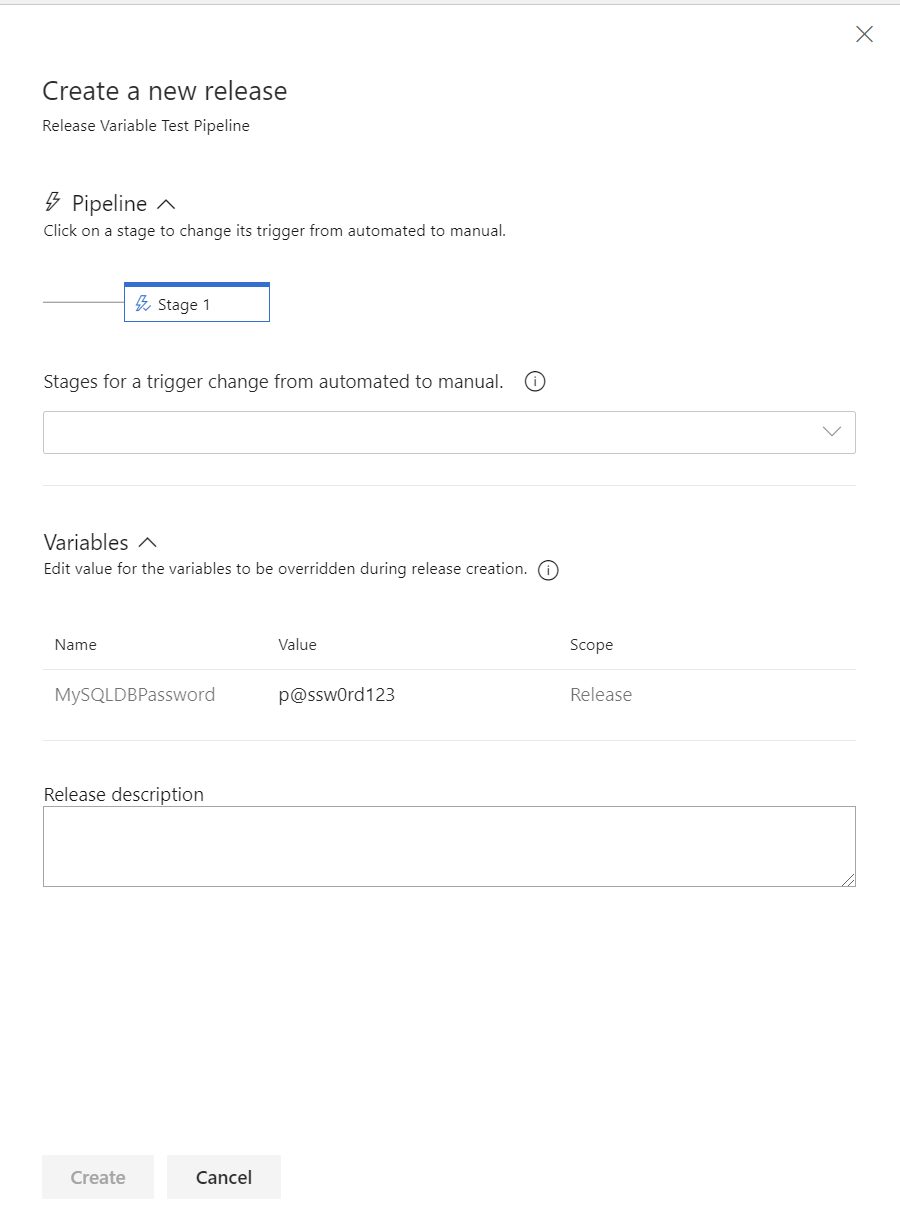
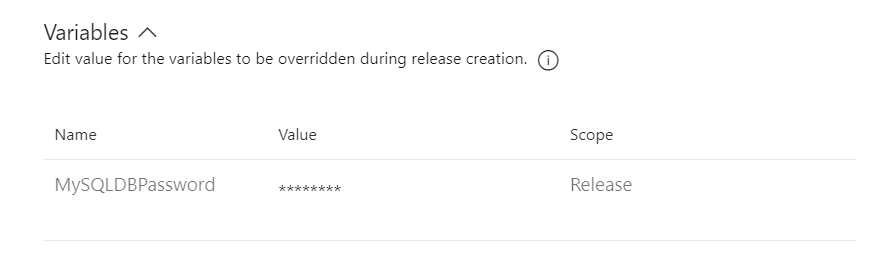
As observed above, the default value for this variable - p@ssw0rd123 - is automatically pulled through, and can be reviewed or even submitted without any further changes. For secret variables, the behaviour is slightly different, as expected, although we can still override the value if we wanted to; the only thing is that you won’t be able to see what you type, similar to a password field:
Implementing Conditional Logic Using Release Variables
As alluded to earlier, there may be occasions where you want certain tasks to be carried out or even skipped entirely, based on what value a variable holds. A good recent example that I was involved in illustrates where this may become desirable. We had several release pipelines that implemented a backup of an Azure SQL database before any updates were applied. This extra step was primarily to ensure that a pre-release version of the database was available in case a rollback is required. In situations where a re-release needs to be triggered, due to the pipeline failing because of a misconfiguration or other issue not related to the release artifacts themselves, having to go through the process of backing up the database again appeared to be unnecessary and a waste of time. We, therefore, set up a variable on the pipeline, configured as follows:

Then, on the PowerShell task that performed the database backup, we navigate to the Control Options tab within the task and, firstly, select the Custom conditions option on the Run this task dropdown:
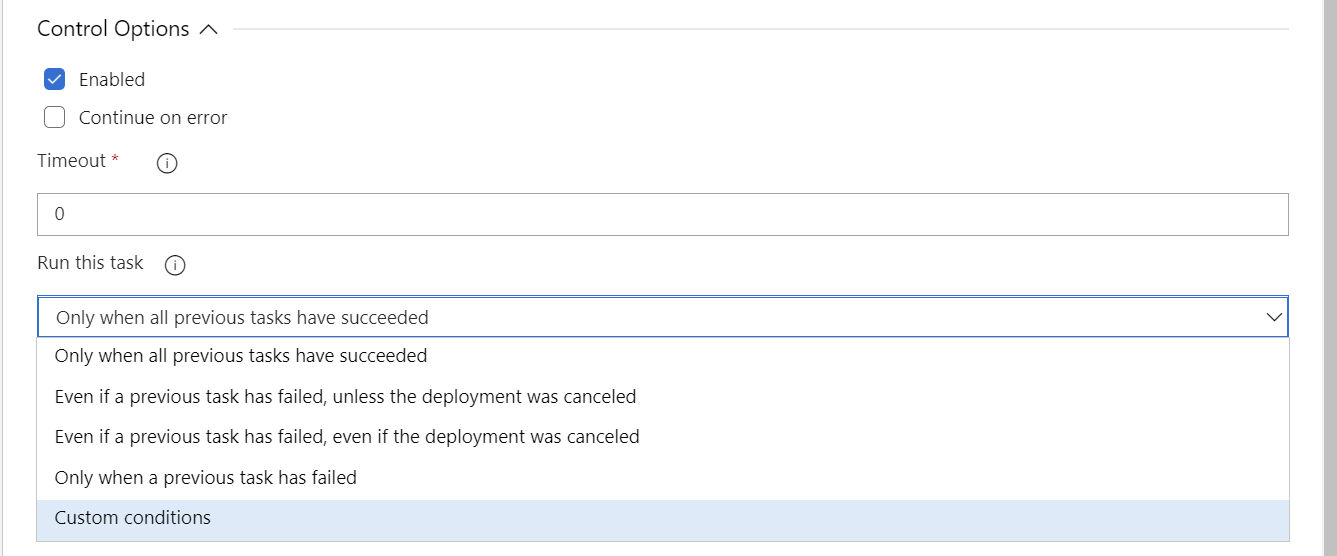
Selecting this option makes a Custom condition field appear directly underneath, which allows you to input a wide array of different conditional logic using an easy-to-understand expression language. Through this, we can straightforwardly define a function that executes the task if the value of the BackupProdDB? variable equals true:
eq(variables[‘BackupProdDB?’], true)

Now, when overriding this parameter value at release-stage to false, the task is skipped entirely:

If a Microsoft hosted VS2017 Agent is used for the task, some additional detail is made available by hovering over the little i icon next to the task name. This tooltip will chiefly indicate how the expression evaluated itself during runtime; quite useful if you are debugging:

The example shown here only scratches the surface of what the expression language can ultimately facilitate. To take things further, you could look at implementing conditional logic that:
- Performs comparisons against numbers
- Works with array values.
- Carries out joins or concatenations on multiple variable values.
As this post has attempted to demonstrate, release variables open up an additional layer of functionality that can take your release pipelines to the next level. You can open up a whole range of functionality that allows those triggering releases to modify the steps involved dynamically and even to skip them entirely, without requiring any pipeline alterations to take place. Hopefully, today’s post has given you a flavour of how to get started using them. Let me know in the comments below if you identify a usage case from them yourself or if you have been able to come up with any ingenious expressions 🙂